Sunday, 10 July 2011

Track Sketch: Watchet

Sketches done on site are often hard to follow. Normally, I'd make a fair copy when I returned home but I haven't found a later copy, so here is the original version from 1964. Watchet Harbour (on the left of the sketch) once generated significant traffic for the railway, hence the fairly generous goods sidings.

(Click on the sketch to enlarge)

FB - Footbridge
LG - Loading Gauge
GS - Goods Shed

Watchet station remains open, as part of the West Somerset Railway. When I made this sketch, I never imagined I'd one day fire steam trains on this route!

For details of the station in 2005, refer to 'Railway Track Diagrams' Book 3: Western', Fourth Edition, published by Trackmaps (ISBN: 0-9549866-1-X). The First Edition of this book was published by Quail in 1989.

Friday, 8 July 2011

Track Sketch: Truro

Sketches done on site are often hard to follow. Normally, I'd make a fair copy when I returned home but, in this case, I haven't found a later copy, so here is the original version from 2nd September 1964.

(Click on the sketch to enlarge)

T - Tubular post
F - Fixed (distant)
D - Doll (small Goods arm)
DT - Doll Tubular
W - Wooden post
CR - 'Catch Rail' (Trap points with switch in outer rail)
GW FB - Great Western Footbridge
WC - Water column
LG - Loading Gauge

Truro station remains in operation.

For details of what remained in 2005, refer to 'Railway Track Diagrams' Book 3: Western', Fourth Edition, published by Trackmaps (ISBN: 0-9549866-1-X). The First Edition of this book was published by Quail in 1989.

Thursday, 7 July 2011

Track Diagram: Stourport-on-Severn

(View from footbridge. Photo: 'Unlocking Stourport's Past')

In the earlier post 'Visiting Signalboxes', I described being invited into the signal box at Stourport-on-Severn. The diagram below is a very simplified version of the signal box diagram.

(Click on the sketch to enlarge)

(View from platform. Photo: 'Unlocking Stourport's Past')

Track Sketch: Stourbridge Junction

(Photo: David Wynne Jones Collection)

Sketches done on site are often hard to follow. Normally, I'd make a fair copy when I returned home but, in this case, I haven't found a later copy, so here is the original version from 1955.

(Click on the sketch to enlarge)

F - Fixed (distant)
W - Wooden post
D - Doll (Goods arm)
S - Subsidiary arm
CO - Calling-on arm

The diverging track top left is the short branch to Stourbridge Town Station, at the time served by a '1400' with a single 'auto' coach, as shown in the heading photograph.

For details of what remained in 2005, refer to 'Railway Track Diagrams' Book 3: Western', Fourth Edition, published by Trackmaps (ISBN: 0-9549866-1-X). The First Edition of this book was published by Quail in 1989.

Track Sketch: Penzance

Sketches done on site are often hard to follow. Normally, I'd make a fair copy when I returned home but, in this case, I haven't found a later copy, so here is the original version from 2nd September 1964.

(Click on the sketch to enlarge)

T - Tubular post
W - Wooden post

Penzance station remains in operation.

For details of what remained in 2005, refer to 'Railway Track Diagrams' Book 3: Western', Fourth Edition, published by Trackmaps (ISBN: 0-9549866-1-X). The First Edition of this book was published by Quail in 1989.

Track Sketch: Newquay, Cornwall

Sketches done on site are often hard to follow. Normally, I'd make a fair copy when I returned home but, in this case, I haven't found a later copy, so here is the original version, believed to date from 1964.

(Click on the sketch to enlarge)

T - Tubular post
W - Wooden post
D - Small arm (Goods line)
CR - Crane
GS - Goods Shed

At the time, there were seven departures during the day to Par, including the 8.10 p.m. On a Summer Saturday there were 16 departures, to destinations as remote as Liverpool.

For details of what remained of this branch in 2005 (at Newquay, simply a single line running into platform 2 with no sidings), refer to 'Railway Track Diagrams' Book 3: Western', Fourth Edition, published by Trackmaps (ISBN: 0-9549866-1-X). The First Edition of this book was published by Quail in 1989.

Track Sketch: Falmouth

Sketches done on site are often hard to follow. Normally, I'd make a fair copy when I returned home. So far, I've not found a better copy, so here is the original version, believed to date from 1964.

(Click on sketch to enlarge)

T - Tubular post
W - Wooden post
GS - Goods Shed

Note the Tablet Catcher opposite the signal box. There was a steeply-inclined branch leading down to the docks. The main platform was provided with an umbrella roof. Note the Camping Coach in the siding next to the station. The branch seemed to be worked by 3-car Diesel Multiple Units.

For details of what remained in 2005, refer to 'Railway Track Diagrams' Book 3: Western', Fourth Edition, published by Trackmaps (ISBN: 0-9549866-1-X). The First Edition of this book was published by Quail in 1989.

Track Sketch: Looe

(Click on sketch to enlarge)

On 1st September 1964 I visited Looe and sketched the layout. Stations don't come any simpler! Amazingly, the line to Looe survives.

'Lion Shoot'

No, not a wildlife safari but a morning filming session with John Hawley at the 'Lion Tavern' in Liverpool on 6th July 2011. Centre Screen Productions are making an audio-visual presentation to interpret 'Lion' in her new home in the Museum of Liverpool and Jan and John had been invited to participate. The 'Lion Tavern' is a traditional Public House situated on the corner of Moorfields and Tithe Barn Street.

I was particularly impressed with the view of the restored facade of Liverpool Exchange station from the bar of the 'Lion Tavern'. The location is now 'Mercury Court' and the interior of the building has been completely re-modelled. There is still a station here - the subterranean 'Moorfields' accessed via the usual nondescript modern British Rail buildings.

John and I were finished shortly after 1.00 p.m. and the weather was good, so we decided to treat ourselves to a round trip on the Mersey Ferry before returning south.

Pictures:

'Lionshoot'
Exchange Station (and elsewhere)
Liverpool (from the Mersey Ferry).

Wednesday, 6 July 2011

Track Sketch: Bude

Sketches done on site are often hard to follow. Normally, I'd make a fair copy when I returned home but, in this case, I don't believe there is a better copy, so here is the original version, believed to date from the 1960s.

(Click on the sketch to enlarge)

TP - 'Tubular Peculiar' Tubular post of a different pattern
W - Wooden post
LG - Loading Gauge
WT - Water Tank
WC - Water Column
CS - 'Catch Rails' (Trap points with a switch in both rails)
GS - Goods Shed
Y - Yellow ground signal (may be passed 'on' for movements towards the goods shed).

Hard to believe this has all been swept away. A note suggests that the platform could accommodate at least six coaches. Note that the goods yard had a Side Dock, an End Dock and a Cattle Dock. It appears that there was a '50' speed limit sign adjacent to the bracket signal carrying the Up Signals. A 'Standard' tank, 80042, was seen here with a 2-coach set.

Tuesday, 5 July 2011

Track Sketch: Fleetwood

Fleetwood Station in B.R. days.

Fleetwood station buildings were of typically Lancashire and Yorkshire railway grandeur - I attempted a very simple sketch of the facade but the picture below may give a better idea.

Sketches done on site are often hard to follow. Normally, I'd make a fair copy when I returned home but, in this case, I don't believe there is a better copy. The first sketch shows the terminal station at Fleetwood, the second shows the first station out from the terminus at Wyre Dock.


(Click on either sketch to enlarge)

D - Doll (reduced-size goods line arm)
DW - Doll (reduced-size goods line arm) on wooden post
DT - Doll (reduced-size goods line arm) on tubular post
T - Tubular post
TP - 'Tubular Peculiar' Tubular post of a different pattern
W - Wooden post
L - Lattice post
WT - Water Tank (parachute tank)
FB - Footbridge

The cryptic note 'As BN - 7 at base' I think means that the large Lancashire and Yorkshire pattern signal box at Fleetwood was similar to that at Blackpool North, with a brick base of seven bays. When I made the sketches, a number of signal arms had already been removed (arm shown dotted on the sketches), indicating a process of "rationalisation" which ultimately resulted in the total loss of railway facilities at Fleetwood.

You can find more detailed track and signalling diagrams of the area in the excellent series of publications from the Signalling Record Society 'British Railways Layout Plans of the 1950's'. Fleetwood area is included in 'Volume 5: ex-Lancashire & Yorkshire Railway Lines in West Lancashire' (ISBN: 1 873228 04 X). This publication gives the date of closure of Fleetwood signal box as 17th April 1966, after which a service was retained to Wyre Dock station (renamed 'Fleetwood') until 1970.

Track Sketch: Bodmin General

Sketches done on site are often hard to follow. Normally, I'd make a fair copy when I returned home. So far, I've not found a better copy, so here is the original version, believed to date from the 1960s.

I noted that the station was served by 8 departures to Bodmin Road (on the Great Western main line) and 7 departures to Wadebridge on a summer weekday. A 'Bo-Bo' and brake van was standing in the platform as I made my sketch, presumably after working a freight in. At around 11.0 a.m., the engine and brake departed on the Wadebridge line.

(Click on either sketch to enlarge)


D - Doll (reduced-size goods line arm)
CS - Coaling Stage
CR - 'Catch Rail' (Trap points with a switch in the outer rail)
T - Tubular post
W - Wooden post
SB - Signal Box
GS - Goods Shed
WB - Weighbridge

Track Sketch: Barnstaple Junction

Sketches done on site are often hard to follow. Normally, I'd make a fair copy when I returned home. So far, I've not found a better copy, so here is the original version, believed to date from the 1960s.

Click on any sketch to enlarge.


CP - 'Catch Point' (Trap points with a switch in both rails)
CR - 'Catch Rail' (Trap points with a switch in the outer rail)
TP - 'Tubular Peculiar' Tubular post signal of Southern Region pattern
WC - Water Column
T - 'Triple Lead' (Tandem Turnout)
L, Latt - Lattice Post signal
LS - Loco Shed
SB - Signal Box

For details of what remained in 2005 (a single platform at what has become the end of the branch, with a siding and run-round loop), refer to 'Railway Track Diagrams' Book 3: Western', Fourth Edition, published by Trackmaps (ISBN: 0-9549866-1-X). The First Edition of this book was published by Quail in 1989.

Matlock Station Festival Reopening

When I first visited Peak Rail, operations were based on the old 'Midland' side of Buxton station. A 4-coupled tank was giving rides along the length of the platform. But, just beyond the platform, the bridge taking the railway over the road had been taken away, preventing further expansion. Reinstating bridges involves serious money so, eventually, the painful decision was taken to abandon the Buxton site, retaining land ownership for ultimate re-instatement of the tracks in the future.

Construction was re-started at Darley Dale and, by the time I became a working member, a passenger service had been re-established between Darley Dale and a new station, Matlock Riverside, about ten minutes walk from the town. At Matlock Riverside there was an end-on connection with sidings forming part of the National Railway Network extending from the original Matlock station.

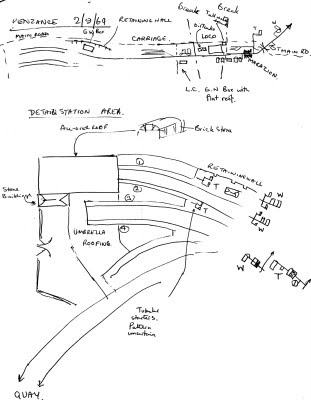
This connection with the National Network was rarely used and was eventually severed to make way for an improved A6 aligned over this connection. Sainsbury's were also developing a new supermarket on part of the old Cawdor Quarry. These changes involved complicated land swops and agreements. As a result, the sidings extending from Matlock town were reinstated, but on a new alignment (because of the new A6 position). The new sidings now terminated alongside Peak Rail's tracks and no longer offered an end-on through route. The challenge then was to reach an agreement with the National Railway regarding linking-up again and constructing a new Peak Rail terminus near the town.

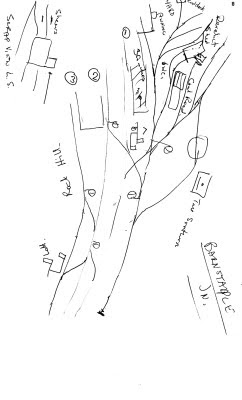
In the meantime, the Peak Rail intfrastructure has been extended from Darley Dale north to a large site encompassing the former Rowsley locomotive depot. The space available here has allowed a station with adequate parking to be developed, together with substantial sidings and a 4-road locomotive shed. The original turntable pit has been cleared and rebuilt and the 60-foot vacuum-operated turntable from Mold junction installed and commissioned (see article here).

The protracted negotiations were not assisted by the demise of British Rail, the rise and ultimate fall of Railtrack and the advent of Network Rail. Persistence has paid off and, at the beginning of July 2011, we saw Peak Rail trains passing the Sainsbury's Supermarket to stop at the original station. The original station at Matlock had been a through station with two platforms, Up and Down. The remaining diesel multiple unit service from Derby (and beyond) now runs on a single line from Ambergate and terminates in the Up platform at Matlock. The abandoned, overgrown Down platform has been cleared and new track laid for Peak Rail trains from Matlock Riverside to Matlock.

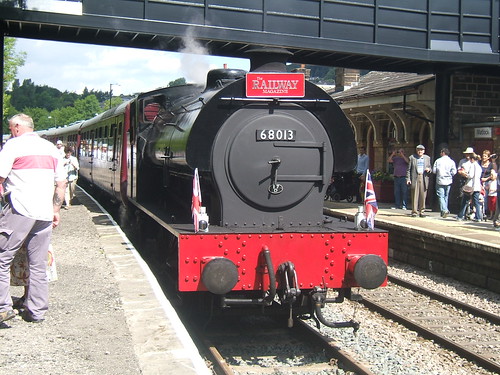
To celebrate these major achievements, a Matlock Station Festival Re-opening was held on the 2nd, 3rd and 4th July 2011. The first trains, reserved for invited guests and Peak Rail shareholders, ran on Friday 1st July. So the first revenue trains were on Saturday 2nd July, when I was booked to drive 68013.

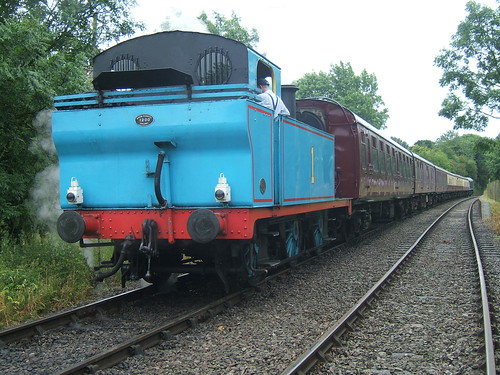
The shared station layout at Matlock introduces some operational problems and trains are currently Top-and-Tailed. 68013 was at the Matlock end of the 7-coach train and new-arrival 'Lord Phil' was at the Rowsley end. There was quite an air of excitement at Rowsley, as you can imagine, as we waited for the guard's 'Rightaway' for the first train. We took the established route to Matlock Riverside, where the ground frame has been altered so that the facing points are now locked towards what was the run-round loop and is now the new running line. At the Matlock end of the loop, the new turnout with facing point lock is now secured towards the extended line to Matlock via a 5-chain radius curve This extended line is now part of the Darley Dale - Matlock single line section. I'd never driven the new line, so the Traction and Train Crew Manager was on the footplate for the first trip as a 'Conductor'. However, I'd taken the precaution of walking the new route earlier in the day so as to avoid any surprises. I'd also been warned that the crews on the previous day had found that a fair amount of steam was needed to drag the train from Matlock Riverside to Matlock so I made sure that I didn't let the speed drop too much (the speed limit on this section is 10 m.p.h.).

With 7-coaches and the extra load of 'Lord Phil' on the back, 68013 was working fairly hard (almost full first valve with the reverser 'pulled up' two notches). After a straight section past Sainsbury's car park, there's an 8-chain radius right-hand curve into our new platform, which is also on the curve. There were quite a few people in Sainsbury's car park (hardly surprising on a Saturday morning), all watching this novel event. As we carried on, I could see the public car park on the Up side. People were crammed against the railings, obviously watching our approach. Continuing round the curve, the Network Rail platform came into view. This, too, was crowded with people waiting for us to appear. Finally, I could see our platform, absolutely thronged with people waving and cheering, with Peak Rail platform staff trying to keep people back from the platform edge. We continued along the platform and stopped opposite the appointed 'mark'. The platform was so crowded that I didn't see much of the official station opening ceremony, though I caught a glimpse of a number of civic chains of office.

Eventually, we set off with the first revenue train from Matlock to Rowsley. This time, 'Lord Phil' did all the work. The second round trip was performed in a similar fashion, then we watered 68013 at Rowsley before swopping engines with the other crew so that crews would get experience both arriving at and departing from Matlock. After two round trips on 'Lord Phil', we watered and swopped back to 68013 for the last two round trips.

A very special day and a landmark in the history of Peak Rail! When I returned home, I looked up the old British Railways gradient diagrams for the line.

Gradient Diagram Ambergate - Bakewell

Although our extension is on a new alignment, two reference points remain - the Derwent Bridge just outside Matlock Riverside and Matlock Station platforms. As you can see from the diagram above, the grade is 1 in 170 from the Derwent bridge (by the short level section) to the station.

More pictures.

Day Out With Thomas - June 2011

'Thomas' at Shenton, ready to return to Shackerstone

The Battlefield Line (which now uses the subtitle "The country railway at the heart of rural England") is committed to bringing the best possible 'Thomas' days out. In June 2011 there were four days with Thomas and Friends - 18th, 19th, 25th and 26th. I shared the driving of Thomas with Eddie on the 25th June and I drove Daisy (the DMU) on the 26th.

In addition to the various entertainments around Shackerstone station (including story reading, playlets and the popular Engine Races), there were seven return trips to Shenton during the day operated by the main train. These were six coach trains, the first five operated 'Top-and-Tail', the sixth by 'Henry' alone, the last by 'Thomas' alone.

Departures from Shackerstone and the leading locomotive in each case were:-

10:00 'BoCo' (actually a Class 25)
11:10 'BoCo'
12:20 'BoCo' ('Lunch on Thomas')
13:30 'BoCo'
14:40 'BoCo'
15:50 'Henry' (actually 'Mayflower')
17:00 'Thomas' ('Tea on Thomas')

Departures from Shenton and the leading locomotive in each case were:-

10:25 'Thomas'
11:35 'Henry'
12:45 'Thomas' ('Lunch on Thomas')
13:55 'Henry'
15:05 'Henry'
16:20 'Henry'
17:40 'Thomas' ('Tea on Thomas')

As a final bonus, the 2-car 'Daisy' made trips all the way to Market Bosworth and back, whilst the main train unloaded and loaded at Shackerstone. This was made possible by the approval of the arrangements for access to the newly-refurbished station at Market Bosworth. Access is provided via the Station Drive on the Up side and a new, gated level crossing provided with a Crossing Keeper, to our platform on the Down side.

'Daisy's' departures from Shackerstone were scheduled for 10:43, 11:53, 13:03, 14:13, 15:23 and 16:38. On one of the afternoon departures, 'Thomas' accompanied 'Daisy' to Market Bosworth.

Although the main train was not stopping at Market Bosworth during the day, the 17:40 from Shenton with 'Thomas' on the front, called to pick up any 'stragglers' who had missed the last 'Daisy' service.

As you can imagine, this intensive service kept everybody on their toes! Although 'Fergus' was not operational, he was posed outside the locomotive shed for his young friends to see.

My pictures are here.

Detailed pictures of the locomotives:

'Thomas'
'Fergus'
'Mayflower'
'Daisy'

Sunday, 3 July 2011

Track Diagram: Folkestone Harbour

(Click on either image to enlarge)

LC - Level Crossing
SB - Signal Box
FB - Foot Bridge

In August 1967 I recorded what I could see of Folkestone Harbour on my way through. Back home, I produced a 'fair copy' (oddly, using a blue fountain pen).

A double-track branch about one mile long connected Folkestone Harbour to the sidings at Folkestone Junction on the main line. The gradient is 1-in-30! In steam days, up to four six-coupled tank engines would struggle Boat Trains up the bank to the sidings, where something like a 'Merchant Navy' would hook-on for the rest of the journey.

By 1967, the branch was electrified and Electric Multiple Units of slam-door stock worked the passenger service. There were numerous 4-wheel vans in the extensive sidings, with a 350 h.p. diesel electric shunter. There were two passenger platforms, set on an S-bend. The Up platform was much longer, extended out along the massive jetty. The western side of the sea wall carried a raised promenade. All signals were colour light, with a couple of position light shunting signals controlling movements from the jetty towards the station. There was a signal box at the 'London' end with a lifting-barrier crossing giving road access to the old docks. An elderly signal box at the jetty end straddled the one track. I was not sure whether it was still in use. Two electric overhead travelling jib-cranes spanned the jetty. On arrival by Boat Train, passengers walked to the end of the Up platform then crossed the quay to pass through a temporary-looking customs shed before boarding the Cross-Channel Ferry.

For details of what remained of this area in 2008, refer to 'Railway Track Diagrams' Book 5: Southern and TfL', Third Edition, published by Trackmaps (ISBN: 978-0-9549866-4-3). The First Edition of this book was published by Quail in 1994.

Friday, 1 July 2011

Track Diagrams: Peak Forest

(Click on either image to enlarge)

D - Doll (reduced-size goods line arm)
DW - Doll (reduced-size goods line arm) on wooden post
DS - Diamond with double-slip
CS - 'Catch Rails' (Trap points with a switch in both rails)
CR - 'Catch Rail' (Trap points with a switch in the outer rail)
T - Tubular post
W - Wooden post

In August 1967 I visited Peak Forest on the Derby - Manchester main line and recorded what I could see. Back home, I produced a 'fair copy' (oddly, using a blue fountain pen).

At the Manchester end of the Up Platform, there was an interesting Midland signal - wooden bracket, lower quadrant goods arm and a mechanical route indicator. Nearby, a small triangle indicates Peak Forest Summit. The gradient diagram below confirms the summit location. In both directions, trains approached Peak Forest via a gruelling 3-mile climb at 1 in 90 - from the north via Dove Holes Tunnel.

You can find more detailed track and signalling diagrams of the route in the excellent series of publications from the Signalling Record Society 'British Railways Layout Plans of the 1950's'.

Peak Forest is included in 'Volume 8: Manchester and Chesterfield to Derby and Trent' (ISBN: 1 873228 09 0).

For details of what remains of this route in 2005, refer to 'Railway Track Diagrams' Book 4: Midlands & North West', Second Edition, published by Trackmaps (ISBN: 0-9549866-0-1). The First Edition of this book was published by Quail in 1988.

It's amazing that this important main line was irresponsibly thrown away. A few years ago Railtrack (remember them?) proposed re-instating the complete line as a through route. Having spent unreasonable amounts of money just thinking about it, Railtrack abandoned the idea, before being replaced by Network Rail.

Track Diagrams: Lancaster (Green Ayre)

(Click on image to enlarge)

S--C - Sleeper Crossing (barrow crossing)
CR - 'Catch Rail' (Trap points with a switch only in the outer rail)
HP - Hand-operated points

Lancaster (Castle) station on the West Coast Main Line was well-known, where you could once see steam-hauled expresses roaring past on the 'through' lines. The more modest Midland Railway establishment at Lancaster (Green Ayre) was less famous.

The Midland reached Morecambe by a branch leaving their main line near Skipton, giving access from Leeds and the South. The Midland Railway also promoted its own route to Ireland via a branch from Morecambe to the port of Heysham. The Midland line passed through Lancaster (Green Ayre), crossed the River Lune on an impressive, curving plate girder bridge of nine spans ('Greyhound Bridge', now used by road traffic) and continued to Morecambe (Promenade) station. The London and North Western, of course, had its own station at Morecambe (Euston Road). At Lancaster, a steeply-graded single-line branch less than half a mile long linked the two stations.

(Map: Railway Magazine)

I'd first been introduced to Lancaster (Green Ayre) in 1952 (more here), so what I recorded in August 1967 was something of a shock. I found a rather derelict railway with the line towards Skipton singled and the Overhead Line Equipment dismantled. I originally suggested that the single line to Lancaster Castle had been severed, but a correspondent corrected me - apparently the line continued to ship coal to Lancaster Power Station until 1976. I think I misunderstood the dotted lines on the sketch. The fragment of an old Ordnance Survey Map below shows how the single line branch crossed the Down Line (towards Morecambe) at a double slip and made a trailing connection with the Up Line but I think I was unsighted when making my sketch, hence the dotted lines.

My sketch shows Electrification Trains stabled in the Down Sidings. As far as I recall, these were the flat-roofed, black-painted 'Wiring Trains' which proliferated during electrification of the West Coast Main Line.

You can find more Comprehensive track and signalling diagrams of the route in the excellent series of publications from the Signalling Record Society 'British Railways Layout Plans of the 1950's'. Lancaster Green Ayre is included in 'Volume 12: ex-MR Main Line Carlisle to Leeds, associated branches and joint lines' (ISBN: 1 873228 15 5). This publication gives the closure date for both Lancaster Green Ayre box and the next box towards Skipton, Ladies Walk, as 4th June 1967 (just a couple of months before my survey).

There's a Wikipedia Article on Lancaster Green Ayre and I found a Video Presentation which includes a number of historic Science Museum photographs. The impressive station building has even inspired a 2mm/foot scale model (downloadable from modelrailwaybuildings.com)!

[Revised August, 2011]

Track Diagrams: Hest Bank

(Click on image to enlarge)

D - Doll (reduced-size goods line arm)

This is the one place on the West Coast Main Line where you can actually see the coast. Note the plan is drawn with 'North' at the bottom.

There's a simple station, level crossing and a British Rail standard signal box. In 1967, there were five Camping Coaches in a siding on the seaward side and Water Troughs to the north of the station. A bi-directional third line extended to the south, curving through a cutting and under a bridge. Beyond the bridge, the third line diverged to join the Lancaster - Morecambe line at Bare Lane. The two main lines continued south to Morecambe Junction and Lancaster. I show only two semaphore arms on the Down Home gantry but I think I missed the colour light Down Main Home, also on the gantry.

The Up Home was a 3-aspect colour light with 'line-of-lights' route indicator reading to the third line.

You can find more detailed track and signalling diagrams of the route in the excellent series of publications from the Signalling Record Society 'British Railways Layout Plans of the 1950's'.

Hest Bank is included in 'Volume 6: West Coast Main Line (Euxton Junction to Mossband) and Branches' (ISBN: 1 873228 00 7).

For details of what remains of this route in 2005, refer to 'Railway Track Diagrams Book 4: Midlands & North West', Second Edition, published by Trackmaps (ISBN: 0-9549866-0-1). The First Edition of this book was published by Quail in 1988.

Track Diagrams: Llanfair P.G.

(Click on image to enlarge)

T - Tubular post signal
L - Lattice post signal
LG - Loading Gauge
tt - Turntable
CR - Crane
s.b. - Signal Box
L.C. - Level Crossing

This village on Anglesey, originally called Llanfairpwll would probably have remained little-known had not a Victorian committee with a flair for self-promotion extended the name to a jaw-breaking 'Llanfairpwllgwyngyllgogerychwyrndrobwllllantysiliogogogoch'. More information here. The L.M.S. commonly simply used the abbreviation 'Llanfair P.G.', which was much easier to fit on an Edmundsen ticket.

Signalling was Absolute Block. On the Down, there was a lattice post Home protecting the crossing, Starter and a fine L&NW lower quadrant Advanced Starter. The Up had two Home signals, the one protecting the crossing on a short post to improve sighting (presumably because the station footbridge would otherwise impair an approaching driver's view).

The Down Advanced Starter and the first Up Home (I'm not sure whether it was 'Home 1' or, if 1/4 mile in advance of the second Home, it would be called an 'Outer Home') each carried a 'White Diamond'. This indicated to train crews that 'Rule 55' was exempt and the Fireman did not have to trudge to the signal box when detained at the signal to remind the Signalman of his train's presence. Track Circuits on the line approaching the signal would indicate 'Occupied' to the Signalman and electrical 'Block Controls' would prevent the Signalman from inadvertently allowing a second train to approach.

I didn't spot the down Distant but the Up Distant was a Colour Light. Under A.F. Bound, who joined the LMS as Chief Signal & Telegraph Engineer in 1929, there was a long-term program of risk reduction by converting semaphore Distants to colour light signals to reduce the chances of a 'missed distant'. Bound also prioritised the introduction of track circuits and block controls, dealing with the biggest risks and the more important lines first.

The small goods yard is served by a single wagon turntable, neatly giving access to a goods shed, two loading dock roads, a high-level loading dock and a crane. The London and North Western was rather addicted to wagon turntables and was not averse to connecting Up and Down sidings with wagon turntables and a line crossing both main lines at right angles (a potentially damgerous practice) but here the use of the wagon turntable is both economical and efficient - that would have certainly appealed to the feared Chairman of the London and North Western Captain Mark Huish (1808 - 1867)!