Hamilton Square
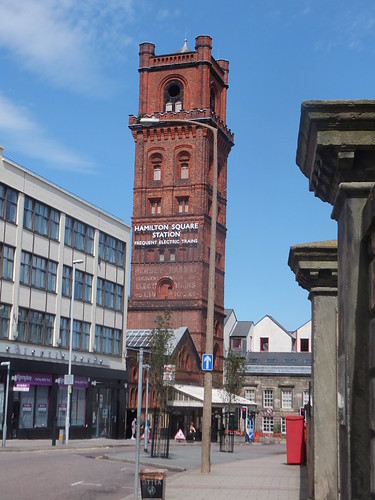
Birkenhead Hamilton Square station building looking towards the river.
Having made the almost-obligatory journey on the Mersey Ferry, I walked to Birkenhead Hamilton Square station, where my 'Saveaway' ticket admitted me past the automatic barriers and a rapid lift took me down to the underground concourse level where steps lead down to each of the three platforms (1: to Liverpool, 2: to Chester/Ellesmere Port, 3: to West Kirby/New Brighton). I'd decided to make a brief visit to Rock Ferry, so I took the steps to platform 2 and, within seconds, a 3-coach Chester train arrived. After stops at Birkenhead Central and Green Lane, I alighted at Rock Ferry.
Rock Ferry
Rock Ferry is an interesting location which has seen many changes over the years. The Chester & Birkenhead Railway passing through Rock Ferry was originally a single line railway. It opened in 1840 to a terminus in Grange Lane, Birkenhead. The line was then extended via a single-line tunnel to a cramped site at Monks Ferry, from where ferries provided a connection to Liverpool. There's more information about Monks Ferry on the excellent Disused Stations site here. Following a merger in 1859, the line became part of the Birkenhead Railway, which was acquired jointly by the London & North Western and Great Western railways in 1860. In 1878, a new terminus was provided at Birkenhead Woodside. This important route eventually became 4-track for much of the route (Down Slow/Up Slow to the west, Down Fast/Up Fast to the east). In 1891 Rock Ferry also became the southern terminus of the Mersey Railway when the line extended south from the original terminus at Green Lane. The Mersey Railway was operated by steam haulage until electrification in 1903.
Even as recently as 1961, Birkenhead Woodside retained quite a healthy service, as shown in the post Services to Birkenhead Woodside in Steam Days. But, by 1967 the passenger service from Chester to Birkenhead had been reduced to a few Diesel Multiple Units. Terminating these trains at Rock Ferry and forcing passengers to change to the electric trains on the former Mersey Railway to reach Birkenhead (and Liverpool) allowed Birkenhead Woodside station to be closed. For more information about Birkenhead Woodside, see the Disused Stations site here. Rock Ferry then became two terminal stations, side-by-side, pointing in opposite directions and I remember during this period once making the journey from Liverpool to Chester with a change from EMU to DMU at Rock Ferry.
In 1985, Rock Ferry became a through station once again when Merseyrail electrified the line from Rock Ferry to Hooton. Subsequently, this electrification has been extended to Chester and Ellesmere Port.
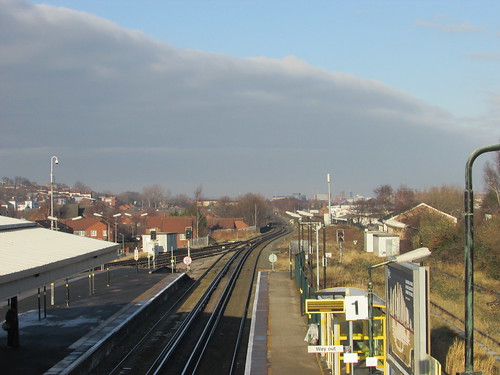
Rock Ferry station, looking north. (L-R) Platform roads 4, 3, 2, 1, Goods Line.
In the view above, platform roads 4 and 3 are the terminal platforms originally provided by the Mersey Railway (now used for stabling stock and occasional passenger services). Platform roads 2 and 1 are the through platforms serving trains between Liverpool and Chester/Ellesmere Port (formerly the Down Slow and Up Slow). The Goods Line (behind the fence) is what remains of the former Down Fast and Up Fast lines. The Goods Line still connects to what's left of the Dock Lines but appears to be out of use. However, signal ML730 is still lit. It is a single-aspect colour light, permanently red. Movements towards the uncontrolled dock lines are authorised by the 'cats eyes' subsidiary signal of two white lights diagonally.
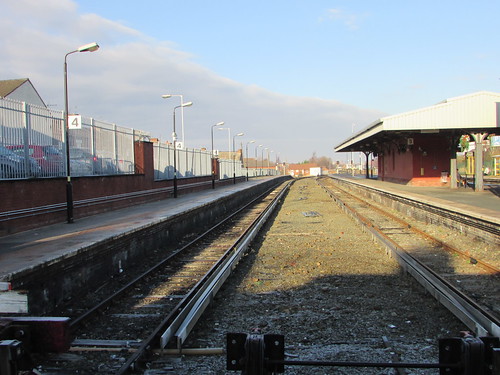
Rock Ferry station - terminal platforms 4 and 3, looking north. There was originally a 'middle siding'.
Most of the station facilities are modern. There's an earlier brick and stone kiosk on platform 2 boarded-up and labelled "WARNING ASBESTOS IS PRESENT WITHIN THIS ROOM. NO ACCESS TO ANY INDIVIDUAL TILL FURTHER NOTICE. THANKS, LORNE STEWART". The canopy on platform 2/3 and associated brick and stone building are of a similar age to the kiosk. I left the station briefly and contemplated walking along Bedford Road towards the river where I could see a tanker moored adjacent to the Tranmere oil storage tanks but I decided that this would probably be unproductive so returned to platform 2 and caught a Liverpool-bound train.
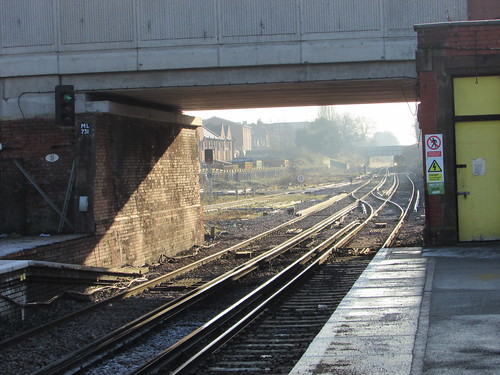
Rock Ferry station looking south, showing Bedford Road overbridge, Goods Line converging from left and Liverpool-bound EMU approaching.
Hamilton Square (again)
At Hamilton Square, I'd hoped to take a New Brighton train but I approached the platform just in time to see a New Brighton train disappear. With 15 minutes to wait for the next service, I reviewed whether my schedule really allowed time for a visit to the seaside and decided, instead, to return to Liverpool. After a short wait, a crowded train arrived.

Birkenhead Hamilton Square - Train for Liverpool Central approaching platform 1.
My train passed under the River Mersey, paused at James Street station, then traversed the single-line Liverpool Loop opened by British Rail in 1977, stopping at Moorfields and Lime Street before I left the train at Liverpool Central.
The original Liverpool Central
Liverpool Central has a complex history. The Cheshire Lines Committee or 'CLC' (there's a brief history here) built a line from Manchester to Liverpool to siphon off traffic being carried by the London & North Western Railway and the Lancashire & Yorkshire Railway. The Liverpool terminus was originally at Brunswick but, when the complex task of driving a series of tunnels into the city was complete, a new 'CLC' terminus, called Liverpool Central, was opened in 1874.
A little to the north, Liverpool Exchange had become the Lancashire and Yorkshire terminus in Liverpool, dealing not only with longer-distance steam-hauled trains but also with an intensive commuter service from Southport which had been electrified in 1904. There's a little about the line from Southport in the post Day Trip to Southport and Liverpool (Part 2).
The original Liverpool Central (Low Level)
The Liverpool terminus of the Mersey Railway was initially at James Street but, to provide a more central station, a double track tunnel was driven from James Street to a sub-surface station provided with a single island platform located underneath the platforms of the 'CLC' Liverpool Central station. This extension opened in 1892.
The new Liverpool Central (Low Level)
In the 1960s, the reports prepared by Dr. Richard Beeching resulted in the loss of many services and routes: both Liverpool Central and Liverpool Exchange closed. The 'Disused Stations' site has an article on Liverpool Central (CLC) here, on Liverpool Central (Low Level) here and on Liverpool Exchange here.
Although both terminal stations closed, an ingenious scheme by British Railways developed the electric services. Firstly, the terminus at Liverpool Central (Low Level) was replaced by a new tunnel, the Liverpool Loop, so that trains from Hamilton Square approaching James Street diverged to the left, using a new platform at James Street station, traversed a single-line serving new underground stations at Moorfields (near the now-closed Liverpool Exchange), Liverpool Lime Street and Liverpool Central before returning to James Street, now heading out of the city.
The original Liverpool Central (Low Level) sub-surface station was not abandoned but incorporated into a new line - the Northern Line. At the north end of the sub-surface station, part of the 1892 tunnel from James Street was re-used and this, together with a new tunnel serving two platforms at Moorfields followed by an incline linked-up with the existing electrified lines to Southport. At the south end of the sub-surface station, a new tunnel and incline was provided to link-up with the existing but closed 'CLC' line to Manchester and the former 'CLC' route was electrified as far as Hunts Cross.
Part of the 1892 tunnel from James Street to the sub-surface platforms at Liverpool Central (now part of the Northern Line) was re-connected as a single-line Stock Transfer Siding, providing a link between the former Mersey Railway, now marketed as the Wirral Line, and the newly-created line from Southport to Hunts Cross, the Northern Line.
The Northern Line
On my arrival at Liverpool Central on the 'deep tube' Liverpool Loop, I took the long escalator up to booking hall level by which time I'd decided that, rather than look at shops, I would take a better look at the Northern Line platforms at Liverpool Central so I then took the short escalator down to the sub-surface island platform now serving the Northern Line. It's a fairly cramped site and I noticed that, each time a crowded 3-coach train arrived, it took some time for the escalator and stairs to clear the platform.
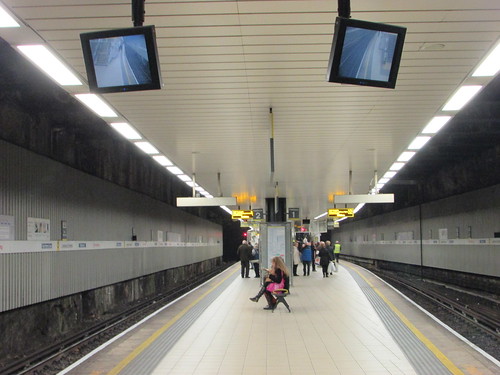
Liverpool Central Northern Line platforms looking north.
The station is rather featureless: I found it disorientating trying to remember which end was which. At the extreme south end of the platforms there's an enclosed metal staircase marked 'EXIT', presumably intended for emergencies. The access doors were prominently labelled 'HUNTS CROSS', I suppose for the benefit of train crews similarly disorientated. I did rather worry that the labelling might induce passengers to conclude either that they had already arrived at Hunts Cross or that, through some space-warp, the metal stairs might transport them to Hunts Cross.

Liverpool Central Northern Line platforms looking south.
Liverpool Central is a through station for trains from Southport to Hunts Cross but terminates trains from Ormskirk and Kirkby which reverse at Liverpool Central. I watched as a heavily-loaded 3-car train arrived from Ormskirk in platform 1, discharged all its passengers, loaded waiting passengers and the Driver and Guard changed ends, ready to return to Ormskirk. Looking north from platform 1, I could see colour light signal ML29 suspended from the roof on the left near the tunnel portal. There was a duplicate signal on a tubular post on the right, identified as signal ML29CA where the 'CA' indicated a 'Co-Acting' signal. I was intrigued by the illuminated 'TT' displayed in the tunnel. This may refer to 'Tunnel Telephone' but Merseyrail normally use the acronym 'T.E.C.' (Traction Emergency Communication, I think).
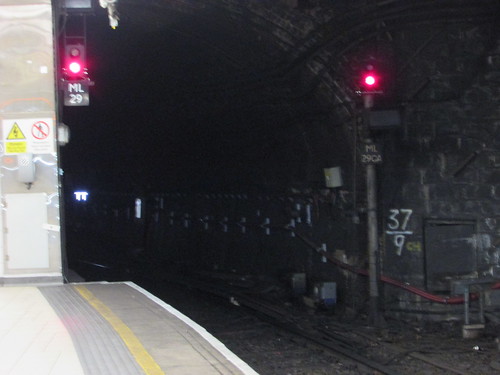
Liverpool Central Northern Line platform 1 looking north with signals ML29 and ML29CA. applying to reversing trains. Note the white illuminated 'TT' displayed in the tunnel.
Another fully-loaded train arrived in platform 2, bound for Southport. After the Southport had departed, I heard the loud 'clunk' as the crossover in the tunnel at the north end reversed. The route indicator on signal ML29 (suspended from the roof on the left near the tunnel portal) lit, showing 'D' for Down Line and finally, when the route indicator had been 'proved' as lit, the 2-aspect colour light changed from 'red' to 'yellow'. The same indication was given by a duplicate signal on a tubular post on the right, identified as signal ML29CA where the 'CA' indicated a 'Co-Acting' signal. There's presumably another route possible, for movements onto the Stock Transfer Sidinig.
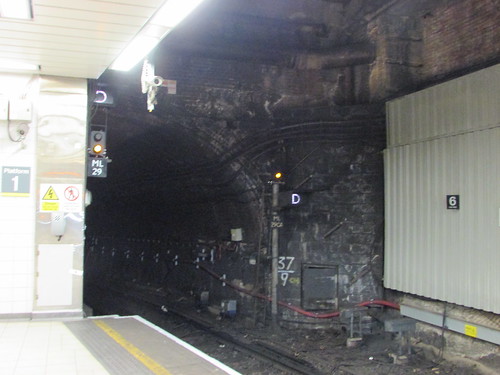
Liverpool Central Northern Line platforms looking north with signal ML29 (and ML29CA) cleared for a train which reversed in platform 1.
Whilst this was going on, I'd made another changed of plan. I'd decided that, rather than travel home from Liverpool Lime Street, I'd take a Northern Line train to Liverpool South Parkway and pick up my Wolverhampton-bound service there, giving me enough time to have a brief look (a very brief look) at what remained of the docks 'upstream' from Pierhead.
Go to Part 3 ...
Related posts on other sites
Rock Ferry railway station (Wikipedia).
Merseyrail - A Brief History (Merseytravel).
Northern line (Merseyrail) (Wikipedia).
Related posts on this site
Return to Merseyside (Part 1).
More Merseyrail.
Railways around Birkenhead.
I've written about Liverpool a number of times. Most are referenced in the post Liverpool (again).
My Pictures
Where necessary, clicking on an image above will display an 'uncropped' view or, alternately, all the pictures from this and earlier trips may be selected, viewed or downloaded, in various sizes, from the albums listed:-
Return to Merseyside (This trip).
Merseyrail (Earlier trips).
