The locomotive
'Cumbria' is a six-coupled 'Austerity' saddle tank locomotive. The 'Austerity' tank locomotive class is described here. In the section 'Related Posts on this site' below there are links to other posts about 'Cumbria'.
The timetable
The normal weekend 'Green Timetable' of five return workings between Shackerstone-Market Bosworth-Shenton had been strengthened by an earlier round trip (operated by the diesel railcar) and two evening 'Special' trains.
| Shackerstone Dep | 09:45 | 11:15 | 12:30 | 13:45 | 15:00 |
| Market Bosworth Arr | 09:53 | 11:23 | 12:38 | 13:53 | 15:08 |
| Market Bosworth Dep | 09:57 | 11:27 | 12:42 | 13:57 | 15:12 |
| Shenton Arr | 10:05 | 11:35 | 12:50 | 14:05 | 15:20 |
| Shenton Dep | 10:20 | 11:50 | 13:05 | 14:20 | 15:35 |
| Market Bosworth Arr | 10:28 | 11:58 | 13:13 | 14:28 | 15:43 |
| Market Bosworth Dep | 10:32 | 12:02 | 13:17 | 14:32 | 15:47 |
| Shackerstone Arr | 10:40 | 12:10 | 13:25 | 14:40 | 15:55 |
| Shackerstone Dep | 16:15 | 17:30 | 18:55 | ||
| Market Bosworth Arr | 16:23 | 17:38 | 19:03 | ||
| Market Bosworth Dep | 16:27 | 17:48 | 19:12 | ||
| Shenton Arr | 16:35 | 17:56 | 19:20 | ||
| Shenton Dep | 16:50 | 18:15 | 19:35 | ||
| Market Bosworth Arr | 16:58 | 18:23 | 19:43 | ||
| Market Bosworth Dep | 17:02 | 18:27 | 19:47 | ||
| Shackerstone Arr | 17:10 | 18:35 | 19:55 |
Speed Restrictions
The Line Speed Limit is 25 m.p.h. but parts of the line have lower limits, as shown below.
| Location | Speed m.p.h. |
| Shackerstone Station (Signal Box - Stop Board on Plat 1 and 2) | 5 |
| Barton Lane overbridge 32 - Signal Box (Relaid section) | Dead slow |
| Adjacent Headley's Crossing (Relaid section) | 10 |
| Market Bosworth Station (Signal Box - Bridge 27) | 5 |
| Through Market Bosworth platform | Dead slow |
| Underbridge 26 (approach to Market Bosworth) | 15 |
| South of Bridge 21 - Shenton | 5 |
| Shenton Station Ground Frame - Buffer stop | 5 |
The frequent changes in permitted speed make the working of the train more challenging for the locomotive crew. Permanent speed restrictions are usually marked with a sign of the old 'British Railways' pattern - a steel post carrying steel cut-out figures painted yellow on the front showing the limit (in miles per hour) which is positioned at the Commencement of the Restriction. The Driver must start braking in advance of the sign since the locomotive must not exceed the speed limit when passing the sign and that limit must then be observed until the whole of the train has left the restricted area. On single lines, there is no sign marking the end of the restriction so the driver has to look out for the 'Commencement of Restriction' sign for trains running in the opposite direction and ensure that the whole of the train has passed that sign before adjusting speed. This pattern of sign is no longer used on the modern railway - coloured, reflective signage is now in use.
Temporary speed restrictions may be unmarked on preserved lines, hence the importance of the Driver being thoroughly familiar with the line and reading the notices on display at the Motive Power Depot (or Signing-on Point) at the start of each shift as well as checking the 'Late Notice Case' (where provided) for recent changes.
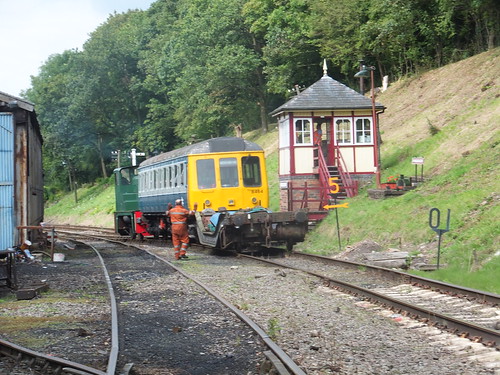
Battlefield Line, 2014: A 'Midweek Shunt' outside Shackerstone Signal Box (on an earlier date). The yellow-painted front of a '5' restriction sign and the black-painted rear of a '10' restriction sign can be seen.
Preparation
The term 'Preparation' covers both Driver's and Fireman's duties. In general, the Driver is responsible for the daily examination of the locomotive and 'oiling round' whilst the Fireman concentrates on raising steam but they should work as a team to ensure that all the tasks are carried out efficiently. On preserved lines, a Trainee may also be rostered both to learn about firing and boiler management and also assist in all other tasks. Proper attention to Preparation can help to prevent failures 'on the road' later.
By the time I 'signed on', Jamie had matters well in hand and had done some of the oiling (four eccentrics and two big ends in between the frames), then I carried on. Once I was in the pit and had completed my examination and oiling, I decided I might as well 'ash out' the ashpan, assisted by Richie. Since Jamie had done the initial boiler safety checks the previous evening, leaving a 'warming fire' in overnight, there was already a fair bit of ash to remove but it's important to enter traffic with a clear ashpan, to prevent possible steaming difficulties later once the inevitable build-up of ash starts to obstruct the flow of 'primary air' which reaches the burning fuel through the ashpan. Other design considerations tend to make the layout of the ashpan something of a compromise.
In the 'Austerity', the trailing coupled axle is positioned underneath the firebox, so the ashpan is designed with a 'hump' to clear the axle, effectively dividing the ashpan into two. Two damper doors are provided to control the flow of 'primary air', one at the front of the ashpan, one at the rear. The damper doors are controlled by a simple linkage from levers in the cab which lift up and down. Fully opening the rear damper door allowed the back ashpan to be cleared, then opening the front damper door allowed the (larger) front ashpan to be cleared. Once we'd filled the saddle tank from the hose in the shed and steam pressure in the boiler had risen to allow us to move, we shunted the engine just outside the shed to complete as much cleaning as time permitted.
There are other posts in my blog about Preparation, covering different engines and different sites. Here are two about other 'Austerity' tank locomotives:-
Driving Turn at Peak Rail - Part One: Preparation.
Preparation of Locomotive 'Sapper'.
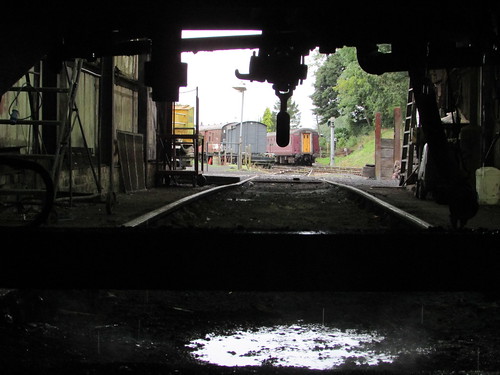
View from the Inspection Pit in the Loco Shed, underneath 'Cumbria', looking towards Shackerstone station.
In Traffic
In good time, we came off shed 'Light Engine' and coupled onto our waiting 5-coach train (the maximum that can be accommodated at the platforms on the line) in platform 2. We created vacuum, the Guard did a 'brake continuity' test and the signals cleared for us to depart. Then we waited. As often happens, departures are often late away, waiting for tardy passengers or for other reasons. Bearing in mind the speed restrictions along the line, it is very difficult to make up time once late. When we finally received the 'Right Away' from the Guard, we crept out of Shackerstone, bunker first.
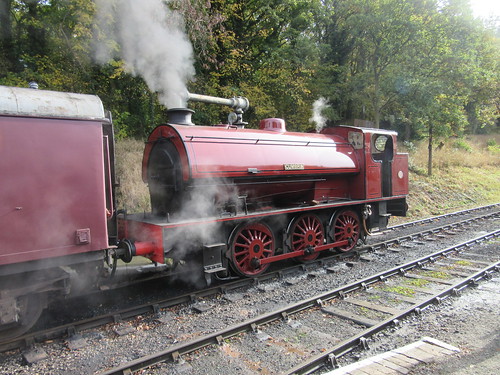
'Cumbria' ready to leave Shackerstone on an earlier date.
The signalman passed the Single Line Token to me as we passed his 'landing'. This was our authority to occupy the single line to Shenton. I also checked that the Starting Signal (these days called the 'Section Signal') was still 'off' and observed the 'Dead Slow' over the relaid section. The gradient profile of the Battlefield Line is a bit like a capital 'M' - uphill leaving Shackerstone then downhill to Market Bosworth, after which the line rises again before a downhill section to Shenton. Once the whole train was clear of Barton Lane overbridge, I was able to open the regulator to 'Full First Valve' but the locomotive was fairly sluggish - the fire was still 'green' and it would take some time for firebox to rise to a proper working temperature. In addition, until an engine has been doing real work for a time, the temperature in the cylinders remains low enough to rapidly chill steam and these 'condensation losses' reduce the effective work done. During the course of a shift, the situation noticeably improves and it's often commented that "it's a different engine in the afternoon". To reduce condensation losses on starting, it was once common practice, after backing onto a train, to leave the engine in 'back gear' and slightly open the regulator with the drain cocks open to 'warm through' one end of the cylinders. Shortly before leaving, the reverser would then be placed in forward gear with steam applied, to warm the other end of the cylinders. Needless to say, the locomotive handbrake would be firmly applied during this process.
'On the road', it's essential that the driver and, when not otherwise engaged, the fireman keep a good look-out. As we approached our next 'slack' (the speed restriction around Headley's Crossing), I banged the regulator shut and dropped the reverser into 'full gear' since most engines with Link Motion 'drift' best in full gear. Next, watching the vacuum gauge, I carefully dropped the vacuum to around 15 (inches of mercury) to start lowering our speed. As our speed fell, I pushed the application valve back to 'Release' so that the Vacuum Ejector re-created 21 (inches of mercury) to release the train brakes. It may take some seconds for the train brakes to release, particularly with industrial locomotives like 'Cumbria' which were not originally vacuum fitted, so it's important not to 'overdo' the brake application. There's an introduction to the vacuum brake in the post here.
I whistled for the farm crossing at Headley's and we rumbled across slowly, then I whistled for the next crossing and we continued at our rather funereal pace until our last coach had passed the speed restriction sign for trains in the opposite direction, when I was able to apply steam again. First, I 'pulled up' the reverser to the second notch (easier to do with steam off), then I opened the regulator to 'full first valve'. I allowed the train to accelerate to line speed then partially closed the regulator so as to maintain the desired speed with minimum use of steam.
On this downhill section, as we passed the golf course on our left, the train was moving fairly well. As we approached what's usually called 'Airfield Bridge' (near a private house with a hangar and a grass landing strip), I shut off steam and drifted in full gear before commencing braking as we approached the 5 m.p.h. restriction entering Market Bosworth Station which reduces to 'Dead Slow' in the platform. I complied with the 'SW' ('Sound Whistle') board and rumbled along the platform, trying to judge the right point to stop so that all the doors of the 5-coach train were on the platform. Just before the train finally stopped, the vacuum brake application valve was put back to 'release' so as to avoid a jerk (the old locomen's adage is "stop on a rising vacuum") and I 'held' the train on the locomotive steam brake to prevent any movement as passengers boarded and alighted. Jamie made sure his fire was ready for departure and then we all had a few moments to watch the activity of the platform. There were certainly plenty of people about!

Battlefield Line 1940s Weekend 2016: Passengers at Market Bosworth.
Eventually, the doors were closed, the station staff gave the 'tip' to the guard who whistled and gave us the 'Right Away' with a green flag. As I moved back across to my side, I sounded the whistle and scanned the line ahead, particularly the foot crossing with wicket gates which gives access to the platform. Then I released the steam brake and pushed open the regulator, 'linking up' the reverser after a few 'chuffs'. Both Jamie and I carefully observed the foot crossing, with the public both sides watching our departure, to make sure nobody suddenly decided to cross. I gave another whistle in warning and we slowly trundled over the crossing, waving to the people. When the whole train was past the signalbox (currently not in use), I eased the regulator open a little more, so as to cross underbridge 26 (the 'Cattle Creep') at 15 m.p.h.
Once clear of the 15 m.p.h. restriction, I could open up again as the line entered the uphill section, a curving cutting crossed by three overbridges. As speed rose, I first eased the regulator and finally shut-off to drift in full gear, although we'd still not reached the summit. The cutting ended near the summit so, judged correctly, our momentum would take us to Shenton without further use of steam. Well before the fixed distant signal for Shenton, I'd started to slow the train because, just short of Shenton with its 5 m.p.h. restriction, there's a temporary 'slack' over a 'dip' in the track which has appeared near underbridge 21.
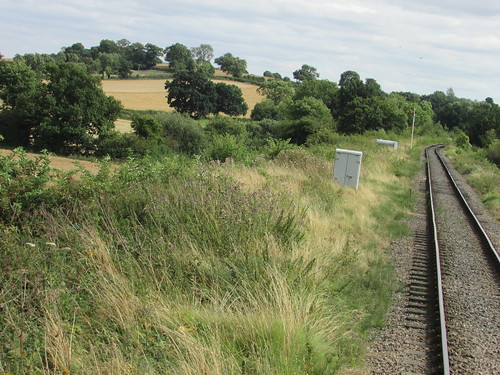
View from the footplate of 'Cumbria' approaching Shenton. Note the Fixed Distant signal.
I whistled as we approached the platform and rolled the train well along with the leading coach door right at the end of the platform when we stopped, hoping that the double doors of the Guard's Brake at the rear would also be on the platform. The double doors served the luggage section, used to transport bicycles, pushchairs and wheelchairs, so it's quite important to get them on the level platform (and not on the platform ramp). Once we stopped, I applied the locomotive steam brake, destroyed the vacuum in the train pipe and shut off the steam supply to the vacuum ejector.

'Cumbria' on arrival at Shenton (on an earlier date).
I haven't described Jamie's firing in detail but the frequent changes of speed meant that the demand for steam varied throughout the journey and the firing rate had to be adjusted for this. The gradient changes necessitated frequent attention to the boiler water level and a sometimes-problematic fireman's side injector meant that the driver's side injector periodically had to be used, sometimes with the driver's help, if not otherwise pre-occupied. Of course, the fireman is also expected to help the driver in keeping a look-out, particularly approaching signals, in the vicinity of the various crossings and entering or leaving platforms.
Although, even on a simple railway like the Battlefield Line, the driver has plenty to concentrate on when on the road, it's important that the driver periodically scans the pressure gauge, the water gauges and the apparent condition of the fire (judged by the smoke from the exhaust and the colour of the fire). I knew that there was no necessity for this with Jamie on 'the other side' but force of habit meant I still carried out these checks. The work always goes best, and is more enjoyable, if the driver and fireman work as a team. In the old days, many fireman reported problems with drivers who didn't see footplate work as a partnership - one such tale is recounted in my post here.
Our arrival at Shenton signalled a period of furious activity for the footplate crew as the timetable allows only 15 minutes to uncouple, run round, couple up and prepare for the return journey. Fortunately, these tasks were shared with Richie. The Guard is responsible for putting the handbrake on in the Brake Van so that the driver can 'ease up' against the train, compressing buffers, to make uncoupling easier. 'Cumbria' has an unfortunate tendency to 'steam lock' during this process. The Guard works the Ground Frame at the northern end of Shenton for the locomotive crew. This Frame is released by a key forming part of the Single Line Token so I placed the Token, in its pouch, on the fence for the Guard to collect and moved one of the lamps to the front bufferbeam whilst we ran round. The locomotive was stopped just by the busy foot crossing with wicket gates which links the car park to the station and to the Bosworth Battlefield Experience so it was vital to ensure that the public were clear of the track before whistling and moving off into the headshunt. With the handpoints reversed, we moved towards the crossing, stopping to pick up the 'third man' once the points had been reset towards the platform line. Handpoints are designed to be 'trailable' without damage and, back in steam days, enginemen would happily 'trail' but most preserved railways encourage positively setting points to be 'trailed' to avoid both wear and possible mishap. We passed our 5-coach train, looking out for the ground shunting signal, which would be 'cleared' by our Guard from the Ground Frame once the points had been set from the run round loop to the single line.
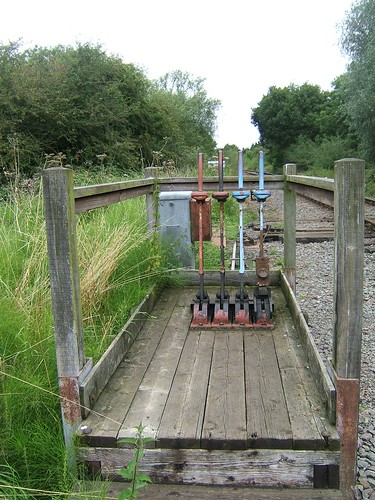
Shenton Ground frame. The frame is released by inserting the Single Line Token into the release near the bottom of the rightmost lever (on an earlier date).
We ran onto the single line and stopped until the guard had restored the ground frame and extracted the Single Line Token which we would carry back to Shackerstone. I moved the locomotive onto the waiting train, we coupled on and I 'set' the lamps to one above each front buffer (Express - called class 'A' when I was young, becoming class '1' when the 4-character headcodes were introduced by British Rail). I created vacuum and watched for the Guard's 'Brake Continuity Test'. By checking that operation of the Guard's Brake Valve (the 'Setter') destroys the vacuum in the train pipe, the Guard is reassured that he can bring the train to a stand in an emergency. The Guard checked that all the carriage doors were properly closed, made sure that there were no 'late passengers' hurrying to board the train and, with a whistle and a flourish of his green flag, gave us the 'Right Away'.
On our return journey, the engine was the 'right way round' - chimney leading. Actually, the driver's forward view is impaired compared with bunker leading because the boiler and saddle tank restrict the view ahead. Unless it's very cold or wet, I tend to lean out of the cab when driving as that gives somewhat improved visibility but good teamwork between the driver and fireman in keeping a lookout is the best method. Approaching the various speed restrictions in the opposite direction, with the gradient profile reversed, I had to use a different set of 'markers' to initiate braking.
We were still running late as we approached Shackerstone. I slowed before Barton Lane overbridge to comply with the 10 m.p.h. 'slack' and also in readiness for having to halt at the tall outer home signal. Particularly in the growing season, when the vegetation in the cutting goes wild, the signal is quite hard to 'sight'. A team of three volunteers are kept busy in the season trying to keep the line clear of overhanging branches which can give the unwary engineman a nasty 'swipe'.
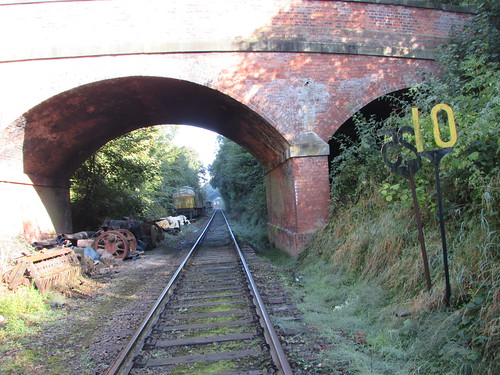
Barton Lane overbridge No. 32 on the approach to Shackerstone originally spanned a double track route, like all the overbridges on the line. Note the speed restriction sign (10) on the right. The lattice post outer home signal (beyond the derelict 'Peak') is quite hard to sight. Shackerstone signal box is visible in the distance.
As we emerged from the bridge, the signal was still 'on', so I gave the signalman a blast on the whistle as a reminder. The signal immediately came 'off', so I politely gave a short 'pop' on the whistle in thanks and continued down the cutting, braking again for the 'dead slow' restriction on the relaid section. The inner home signal is a two-disc L.M.S. pattern ground signal. Where signals are placed one above another, the topmost arm or disc relates to the leftmost route.
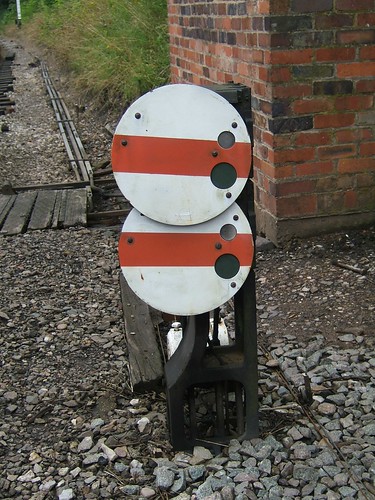
Shackerstone: Driver's view of the inner home. The upper disc reads
to platform 1; the lower disc to platform 2.
This is where it went a bit awry. With a 5-coach train in platform 2, it's difficult to run round and still access the water crane at the end of platform 2 so the special timetable called for arrivals during the day to be into platform 1. But the disc came off for platform 2 and I 'took it', thinking I knew the stopping 'mark' for 'Cumbria' with 5-coaches in platform 2. Unfortunately, I got it slightly wrong, so when we ran round, we buffered up to the coaches still a few feet short of the water crane. We checked the level of water in the tank but thought it imprudent to depart without taking water so we coupled onto our train, had the Guard close the doors and ensure that the barrow crossing at the rear of the train was clear and set back back a short distance so that we could take water.
We had to take water each time we ran round our train at Shackerstone but the signalman routed us into platform 1 after the first train, so we had no further trouble accessing the water crane, although taking water is always a fairly heavy and unpleasant business for whoever is 'on top'. When I was young, I used to watch locomotives taking water at Wolverhampton High Level Station and the LNWR pattern water column is described in the section 'Water Column' in post Wolverhampton High Level Remembered

Water Crane, Shackerstone. Note the brazier.
We made four more round trips to Shenton on the regular timetable, doing good business each time. On most trips, we'd make up a few minutes, only to lose them again waiting for passengers. After the fifth round trip, we'd arranged for Adrian to meet us at the ground level coal storage bunker in the North End Sidings at Shackerstone. Here, with Adrian driving the 'Wetherill' bucket loader, we re-coaled, ready for our two Evening Specials, inevitably increasing our lateness. Movements from the North End Sidings back into either platform line are controlled by a ground disc signal which, because of the distance from the signal box, is electrically-operated. Unusually, the signal is not provided with coloured spectacles to allow the signal to give red or green indications at night. The signal is similar to types which were used extensively on both the Southern Railway and London Underground, where an electric spotlight was provided to illuminate the face of the disc at night.

Westinghouse electrically-operated semaphore ground signal,
Shackerstone No. 7.
The 'Specials'
We watered, completed the run-round and prepared to take the first of the Evening Specials. A relief signalman had taken over in Shackerstone signal box and Garth took over as Guard but the locomotive crew carried on. We were due out at half past five, but it must have been nearer six before we left.

'Cumbria', coaled, watered and with the engine lamps lit, ready to depart with the late-running 17:30 'Special'.
We set off at dusk in that strange twilight where motorists often mistake what they can see so we made sure we kept a sharp lookout. The train was well-patronised with lots of people getting off and on at our intermediate stop at Market Bosworth. In the gathering gloom, we made our sixth journey of the day to Shenton. When leaving the engine at Shenton, extra care was taken during uncoupling, coupling, setting lamps and working points because of the increased risk of slips, trips or falls in the reduced visibility.
As we waited for the "Right Away" from Shenton, the station lighting threw a few small pools of yellow light onto the platform, insufficient to see how advanced station duties were. Eventually, we set off, slowly until we'd passed over the temporary speed restriction at Bridge 21, where the bridge parapet was just visible as we passed, then accelerating up the bank. It had become properly dark and much cooler. The ground was completely black and the line ahead invisible. The sky had dimmed to a deep purple so that the outlines of lineside features like trees, overbridges or telegraph poles were eerily silhouetted against the sky. In the post The Railway at Night, there's a brief description of the problems of running trains in the dark. As visual cues are reduced, hearing becomes more important and drivers had to orient themselves largely by listening to the differing sounds made by various lineside features. At Market Bosworth, there was the usual bustle of activity on the platform then we set off for Shackerstone.
Approaching Barton Lane overbridge, I slowed to 10 m.p.h. and looked out for the outer home signal. The post and signal arm would be invisible - I was looking for a red or green signal lamp. Traditionally, semaphore signals were lit with paraffin lamps, as described in the post here, but the main signals at Shackerstone have been electrified, with filamentary lamps replacing the original oil lamps. The signal was 'off' so we continued our approach, looking out for 'green above red' at the inner home, which would mean we were cleared to platform 1. Having confirmed the signal aspect, I prepared to surrender the Single Line Token to the Signalman, who had to leave his cosy-looking box to wait on the outside landing. As I passed, he gave me permission to pass the Stop Board at the north end of Platform 1 to run round. On arrival, we ignored the activity on the platform to concentrate on uncoupling, drawing forward, setting the hand points towards platform 2 and, once the signalman had 'cleared' the ground signal, reversing to the water crane.
Taking water is not much fun in the day but, at night, the man on top of the saddle tank manhandling the water 'bag' has to be especially cautious. Having taken water for the last time, we moved across to the front of our train for our final round trip to Shenton. Before we left Shenton for the last time, I recorded the scene but, even with flash, there's not much to see.
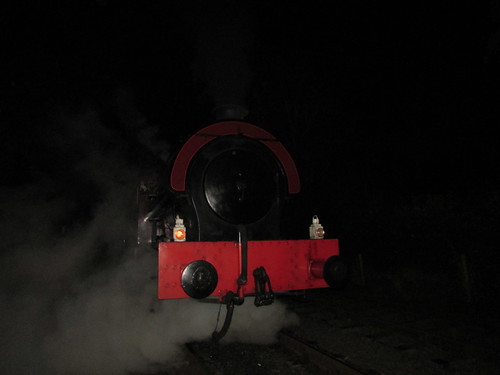
'Cumbria' ready to leave Shenton with the last service of the day to Shackerstone.
Once again, we went through the complex pattern of changing speed to comply with the various slacks, in the dark. This is where a good Fireman shows his colours. We needed enough fire to work the train back to Shackerstone, move light engine to shed, clean the fire and fill the boiler, leaving ideally not more than 50 p.s.i. on the 'clock'. Underdo it and it may be difficult to complete one or more of those tasks; overdo it and the crew may be faced with 'paddling out' excessive fire, wasting fuel (and effort). Jamie had judged matters nicely and everything was in order as the approached the inner home at Shackerstone where, this time, we got 'red above green' - cleared to platform 2, as shown in the special timetable. On arrival, we lost no time in uncoupling, drawing forward, changing the points for platform 1 and backing through the platform to the Ground Frame which gave access to the Loco Shed.
Disposal
We stopped outside the Shed with reasonable pressure to move into the shed (the problem isn't being able to move, it's having sufficient steam for an effective steam brake - without that, you're reliant on screwing on the handbrake to stop), decent water level and a nice 'low' fire. We co-operated on 'cleaning' the fire. The coal we'd been using was pretty good, but tended to produce some 'clinker' where impurities in the coal fuse with the incombustible ash to produce a metallic 'slag'. If left undisturbed to cool down, 'clinker' tends to 'glue' itself to the firebars and can be very hard to remove. The standard approach is to scrape the clinker off the bars whilst hot and break it up, removing it with a 'clinker shovel' or 'paddle' ('paddling it out'), if necessary. I prefer to slide the flat end of a 'long pricker' up and down the bars to detach clinker but other tools, like a 'long dart' or a 'bent dart' may also be needed. There's a general post on Disposal here.
I moved 'Cumbria into the shed for the night and we used the remaining steam to fill the boiler. I had a quick look round the locomotive for anything untoward, checked each wheel centre with the back of my hand for running 'hot' then (because "The job's not done 'till the paperwork's done") set about completing the three-page 'Fitness To Run' ('FTR') report completed for each day's steaming. Meanwhile, Jamie and Richie isolated the various cocks and tidied things away. My shift had been 11 hours - Jamie's and Richie's even longer but we all agreed that we'd had a good, if tiring, day.
On the footplate
The description above is specific to working the trains for 'Operation: Market Bosworth'. Footplate work is very varied according to the locomotive in use and the 'diagram' (the details of the movements to be carried out). More posts on this topic are listed below:-
On the Footplate (Part 1).
Stanier '8F' inauguration at Peak Rail.
MIC - The Working of Trains.
Driving Turn at Peak Rail - Part Two: Driving Experience.
A Day on the Footplate (2).
Peak Rail Winter Service 2013.
Other posts on this site featuring 'Cumbria'
The Battlefield Line Steam Gala.
The 'Austerity' 0-6-0ST locomotive.
'Santa Specials' at The Battlefield Line - Christmas 2015.
Sunday at Shackerstone.
Teddy Bears' Picnic (by another author).
'Operation: Market Bosworth' - The Battlefield Line 1940s Weekend 2016
My Pictures
Battlefield Line 1940s Weekend 2016.
All my Battlefield Line pictures.
[Update 13-Aug-2017]
