skip to main |
skip to sidebar
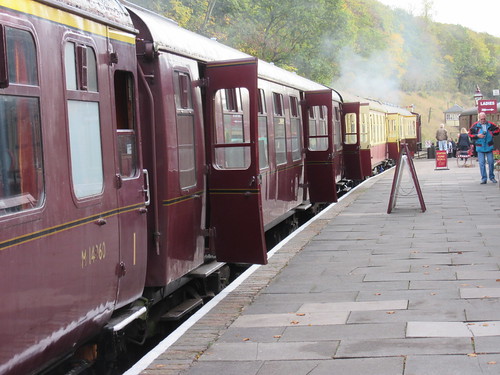
The Battlefield Line held a Steam Gala on the weekend of 23rd, 24th and 25th October. Four locomotives were in steam - 7820 'Dinmore Manor', 3205 'Collett Goods', Hunslet 3794 'Cumbria' (an 'Austerity Tank') and resident Peckett 1859 'Sir Gomer' (now in blue livery).
On the Sunday, I was 'marked' to drive visiting 'Austerity' 0-6-0ST locomotive 'Cumbria'. There's more information about 'Cumbria' on the Furness Railway Trust Site here. I turned up early as 'Cumbria' and 'Sir Gomer' were booked to double-head a demonstration freight train departing Shackerstone at 08:45. I found 'Cumbria' and 'Sir Gomer' outside the shed, coupled together bunker to bunker. The fire in 'Cumbria' was being lit so I set about oiling round. Fortunately, 'Cumbria' is in 'as-built' state without mechanical lubricators on the framing and the mechanical drive that necessitates so access was not a problem and I was able to climb into the motion to attend to the eccentrics and big ends without difficulty. I've lamented before that I find the other 'Austerity Tank' I drive fairly regularly, 'Lord Phil' at Peak Rail, difficult to prepare because of the 'modernisation'.
Both engines were in steam in plenty of time but both engines needed to take water and Danny said we'd need coal after our freight train run. So, coupled together, the two engines trundled over to the water column on platform 2 road. We stopped so that 'Sir Gomer' could take water first and whilst he took water, we uncoupled. Because the freight train was stabled in the DMU siding, we had a bit of a shunt to undertake. 'Sir Gomer' went across to the DMU siding, attached the double-braked freight train and drew the whole train down to the North End, clear of the crossover to the single line. Meanwhile, we took water and Phil, the signalman, loosed us to the Section Signal. With the crossover reversed, 'Sir Gomer' propelled the whole train onto us, with Danny "on the floor" giving hand signals to Brian on 'Sir Gomer'.
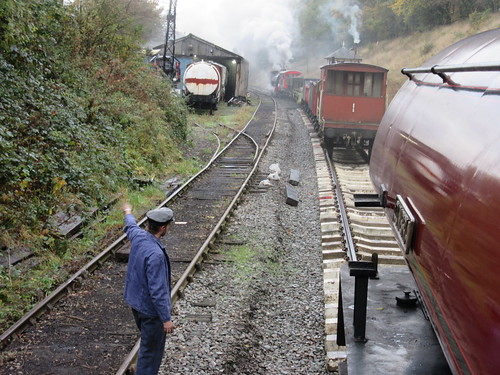 With Danny controlling the move, 'Sir Gomer' propels the freight train onto waiting 'Cumbria'.
The goods train was coupled to us, uncoupled from 'Sir Gomer' and, with the crossover set normal again, 'Sir Gomer' moved north along platform 2 road, clear of the crossover. With the crossover reversed again, we then propelled the freight into platform 1. Finally, 'Sir Gomer' came across and coupled "on top of us".
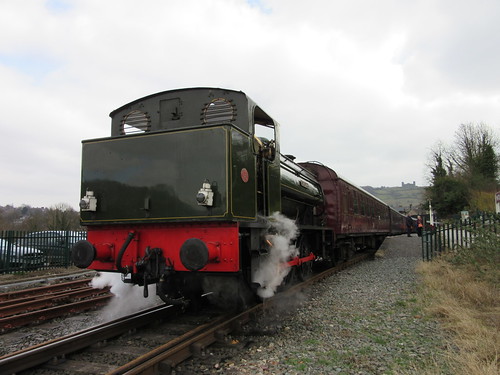
 'Cumbria' and 'Sir Gomer' ready to leave Shackerstone with the 08:45 freight.
Once the Guard had arrived and checked the train, we were "Right Away" on time with Danny supervising firing by the cleaner, Jacob. As we passed the signal box, the signalman, Phil, showed the Single Line Staff to 'Sir Gomer' but handed it to me. In steam days, it was always the rearmost locomotive which carried the Staff.
Peak Rail has reversed this tradition so, when top-and-tailing there, it's the leading engine which carries the Staff.
We made a slow departure - the limit is 5 m.p.h. over the crossover from platform 1, Dead Slow over the relaid track panels, then 10 m.p.h. up the bank until clear of the Barton Lane road bridge. We then picked up a bit of speed. At the two foot crossings, there are 'W' boards ('Whistle') and 'Sir Gomer' complied. In this area, there was a group of photographers trackside but there were various people waiting for us to pass at various places down the line.
 A group of photographers capture the 08:45 freight.
As you approach Market Bosworth there's an 'SW' board ('Sound Whistle' - I think the Great Western originally preferred this formulation) but 'Sir Gomer' didn't whistle. Then Danny shouted "Whistle!", so I did. It appeared that 'Sir Gomer's' whistle chain had become detached, leaving the engine mute. Although we were not booked to stop, Brian brought the train to a stand in the platform so that a whistle repair could be effected and, when the Guard gave the 'tip', both engines whistled and we set off for Shenton. For some time, there had been a 15 m.p.h. slack passing over the bridge near the south end siding, but this had recently been downgraded to a 5 m.p.h. limit. Once clear of this, we were able to hustle on to Shenton.
Leaving the two engines coupled together, we ran round our double-braked train (that is, a brake van on each end), so we didn't have to do the extra shunt which would have been needed to get a single brake van onto the other end of its train.
This used to be a question for shunters - simple loop, one engine, set of wagons, one brake van, what are the moves?
The arriving train stops with the brake van just outside the loop points. Van brake is applied and brake van is uncoupled. Engine draws wagons into station and sufficient wagon handbrakes are applied before engine uncouples, draws forward to headshunt, reverses round the loop to the brake van, attaches it and takes it forward round the loop to the headshunt, then propels the brake onto the waiting wagons. Brake van is attached to wagons, brakes set as required, engine uncouples, forward into headshunt, reverse around the loop until outside the loop points which are then set towards the wagons. Finally, engine moves forward onto the wagons. Job done!
Having used the Single Line Staff to work the points for us at the Shackerstone end of the loop, the Guard showed the staff to me, as I was now the leading engine, but handed it to 'Sir Gomer'. As soon as the Guard was "back in his box" at the rear of the train, he gave the "Right Away". Once we were clear of the speed restriction in Shenton Station, I was able to open 'Cumbria' up a little.
We found her a rather noisy engine. Both injectors were very loud (and the one on the fireman's side wasted a lot of water). In full first valve with the gear notched up one notch (she went a bit 'off-beat' on two notches), there was a loud roar from the chimney - a mixture of the expected four discharges per revolution of the wheels and a continuous noise, possibly turbulence caused by the vacuum ejector or misalignment of the blast pipe. At least the row drowned out the occasional thumps and bangs from the axleboxes and big ends. But, having said that, she gamely hauled our train back to Shackerstone, where we arrived about 'right time'. We cautiously made our way into platform 1, passing the 'Collett Goods' which had 'hooked on' to the 4-coach Griddle Car set in platform 2, ready to work the ten o'clock departure.
We uncoupled from 'Sir Gomer', leaving Brian to propel our train back through platform 1 and stable it in the DMU siding, whilst we kept out of the way on the 'back road' at the north end. 'Sir Gomer' returned, picked up the 4-coach 'Set 2' from the 'front road' at the north end and positioned it in platform 1 ready for the eleven o'clock hauled by 'Dinmore Manor'. Once the coaching stock was removed, we were able to shunt across to the 'front road' to await coaling, after which there was time for a bit of breakfast before our next duty.
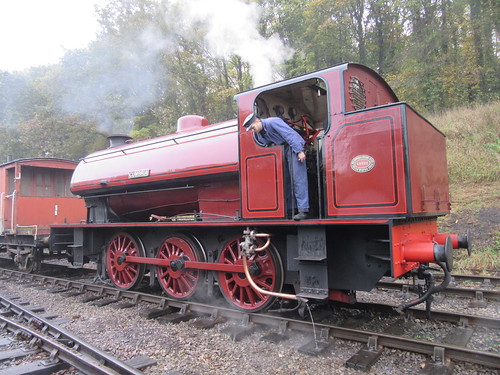
 3794 'Cumbria' awaiting coaling.
Passenger trains were booked to depart Shackerstone hourly. The 'Collett Goods' was back in good time and enthusiasts scuttled across from the train they'd just arrived on to platform 1 for another trip down the line on the eleven o'clock departure. Once 'Dinmore Manor' had left with its train, we were able to shunt via platform 1 to couple onto the head of the 'Griddle Car Set' in platform 2 ready to work the 12 o'clock.
 'Cumbria' ready to take the 12 o'clock departure.
We were a little late away. Although we had a good run down to Shenton, we were still a couple of minutes late at Shenton, as the Guard pointed out. We ran round smartly and had another good run back to Shackerstone, this time, of course, chimney leading and ran into platform 2 about right time. The 'Collett Goods' was ready to take the one o'clock out of platform 1 and, when that departure had left, 'Dinmore Manor' was able to take her place at the other end of the train we'd brought in.
Dinmore Manor was first restored to traffic in 1995 at Tyseley Locomotive Works. When she was first steamed, they were keen to try her out looking for any problems before she left Birmingham, and I was fortunate enough to have her for a few hours whilst we ran up and down the demonstration line continuously. I'd been told that, to celebrate the event, I could allow Museum Volunteers to have a footplate ride on this "fresh off" (the term for a locomotive emerging from the works after overhaul) and it was a very jolly time. Then, she was in green livery but she now sports unlined black with the original British Railways insignia on the tender, affectionately called 'the Lion astride a Mangle-wheel'. There's more about the '7800' class here and more about the preservation group which owns 'Dinmore Manor' here.
 'Sir Gomer' stands in platform 1 and 7820 'Dinmore Manor' waits to take the two o'clock from platform 2.
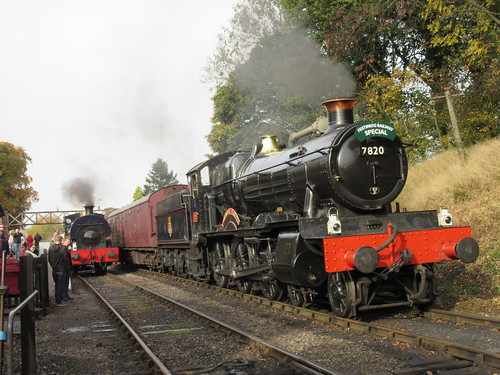
The 'Collett Goods', working tender first, arrived back in platform 1 in plenty of time to allow the 2 o'clock to leave 'right time'.
 3205 Collett Goods, having left with the one o'clock is back before 2 o'clock.
We then had plenty of time to take water again and couple onto the stock in platform 1. When 'Dinmore Manor' arrived back, we "got the road" for the 3 o'clock departure and, receiving the "Right Away" from the Guard, we set off on our last round trip of the day.
 'Set 2' coaches in platform 1, with 'Cumbria' just visible at the far end, ready to take the 3 o'clock train.
We had another pleasant trip, although some doubts started to be expressed as to whether we should have taken on a little more coal. You often hear talk of "sweeping the tender out" to get home and sometimes it's true. The picture below shows Jacob sweeping out our bunker. When we arrived back in platform 1 at Shackerstone, 3205 and 7820 were ready to double-head the last train of the day from platform 2.

Jacob sweeping out the bunker.
'Sir Gomer' had already disposed and moved into the shed so we knew we would have to shunt our train out of the way ourselves. After the 4 o'clock had left, we were able to run round our train using platform 2, couple onto the stock and create vacuum. Since this would be a propelling move, Danny moved to the head of the movement, to keep a look-out and give handsignals. Because of the line curvature, these handsignals were given on the left of the train to Jacob on the fireman's side of the footplate and he relayed them to me. We couldn't move the stock quite as far as we'd hoped because somebody had parked a Land Rover across the siding. Once the handbrake had been applied to the train, we uncoupled and scuttled off to the shed.
Danny had judged matters to perfection. Whilst we'd had adequate steam to complete the shunt in safety (as boiler pressure falls, the effectiveness of the locomotive steam brake is reduced) with enough steam left to fill the boiler (using the 'best' of the two injectors), there was very little fire left to require 'cleaning' and little clinker. The boiler could be left to cool naturally, minimising the stresses and reducing the chances of creating leaking tubes and stays.
The day had been dry and I understand passenger numbers had been healthy. All-in-all, an interesting and satisfying day.
Related posts on this site
'Sir Gomer'
The 'Austerity' 0-6-0ST locomotive.
All my Battlefield Line posts.
My Pictures
Battlefield Line Steam Gala, October 2015
All my Battlefield Line pictures.
[Moves in connection with coaling corrected: 4-Nov-2015]
Introduction
Railway signalling in Britain was originally based on the operation of 2-aspect semaphore signals by a single wire and operation of points using rodding. This blog has an (incomplete) series of articles about these techniques, starting at Railway Signalling in Britain: Part 1: Introduction.
In continental Europe and its export markets, a completely different approach developed using double wires kept under tension to control each semaphore signal and each set of points. This technique was usually employed with a type of lever frame described as 'Turnover'.
The double wire approach conferred some advantages, most importantly allowing points to be operated at greater distances from the signal box than using rodding and allowing semaphore signals provided one or two arms to be controlled from one double wire. A further potential advantage compared with single-wire operation of signals is that, with single wire operation, the first part of the lever movement may be 'wasted' in taking up the slack. Similarly, if the bell cranks in point rodding runs become worn, that results in 'lost motion' of the lever. Because both wires in the double-wire approach are maintained in tension by Compensators, 'lost motion' is eliminated.
There's an excellent 'primer', written in 2004 by Dr James B. Calvert, here.
The 1932 book ‘Lewis’s Railway Signal Engineering (Mechanical)’ (book reference [1] below) has a chapter on Double Wire Working which you can read here.
Details of design and signal aspects displayed vary from country to country. The paragraph below applies to Poland.
Signal arms project to the right of the post (rather than to the left as in Britain) and arms have a distinctive shape and colouring.
In a signal provided with one arm (often used for 'starting' or 'departure' signals) the arm stands horizontal for 'stop' and is raised to an angle of 45 degrees for 'proceed'.
In a signal provided with two arms (often used for 'home' or 'entrance' signals) the upper arm stands horizontal and the lower arm stands vertical for 'stop'. 'Proceed at line speed' is indicated by raising the upper arm to an angle of 45 degrees and maintaining the lower arm vertical. 'Proceed at reduced speed' (for instance, entering a loop line) is indicated by raising the upper arm to an angle of 45 degrees and lowering the lower arm to an angle of 45 degrees.
At night, coloured lights are displayed through moveable spectacles.
Thailand
My first experience of double wire working of points and signals was when my firm supplied equipment for a Train Despatcher system in Thailand. I made a number of visits to the country during the installation and commissioning phase. Most of the signalling installations were double wire, controlled from distinctive Turnover Frames. At one signal box (Hua Hin, I think), the smiling signalman let me work the frame between trains to my heart's content. I was fascinated with levers which turn through 180 degrees, where the tip of the lever is moved through an arc of over seven feet. Viewed from the left of the frame, the lever arc is from about "11 o'clock" to "5 o'clock" Having been brought up on Mr. Webb's frames for the London and North Western Railway with 'hoop' catch handles, I found Turnover Frames very odd. Having pulled the lever to about the "2 o'clock" position, you then need to reverse your grip on the handle so that you can push it down to the "5 o'clock" position. The signals were of the 'German' upper quadrant pattern, common in Europe and further afield, where the signal post and arm design is very different from British practice and, most confusingly, when viewed from the front, signal arms extend to the right of the post.
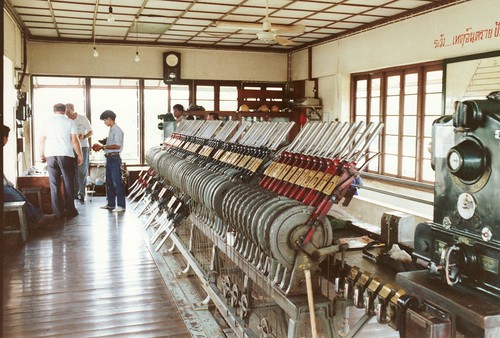 A Signalbox with a large Turnover Lever Frame.
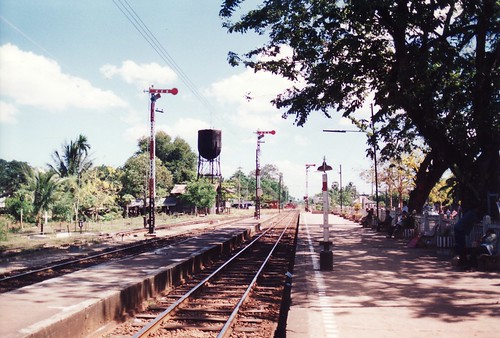 Three semaphore 'starting' signals at a wayside station.
After the Train Despatcher project was completed in 1989, I returned to Bangkok to assist in setting up Bangkok Railway Museum and I arranged for a small Turnover Frame to be exhibited, along with a pair of Electric Token machines, representing a wayside station. There's a short post about the setting up of the Bangkok Railway Museum here, with links to pictures.
Poland
In 2003 I accompanied my friend Mike to Poland for steam locomotive driving on 'The Wolsztyn Experience', briefly described here. Out in the country, most signals were semaphore of the 'German' pattern, although colour-lights prevailed where we joined the main lines at Posnan, Zybasyn and Lesno. I was able to have a good look at the turnover frame at one of Wolsztyn's two signalboxes.
 Wolsztyn Signalbox: Detail of Turnover Lever Frame.
 A row of semaphore signals at Wolsztyn. The black metal box displaying a diagonal white marking is a mechanical point indicator.
Indonesia
Visiting Yogyakarta, Java in 2010, I made a brief visit to Maguwo station which has semaphore signals and points controlled using the double wire system from a turnover frame. Signals were similar to the 'German' pattern but the arc of the levers in the Turnover Frame (viewed from the left) was restricted, extending from "12 o'clock' to "5 o'clock". There's a brief report here.

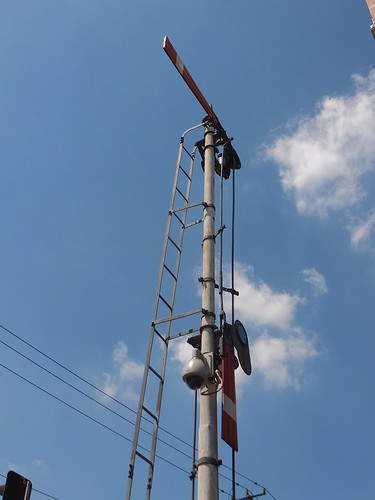
Part of the Turnover Frame at Maguwo, Indonesia.
 Maguwo: Single arm 'starting' signal with two arm 'home signal' just visible left background. Note the point indicators and point/signal wires carried on pulleys
Russia
On my trips to Russia, I only found colour light signals in use but at the Rolling Stock Museum, Novosibirsk (which I visited in 2012 as part of a trip from Ulaan Baatar to Moscow, described here), I found a very Germanic-looking 2-arm 'Entrance' signal with a Signal Cam Wheel mounted on the post.
 Click on image for larger view
Upper part of a 2-arm home signal, showing the post-mounted Signal Cam Wheel operating both arms through push rods.
Vietnam
On my second visit to Vietnam as part of my 'Far East 6' trip in 2013 (described here), I was able to see a little more of the railways which mainly feature colour light signals. But in places I found semaphore, double-wire operated signals, as shown below. However, these were lower quadrant arms, extending to the left of the post. The front of the arms was red and white and they would have looked almost British, apart from generally having two 'stop' arms, one of which was usually hanging straight down. I presume turnover frames controlled these mechanical installations but I didn't have an opportunity to confirm this.
 Click on image for larger view
Lower arm of a 2-arm 'Entrance' signal, showing the post-mounted Signal Cam Wheel operating both arms through push rods.
China
In 2013, I travelled to Tibet by train from China: the journey is described in the post Travelling on the Qinghai - Tibet Railway. As expected, all the railway signals were colour light. Then I had a couple of days in Shanghai and, in Shanghai Railway Museum, I found a 2-arm semaphore signal similar in appearance to those in use in Vietnam. However, the Chinese example had two escapement mechanisms near the base of the post rather than a conventional Signal Cam wheel so I'm not certain it was intended for double wire operation.
A preserved 2-arm 'home' signal from the Tai Yuan Railway Administration, now on display at Shanghai Railway Museum (complete with CCTV camera).

Detail of escapement mechanism at the base of the post.
Britain
The Board of Trade did not permit operation of points using rodding which were more than 350 yards from the controlling lever frame. The use of double-wire operation of points was not authorised until 1925, after which a few installations were made, either as complete turnover frames or simply as a short extension to a conventional lever frame.
Rowsley Down Sidings had one of the early LMS non-interlocked turnover frames - a rather crude affair where a counterweight near the end of each lever held it 'normal' or 'reverse'. In this design, the arc of the levers in the frame (viewed from the left) was from "10 o'clock' to "3 o'clock". There's a picture on Dominic Beglin's page Old Pictures Part 1. The LMS then produced a more refined frame design called the 'LMS New pattern Turnover Frame'. There's a description of some of the LMS double-wire initiatives on Dave Harris's Derby Signalling Web Site page Cottage Lane Crossing. Barrow Hill Up Sidings Box also used this pattern frame and there are more details on the indispensible site 'The Signal Box' here. When Barrow Hill Up Sidings Box was abolished, its Turnover Frame was preserved by the National Railway Museum. Apparently, both the Great Western Railway and the London & North Eastern Railway Railway had a few Turnover Frames.
Peak Rail
Peak Rail have a project in hand to install a Midland-pattern signal box at the present northern terminus, Rowsley, to control the points at the north end of the station. This will feature double-wire operation from a frame of the 'LMS New pattern Turnover' design (part of the Barrow Hill Up Sidings Turnover Frame mentioned above) housed in the structure from Bamford Signalbox (relocated again). Progress on this project is shown on Dominic Beglin's page Latest Project News. There's also a discussion thread on 'The Signal Box' site here.
Related articles on other sites
Two-Wire Transmission.
Double Wire installations in Australia (A very detailed article by Andrew Waugh).
The Signal Page (Information on signalling practice in many countries).
Book references
[1] ‘Lewis’s Railway Signal Engineering (Mechanical)’ revised and enlarged by J H. Fraser (Constable & Company Ltd. 3rd edition 1932).
[2] 'Modern Railway Signalling' by Tweedie and Lascelles (Blackie and Son Ltd 1925).
My pictures
Railways in Thailand (1989).
Polish Railways (PKP).
Java: Maguwo Station.
Railways in Vietnam.
Shanghai Railway Museum.
 'Austerity' Elevation (Industrial Railway Record).
Introduction
In World War II, there was an urgent need for additional shunting engines to deal with the massive volumes of war materiel being produced. To save time, Robert ('Robin') Riddles at the Ministry of Supply chose an existing design - the Hunslet 18-inch industrial - which, with some modifications, was produced in large numbers by Hunslet and other locomotive manufacturers. After the War, many of these locomotives were 'demobbed', finding a new life in collieries and power stations. A total of 75 ended up in LNER stock (classified as 'J94') and a few of these were eventually transferred to Rowsley shed, working on the notorious Cromford and High Peak line. Some new building continued after the War up to 1964 bringing the total build to 485 locomotives.
Hunslet re-acquired some of the surplus locomotives and converted them to the 'Gas Producer' system, based on the work of L. D. Porta in Argentina.
As 'Austerities' were scrapped, around 70 were purchased by preservation groups and, over the years, many of these have re-entered service.
Injector
Two live steam injectors, which force cold water from the saddle tank into the boiler, are provided on 'Austerity' tank locomotives. The Davies and Metcalfe 'Monitor' Live Steam Injector, used on the class, has a good reputation and it's well-worth studying the manufacturer's publication here.
'Austerities' I've driven
The first 'Austerity' I worked on was 68009, on which I took my practical driving examination at Tyseley. We were later re-united at the Battlefield line, by which time she was '8009'.
Next came an 'Austerity' at the North Norfolk Railway. This engine's claim to fame was that she was fitted with a Giesl Ejector, replacing a standard blast pipe and chimney. I believe N.C.B. fitted a number of their 'Austerities' with this feature.
At Peak Rail, 'Duke' was a regular performer. Eventually, this 'Austerity' posed as 68006 (one of the Rowsley 'Austerities').
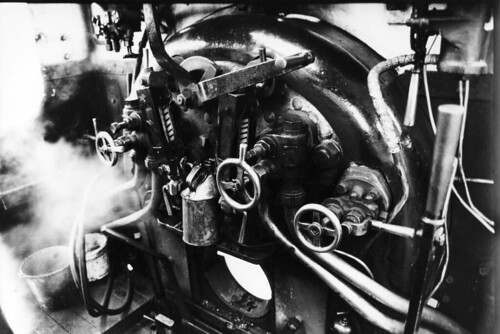 The boiler backhead of 'Duke' (Photo: Marion Reeves).
'Warrington' was the other 'Austerity' at Peak Rail when I joined. I'd first met this locomotive at Dinting Railway Centre as 'Warrington' with the plain chimney cowling I never liked. She remained 'Warrington' for a time at Peak Rail but, thankfully, a proper cast chimney was eventually substituted. Repainted black and carrying the number 68012, she revived memories of the Cromford and High Peak when running with 68006. Then, she assumed her former military identity as WD150, with copies of the nameplates she carried for a time in military service 'Royal Pioneer'.
 WD150 'Royal Pioneer' at Rowsley.
Back at the Battlefield Line, I drove the well-known 'Austerity' from N.C.B. service 'Whiston'.
'Lord Phil' arrived at Peak Rail directly from restoration and required a fair bit of extra work before becoming a reasonably reliable engine.
 Peak Rail: 'Lord Phil' at Matlock, ready to haul the service train back to Rowsley.
In contrast, WD132 'Sapper' which was at Peak Rail for a time was always a rock-solid performer. It had a 'Kylchap' exhaust combined with the plain chimney cowling I'm not a fan of. 'Sapper' has her own 'Loco Profile' here
 'Sapper' operating a 'Santa Special' at Peak Pail.
During Peak Rail's 'Blazing Saddles' event, I got to drive Dean Forest's 'Austerity' 'Wilbert' which I found willing but in need of Tender Loving Care.
 'Wilbert' on the rear of a down train at Darley Dale at the Peak Rail 'Blazing Saddles' Event.
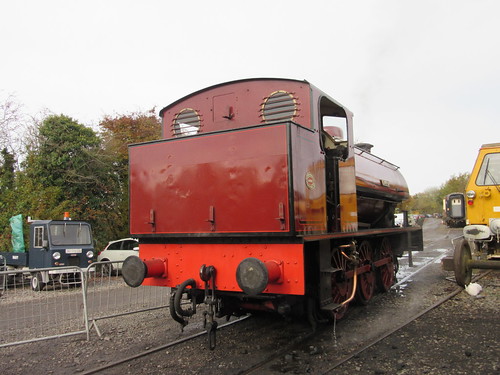
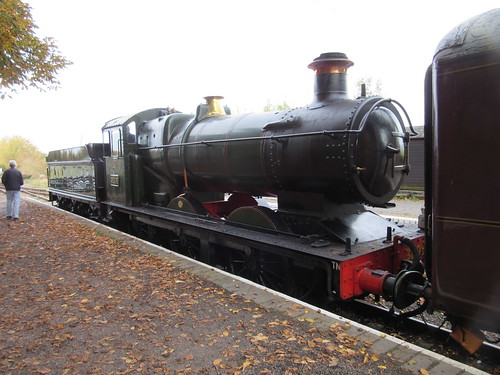
Most recently, I drove 'Cumbria' at the Battlefield Line, looking quite handsome but also in need of some mechanical attention.
 Battlefield Line Steam Gala, October 2015: 3794 'Cumbria'.
The most unlikely 'Austerity' I've driven is Hunslet 3781, rebuilt by the Mid-Hants Railway as a very convincing 'Thomas'. I drove that that at the Battlefield Line for a 'Thomas' event.
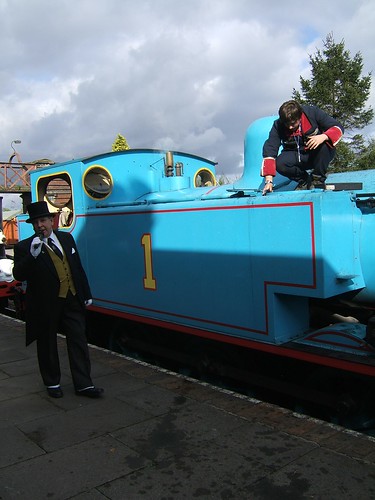
Hunslet 3781, rebuilt as 'Thomas'.
That's a total of 10 'Austerities' I've driven (not counting the 'multiple personalities' some engines adopted at various times).
Related articles on other sites
There's a useful 'Wikipedia' article on 'Austerities' here and a list of preserved examples here.
THE 18in HUNSLETS (article by H. A. Gamble for the Industrial Railway Record)
Austerity 0-6-0st type as modified by L.D.Porta & Hunslet (Article by Martyn Bane).
The 'Austerity Locomotive Owners Association' (A.L.O.A.) has information as part of the Scottish Railway Preservation Society Steam Web Site (select the 'A.L.O.A.' tab).
[A.L.O.A. url updated 23-12-2016, 13-Aug-2017: Injector data added 13-Aug-2017]
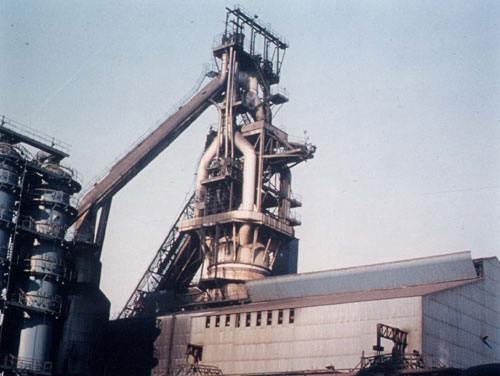
Steelmaking in Bilston
My first visit to a steelmaking plant was when I was at school when I joined an educational tour around the Stewarts and Lloyds Steelworks at Spring Vale, Bilston. I think this started my interest in steelmaking and heavy engineering in general. At Spring Vale, there was one Blast Furnace, called 'Elizabeth', built in 1954. Once 'lit' blast furnaces are kept going as long as possible. A 'campaign' can last 10 - 15 years. The blast furnace produces iron from iron ore in a batch process. Every few hours, the furnace would be 'tapped' to release the new batch of 'blast furnace metal'. Originally, this would be sand-cast into 'pigs', allowed to solidify, then broken up and carried away for further processing which involved melting it again. In an 'Integrated Steel Works', blast furnace metal is kept molten and transferred immediately for further processing. The Spring Vale Works had a number of electric-arc furnaces, used for converting iron into steel.

The Blast Furnace at Bilston (Photo: Wolverhampton City Council).
I wasn't able to visit the Bilston steelworks again but, after I started visiting railway signal boxes (there's a brief introduction here), I was able to watch the traffic flows in and out of Bilston steelworks - iron ore, coke, coal and other minerals in; steel in different forms out. Various posts with the label 'Railway Signalling' mention this traffic and the post Spring Vale Sidings Box details the main line signal box adjacent to the steelworks.
Re-nationalisation of the steel industry
In 1967 the steelmaking industry in Britain was nationalised (for the second time) as the British Steel Corporation. Rationalisation and heavy investment followed to modernise the industry. The more efficient Basic Oxygen Steel process was introduced at certain sites, together with new, larger blast furnaces which, whilst still batch-orientated, had a much larger throughput than 'Elizabeth' at Bilston steelworks. So the Bilston steelworks became less economical, leading to closure in 1979. The works was demolished and there is little trace now of the Bilston works. There's a brief history of Bilston Steelworks in the article:-
The History of Wolverhampton: The City and & its people: Bilston Steel Works.
There's a more detailed account in the article:-
Bilston Steel Works.
My introduction to steelmaking on Teesside
I spent a few years working at Contactor Switchgear (Electronics) Limited in Wolverhampton and, although much of the equipment was destined for various steelworks, I don't think I managed a site visit.
It was only after I set up on my own as an electronics consultant that I was invited to visit a steelworks in the north-east to help out with a problem, as described in the post Flying. That post concluded with the remark "I'm glad to report that our hastily-constructed control module performed better than I'd dared hope and we subsequently did quite a bit of work for various steelworks supplying materials handling equipment of our design".
I'd been asked to make that first trip by Babcock-Moxey in Gloucester. I was already familiar with Babcock & Wilcox from my work on equipment for West Thurrock Power Station (described in the post The World of Work) but I didn't know much about Babcock-Moxey. Later, I found out that 'Moxey' had been set up in 1935 in Birmingham to produce conveyor systems. By 1963 they had been taken over by Winget Ltd and moved to Gloucester then, in 1968, Babcock & Wilcox acquired the Winget activities in Gloucester where they were producing Bucket Wheel Stacker Reclaimer machines and the associated conveyor systems.

Redcar: Bucket Wheel Stacker Reclaimer (Photo: Babcock Moxey).
Electronic Vibratory Feeders
The work we'd become involved in was the manufacture of Electronic Vibratory Feeders for bulk materials handling. Conventional Vibratory Feeders had been in use for many years where a shaker table is deliberately vibrated by a motor which imparts a circular or elliptical motion to the table so as to move the material being handled. This can be particularly helpful in discharging material from a hopper, for instance. Babcock Moxey were operating at the high-capacity end of the market, where material flow rates of up to 6,000 tonnes per hour were required. At these high throughputs, wear and maintenance costs with conventional vibratory feeders can be unacceptable so a Babcock Moxey subsidiary company had produced a design for an electronic vibrator controller for these applications.
The design used 440 volts single phase 50 Hertz a.c. which was half-wave rectified by a high power thyristor. By providing phase angle control of the thyristor, control of the power of the output pulses was achieved. These pulses were applied to a large electromagnet designed by our client for each application. The electromagnet was coupled to the shaker table and, in between pulses, mechanical springing restored the shaker table to its original position. Although we could control the thyristor quite readily and repeatably, achieving the rated output relied crucially on getting the spring rates correct and that could prove quite difficult.

One of our Electronic Vibratory Feeders, rather dusty after many years in service.
Babcock Moxey and the modernisation of the steel industry
Babcock Moxey had wide experience in controlling material flow in heavy industrial plant and undertook a number of major projects for British Steel Corporation, in addition to projects for the National Coal Board, the Central Electricity Generating Board and various overseas customers. The projects for British Steel Corporation were:-
Lackenby (1970)
Scunthorpe (1972)
Cleveland (1972)
Clay Lane (1972)
Consett (1973)
Redcar (1973)
Port Talbot (1974)
Llanwern (1974)
Hartlepool (1974)
Redcar (1975)
Hunterston (1977)
Port Talbot (1978)
Port Talbot (1982)
During this period, my firm supplied a number of variations of electronic controller for Vibratory Feeders and I was able to visit most of the sites in the North East to assist during commissioning. When I can, I'll add more about my visits to British steelworks.
In 1988, the Gloucester offices were closed and Claudius Peters Group GmbH (part of Langley Holdings plc) acquired the business. There's a brief history of Babcock Moxey at Gloucester here.
Basic Oxygen Steelmaking
Modern steelmaking largely relies on the Basic Oxygen Steel process for the economic production of steel, rather than the earlier Bessemer process, Open hearth furnace or the Electric arc furnace methods. There's a description of the Basic Oxygen Steel process here. Tata Steel have a very easy-to-follow video here. This is one of an excellent series of Teaching Resources provided by Tata Steel, listed here.
Re-privatisation of the steel industry
Also in 1988, the steel industry was privatised again under the trading name 'British Steel'. Despite the modernisation, difficult times lay ahead and, in 1999, British Steel merged with the Dutch steelmaker Koninklijke Hoogovens to form Corus. Further rationalisation ensued and Corus was taken over by the Indian company Tata Steel in 2007. The economic prospects for the British steel industry continued to deteriorate during the general recession and Tata Steel closed the massive Redcar blast furnace in 2009. Two years later, the Thai-owned Sahaviriya Steel Industries (SSI) purchased the Redcar plant which re-opened in 2012 but the group collapsed into liquidation in October 2015 with the loss of around 2,000 jobs. 2015 is proving an 'annus horribilis' for the steel industry. Tata Steel have announced plans to cut 900 jobs at its Scunthorpe site and a further 270 at Dalzell plate rolling works in Motherwell and the Clydebridge plant in Cambuslang. In addition, Caparo Industries have been placed in administration, threatening up to 1,700 jobs, just days before I wrote this.
When I was writing the post Railways around Preston, I was reminded that there remained one passenger line in the area I'd not travelled on - the Preston to Ormskirk line. This had been a double track main line with services from Liverpool Exchange to Preston and East Lancashire but it is now withered to a single line from Farington Curve Junction near Preston which terminates at Ormskirk, where there is now an 'end on' connection with the Merseyrail network which operates an electric train service to Liverpool.
Incidentally, there's another 'end on' connection between Merseyrail and Network Rail at Kirkby, on what was the Liverpool - Wigan Line of the Lancashire and Yorkshire Railway. I'd tried out this service, just over a year earlier, as described in the post Day Trip to Southport and Liverpool (Part 2). Perhaps the service from Liverpool Lime Street via St. Helens to Wigan North Western on former LNWR lines is more convenient.
Keen to try out the Ormskirk line before it changes any more, I decided on a trip on Saturday 17th October 2015. The first part of my journey, to Preston, is described in the post Wolverhampton to Preston by rail.
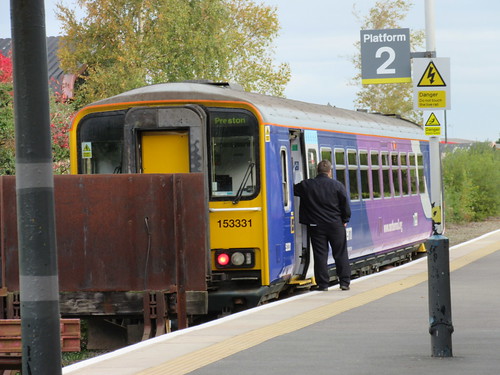
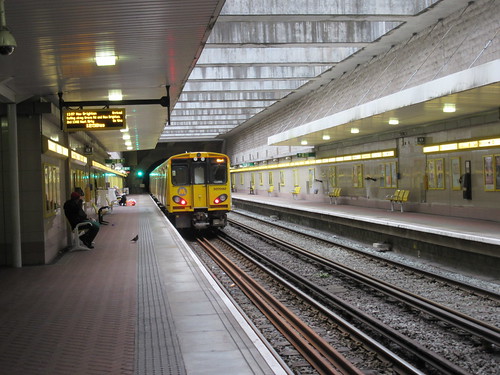
On arrival at Preston, I made my way to platform 1 for the 10:08 to Ormskirk. After a couple of minutes, a single-car Class 153 rumbled into platform 1 from the south.
 The Ormskirk train arriving at platform 1.
I was quite surprised at how many people were waiting to board the service. The Driver and Guard changed ends and we departed on time, taking the Up Slow to Farington Curve Junction where the double-track East Lancs Line diverges to the right. We initially joined the East Lancs Line but, within 100 yards, we had taken the crossover and the right hand route leading to the single line to Ormskirk.
After a little less than three miles, we slowed for the approach to Midge Hall Level Crossing, which is provided with manual controlled barriers and skirts. A 2-aspect colour light signal of 1970's vintage beckoned us over the crossing but we paused momentarily to pick up the single line electric token to Rufford. I only glimpsed the British Rail pattern signal box provided in 1972 as part of the Preston area resignalling. At the time, double track was retained between Farington Curve Junction and Midge Hall (presumably worked 'Track Circuit Block') but it has since been singled (so I assume 'Tokenless Block' is now used).
 Midge Hall Level Crossing.
About two and a half miles beyond Midge Hall, our first station stop was at Croston, which features a handsome stone former station building now in private hands. A station noticeboard displayed a poster for Community Rail Lancashire. The Preston - Ormskirk line is one of two lines in the West of Lancashire Community Rail Partnership (the other is the Wigan - Southport line, which I described briefly in the post Day Trip to Southport and Liverpool (Part 1)). A second poster at Croston featured the history of the station.
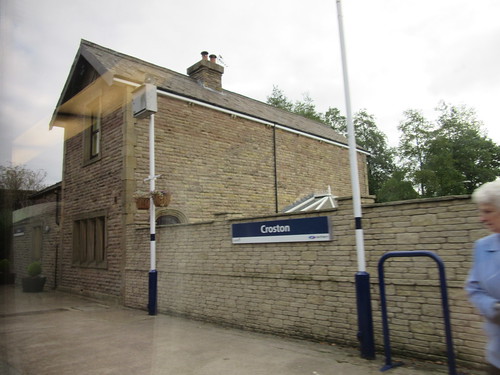 The former station building at Croston.
We were passing across a flat plain, brightly illuminated by a low sun, with the hills of East Lancashire in the background. It was all very attractive and pastoral whilst the 'click-clack' of the rail joints was a reminder of how little fishplated track remains. The driver frequently sounded the horn as we approached minor level crossings with user-worked gates.
 "It was all very attractive and pastoral".
We crossed over the River Douglas and stopped at Rufford station. This retains a level crossing with manually controlled barriers and skirts, a passing loop, two platforms and an inelegant 'Portacabin' signal box. The waiting facilities look like converted garden sheds, painted white - one step up from 'bus shelters', I suppose. The Midge Hall - Rufford electric token was surrendered and the Rufford - Ormskirk one train token issued.
Just over two miles beyond Rufford, we passed over the double-track Wigan - Southport line mentioned above. Originally, the (then double track) Ormskirk line made a triangular connection with the Wigan - Southport line just south of Burscough Bridge station on the Southport line. We stopped at Burscough Junction a shadow of its former self, where only the old Up platform is now used.
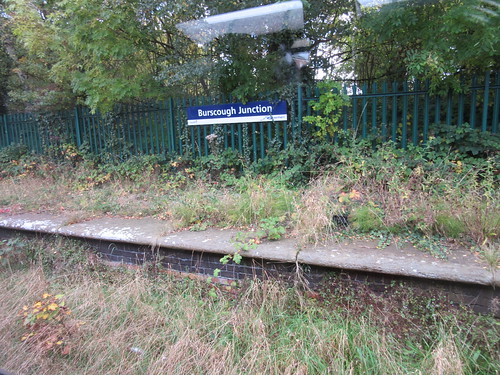 Burscough Junction, showing disused Down platform.
A final run of about two and a half miles took us to Ormskirk - the end of the line. Originally, there were two through platforms, two bays, an 80-lever Lancashire and Yorkshire pattern signal box, extensive goods sidings and a four-road locomotive shed with a 50 foot turntable. At least the attractive station building on the down side has been tastefully restored. Presumably, this is due to Merseyrail, who have a policy of staffed stations, well-lit with toilets (the 35-year old Class 507 and 508/1 electric multiple units operated are without toilets). The inside of the station building was brightly-lit, warm, provided with reasonable seating and a modern ticket office facing the door. The platform side of the building has a partly-glazed canopy of modern design but apparently retaining the original cast columns. The effect is quite pleasing. I was reminded of similar restorations of platform canopies at Irlam (described in the post Irlam Station Launch) and Llandrindod Wells (described in the post A Trip to South Wales (Part 1)).
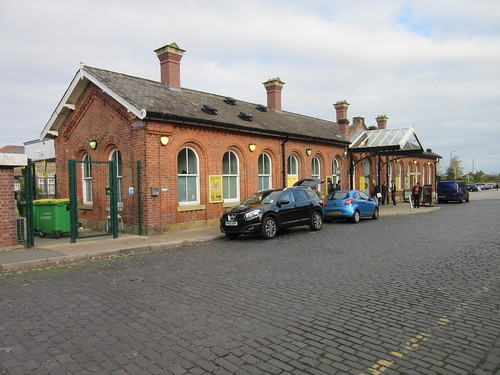 Ormskirk station building from the road side.
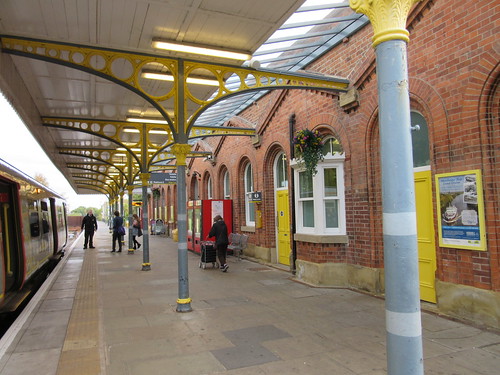 Ormskirk station building from the platform side.
The passenger information displays indicated a wait of less than ten minutes before the next Liverpool train. Meanwhile, the Class 153 I'd arrived on left on its return journey to Preston.
 The Class 153 prepares to return to Preston.
The Merseyrail trains arrive at the same platform as the Preston trains, but further along. Just outside the station, the single platform line splits into separate Up and Down lines. My train arrived and we were soon counting off the stops - Aughton Park, Town Green, Maghull, Old Roan and Aintree. I was surprised at how many passengers boarded for only one or two stops before getting off, but throughout we seemed to be carrying a reasonable load in our 3-coach set. Beyond Aintree, I was back on a previously-travelled line (briefly described here). My train terminated at Liverpool Central and I made my way down to the Wirral Line and took a train to James Street.
From here a brisk walk took me to the Museum of Liverpool to check up on their 'star exhibit', the locomotive 'Lion' (there's more than you need to know about 'Lion' and its supporters club OLCO on my blog here). In the Atrium, a special performance of traditional Irish music was in progress, performed by young people and adults from the Wirral who have learned to play traditional Irish music from scratch. I thought they were excellent. There's a short video here. When you've seen the video, the Back Button will return you to this post.
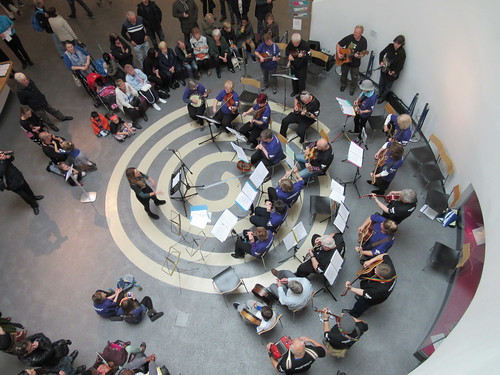 Museum of Liverpool: A special performance of traditional Irish music in the Atrium.
Next, I hurried to Pierhead to book on the ferry departing at noon for Seacombe and Birkenhead Woodside. It's a trip I've done many times but I never tire of it. (I've previously written about taking the ferry, for instance here, here, and here. I commented to the booking clerk that they seemed very busy and he agreed. 'Snowdrop' (still, I'm afraid, with the 'razzle-dazzle' paint job) docked and discharged a heavy load of passengers, before filling up again with the waiting crowd. I positioned myself, as usual, on the open deck towards the bow but I'd forgotten just how breezy it can be. As 'Snowdrop' crossed the Mersey diagonally, I watched an MSC container ship leave Liverpool docks, fussed by two tugs. 'MSC' always makes me think of the 'Manchester Ship Canal' but, in fact, the shipping line is the Mediterranean Shipping Company (their English website is here). With the container ship turned seawards, the two tugs were freed to make their way upstream. Meanwhile, the rather odd superstructure of an approaching ship resolved itself as the Isle of Man Steam Packet Company's futuristic-looking wave-piercing catamaran 'Manannan', heading for her berth next to Pierhead. There's an interesting article about 'Manannan' on Wikipedia here.
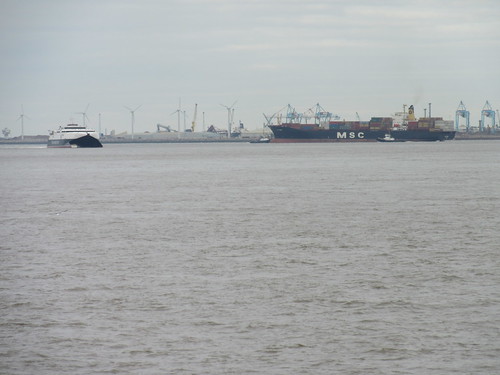 As the MSC container ship turns seawards the two tugs have completed their job whilst 'Manannan' makes her way upstream.
We docked at Seacombe with quite a tide running and it took a minute or two to moor and put the gangway in position. Once we'd disembarked departing passengers and boarded 'joiners', we were off again on the short leg to Birkenhead Woodside.
Ferry 'Snowdrop' berthing at Seacombe Landing Stage.
I disembarked when we arrived at Birkenhead Woodside and walked towards Hamilton Square Merseyrail station, pausing to take in the view of Liverpool (rather spoiled by the remarkable clutter of street furniture in the foreground).

I decided I'd time to take the train to the next station on the West Kirby Line - Conway Park. It's a modern station constructed in a 'box' open to the air. A quick look around outside sufficed, then I returned to the platform to catch a train back to Liverpool.
 Conway Park station looking towards West Kirby.
After our stop at Hamilton Square, we passed under the Mersey quite effortlessly but I always think of the men who constructed this remarkable tunnel and the tough breed of enginemen who ran steam trains through the tunnel for the first new years prior to electrification. There's a post called Early Days of the Mersey Railway. With still a few minutes in hand, I stayed on the train around the 'Liverpool Loop', getting off at Liverpool Central. I treated myself to a portion of chips which I consumed whilst walking to Liverpool Lime Street.
I was in good time to catch the London Midland service to Wolverhampton where I was able to catch the last bus on a Saturday to my village (at five past four, would you believe?). I'd had an interesting trip and, as usual, returned home fairly tired.
Former Railway Signalling between Preston and Liverpool
Signal boxes on the main line from Preston to Farington Curve Junction are listed in the post Railways around Preston. The signal boxes which dealt with West Lancashire line traffic between Farington Curve Junction and Liverpool Exchange are detailed in the John Swift plans (Book reference [1] below) and are listed below:-
Moss Lane Junction
Midge Hall (21 lever L&Y Tappet)
Littlewood Tile Siding (15 lever)
Croston
Rufford (21 lever)
Burscough Jn. North (20 lever)
Burscough Jn. South (50 lever)
Burscough Jn.
Burscough Abbey
Ormskirk (80 lever)
Aughton Park
Town Green (25 lever LMS frame)
Maghull (28 lever L&Y)
Aintree Cheshire Lines Jn. (52 lever L&Y Tappet)
Aintree Station Jn. (88 lever L&Y Tappet)
Orrell Park (8 lever R.S. Co 1887)
Walton Jn.
Kirkdale East (48 lever)
Kirkdale West (44 lever)
Sandhills No. 2 (76 lever)
Sandhills No. 1 (145 lever)
Exchange Jn. (60 lever)
Liverpool Exchange No. 1 (136 lever)
Liverpool Exchange No. 2 (168 lever)
Pre-grouping railways in West Lancashire
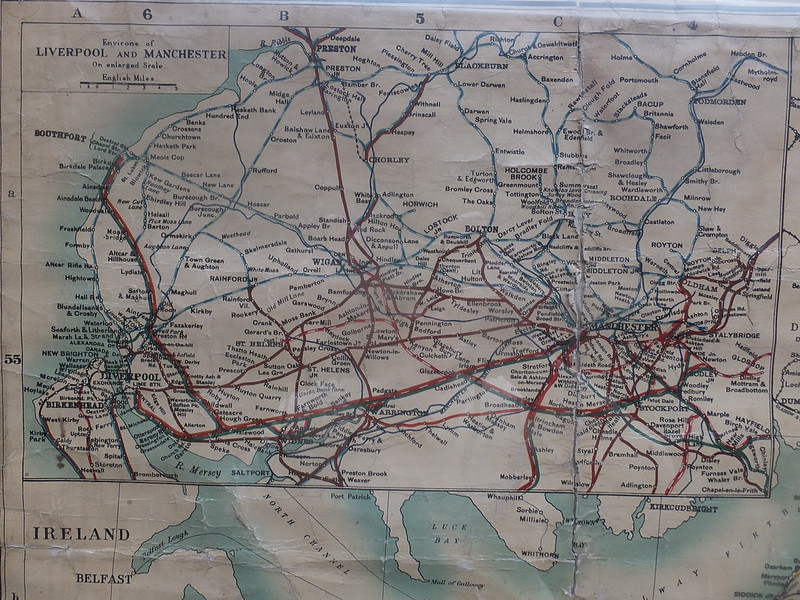 Click for larger view.
My journey from Preston to Liverpool was on the former Lancashire and Yorkshire line (blue/white) to Ormskirk where I changed to Merseyrail's Northern Line (originally Lancashire and Yorkshire) to Liverpool Central where I changed to Merseyrail's Wirral Line (originally Mersey Railway) for the short trip to James Street. I then crossed the Mersey by ferry, made a brief trip from Hamilton Square to the modern station at Conway Park (on the Wirral Line) before travelling to Liverpool Central and finally walking to Liverpool Lime Street for my homeward journey. Many of the railways on this map no longer exist.
Books
[1] ‘British Railways Layout Plans of the 1950’s - Volume 5: ex-Lancashire & Yorkshire Railway Lines in West Lancashire’ (ISBN: 1 873228 04 X).
[2] ‘Railway Track Diagrams Book: 4 Midlands & North West’, published by TRACKmaps (ISBN 978-0-9549866-7-4).
[3] ‘A Regional History of the Railways of Great Britain: Volume 10 The North West’ by G. O. Holt, revised Gordon Biddle published by David & Charles (ISBN: 0946537 34 8).
[4] ‘The Railways around Preston – An Historical Review’ by Gordon Biddle (Foxline Publishing 1989) ISBN 1 870119-05-3.
Related Posts in this Blog
Day Trip to Southport and Liverpool (Part 1)).
Day Trip to Southport and Liverpool (Part 2).
Railways around Preston.
My pictures
General pictures:
Liverpool.
Museum of Liverpool.
Birkenhead and its Docks.
Railway pictures:
West Midland Railways.
Stafford Area rail.
Crewe Area rail.
Railways around Preston.
Lancashire & Yorkshire Railway in West Lancs.
Merseyrail.
I travelled to Preston by train on Saturday 17th October 2015 so that I could try out the service from Preston to Ormskirk from where Merseyrail has a good service to Liverpool. Most of my journeys by rail start from Wolverhampton which involves a journey by road first from my village to Wolverhampton. For this trip, I took the first bus to Wolverhampton which did not arrive early enough to catch the favoured 07:37 'Virgin' train northwards. Rather than wait at Wolverhampton for the next 'Virgin' service, I took the London Midland Liverpool service to Crewe, stopping at Penkridge and Stafford.
I'm only just getting used to the fact that Wolverhampton Power Box has been abolished and control is now from the West Midlands Signalling Centre at Saltley. Now, the last two signal boxes at Stafford (No. 4 and No. 5) have gone with control transferred to Rugby.

A view of the replacement cantilever signal gantry at the north end of the Station (U&D Goods/U&D Platform) after re-signalling.
There's more change on the way at Norton Bridge. A new flyover junction is being built to eliminate a notorious bottleneck where the line to Stone and Stoke-on-Trent diverges.
I left the London Midland service at Crewe and, having a while to wait, went out of the station to wander around nearby. The multistory offices at Rail House are not elegant but I'm used to them. Over the years, I've attended quite a few meetings with railway staff there. I see that at least part of the building is now occupied by Atos who claim to be 'business technologists' (they've been involved in interviewing claimants as part of the Government's welfare reform programme, attracting a fair bit of criticism).
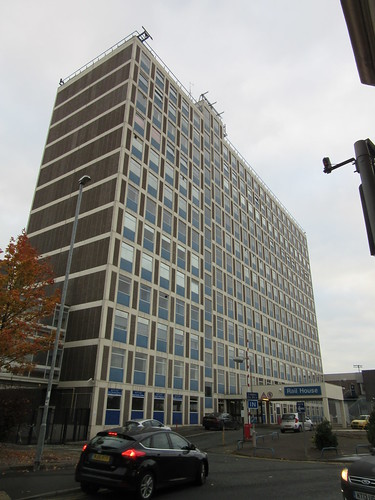
Rail House, Crewe.
British Transport Police occupy a building opposite provided with a small 'belfry' or perhaps ventilator on the gable roof.
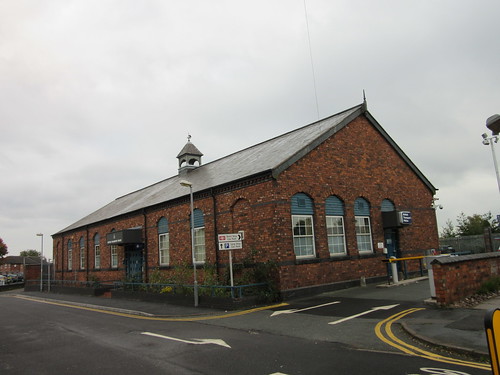 British Transport Police offices, Crewe.
Looking northwards over the parapet of the Nantwich Road bridge, I could see that nature is reclaiming the unused spaces, whilst the 'temporary' signalling centre remains in use.
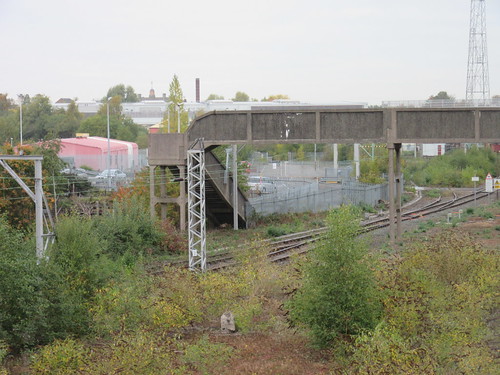 Nature reclaims North Junction (Signalling Centre left background).
I took a couple of pictures of the historic Crewe Arms Hotel.
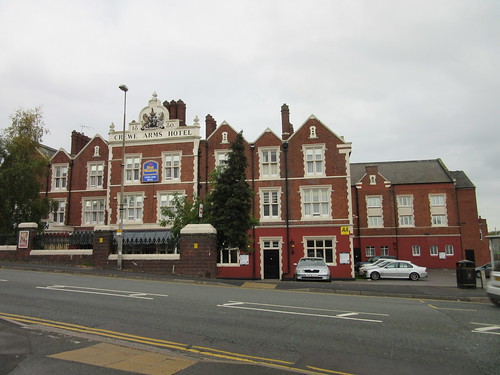 Crewe Arms Hotel.
Just round the corner, I recorded the rather bleak railway offices on the east of the station which are linked to the main station footbridge and formerly housed Crewe Control Office.
 This building formerly housed Crewe Control Office.
The only time I visited was many years ago for a private visit to Crewe Control Office. I was very impressed by the detailed track diagram along one wall with all loops and sidings carefully recorded with their capacity. A series of holes allowed the position of freight trains to be plotted by inserting a peg which held a small card with the train details. A number of desks faced this diagram, each with a telephone concentrator. I was a bit disappointed that passenger trains did not appear on the diagram - I was told they move too quickly. Apart from regulating the traffic and making sure that wagons were available in the right places, the most important aspect of the work was keeping a check on crew hours and making sure that relief crews could be provided as necessary. I wish I'd had longer and I wish I'd photographs but I did take a shot of a similar preserved Control Office Train Board at the Midland Railway Centre, Butterley.
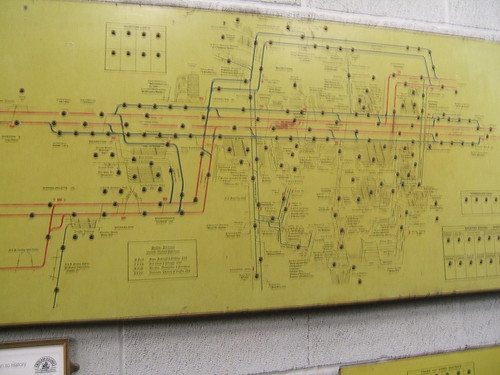 Control Office Train Board preserved at the Midland Railway Centre, Butterley.
I made my way back to the station, to look for what was the entrance to the Crewe Control Office from the footbridge. It is transformed! The entrance now leads to 'The Cheshire Lounge' for First Class passengers.
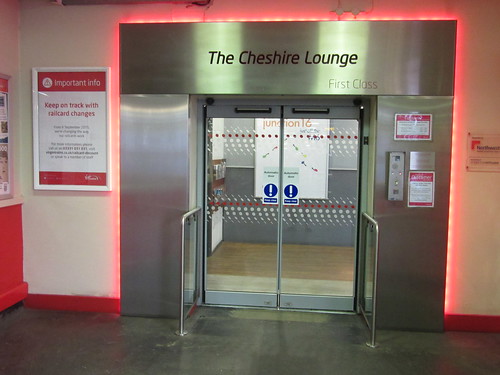 Entrance to 'The Cheshire Lounge'.
The sense of luxury is somewhat tempered by a the notice outside instructing customers to press a button and wait for an answer from "a very busy ticket office" after which credentials are checked by holding the appropriate First Class ticket up to a camera for inspection.
I returned to the platform, noticing the stock for 'The Northern Belle' stabled on the adjacent line which is now the Up & Down Loop (but will forever remain No.2 Down Through to me). My Edinburgh-bound 'Pendolino' arrived a few minutes late and we made good time to Warrington Bank Quay. We started to accelerate away from the station stop but, before long, the brakes came on quite hard and brought us to a stand short of Winwick Junction. I could see no obvious reason for the stop and no announcement was made but after a couple of minutes we re-started and reached Wigan North Western without further incident. A final spurt took us to Preston where we arrived still a few minutes late.
My railway pictures
West Midland Railways.
Stafford Area rail.
Crewe Area rail.


