skip to main |
skip to sidebar
An ambitious Day Trip from Wolverhampton to Glasgow on 13th April 2019.
I was booked on 9S47, an 11-coach 'Pendolino' to Glasgow, in seat J39. The coach was almost full when I boarded, so I had to take the assigned seat (back to direction of travel) until Preston, when I swopped to a 'facing' seat.

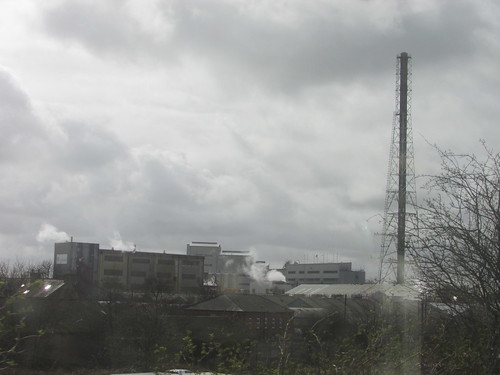
Wolverhampton Station: Progress on steelwork for new station. The tall building in the background is student accommodation for the University (Glasgow by Rail).
The train left Wolverhampton at 09:39 and the catering staff offered tea/coffee and a sandwich soon afterwards. We passed through Stafford at 09:51, where I was surprised to see the 'Northern Belle' Pullman train waiting to depart southwards from platform 6, 'top and tailed' by Class 47s. North of Stafford, we passed another set of coaching stock heading south - this time in maroon livery.

Stafford: Northern Belle stock (Glasgow by Rail)
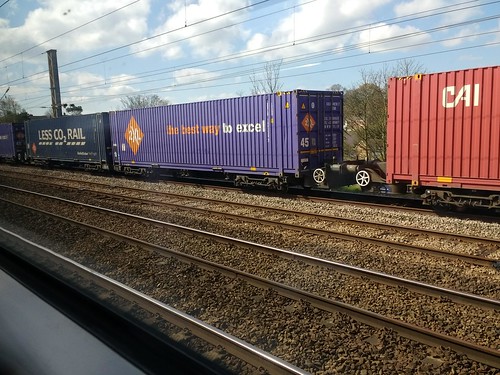
We arrived at Crewe, platform 11, at 10:10 by which time I'd discovered that I was seated above a rather 'rough riding' bogie with brakes that squeaked each time they were applied but it wasn't too bad. We departed after a brief one-minute stop. At 10:17 we passed a train of loaded container wagons on the Down Slow. I used 'Railcam.UK' on my Smartphone to find out that the freight was 4M45, on its way to Garston Freight Liner Terminal from Felixstowe (there's a brief outline of the remarkable features offered by 'Railcam.UK' in my post here).
We passed Winsford, where the quadruple track from Crewe converges into double track, at 10:20. On the Down Slow, a steam special headed by 'Tornado' was waiting for us to pass before following. 'Railcam.UK' informed me that the 'special' was 1Z68 which had started from Birmingham at 07:48 to make various pick-ups. It would follow us to Faringdon Junction where it would diverge right and, via Blackburn, Hellifield and the S & C Line, was due to arrive in Carlisle at 14:56.
I noted us passing Weaver Junction at 10:24 and arriving at Warrington at 10:29, against a 'booked' time of 10:26. Then we stood until, at 10:35, the Train Manager announced on the Public Address that we would be held for an indeterminate period because of an unspecified "Safety problem at Lancaster". Whilst we waited, 'Tornado' and her train caught-up and came to a stand in the adjacent platform on the Down Slow. We quietly departed at 10:43, now 15 minutes 'down'. As we approached Winwick Junction, we passed a train of bogie bulk cement wagons on the Down Slow. 'Railcam.UK' revealed that this was 6M90, 04:57 Hanson's sidings at Avonmouth to Castle Cement at Clitheroe and, when we passed, 'right-time'.
Our Wigan timings should have been 10:37 arrive, 10:39 depart, but were actually 10:52/10:54. The 1½ mile 'pull' out of Wigan at 1 in 104 to the site of Boar's head Junction was scarcely noticed by the 'Pendolino', then the gradient eased to the summit near Coppull, where we started our descent towards Preston.

Gradient Diagram: Betley Road - Coppull
Click for larger view
Because of the "Safety problem at Lancaster", trains were now 'bunching-up' and, as we approached Preston, our speed fell. On the Down Slow, we crept past trains 1B19 and 1N55, already stopped and came to a stand at 11:05, just south of the station, next to a waiting container train (4S53) on the Down Goods headed by a Class 88 'electro-diesel'. This class runs from 25 kV a.c. most of the time but can run from its own diesel engine when necessary.
Preston: Freight 4S53 waiting on Down Goods, just south of station (Glasgow by Rail)
We waited whilst the train ahead of us cleared the platform then our signal 'cleared' and we slowly rolled into platform 4, coming to a stop at 11:10. Although platform 4 at Preston was crowded with passengers, I was near the rear of the train where the broad platform remained empty. I fumed once again over the insensitive 'modern' infilling of a cross-passage in the station buildings.
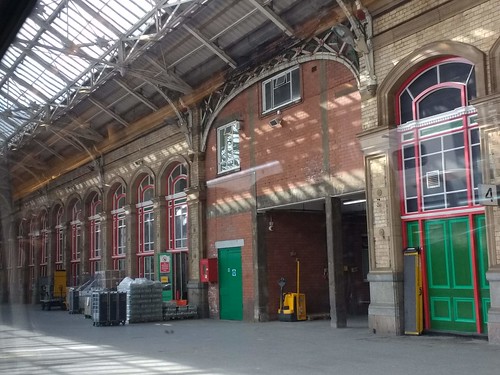
Preston Platform 4: The pleasing proportions of the original station are marred by a crude later infill of reinforced concrete and brick (Glasgow by Rail)
The apologetic Train Manager described the situation as "Chaotic" but eventually passengers managed to sort themselves out. Another announcement then said we could not leave since the dislocations to the service meant that we had no Train Manager to take the train forward! According to 'Railcam.UK', we should have left Preston at 10:53½ after a two-minute stop, but it was 11:16 when we left with the lady Train Manager making a nice apology for the delay caused by the "Line Inspection between Preston and Lancaster" and admitting that we now hadn't got catering staff in First Class.
As we passed Oubeck Loops (18 miles beyond Preston), the live signalling diagrams of 'Railcam.UK' showed the disposition of trains in the area. Ahead of us, 1S40 was in Lancaster station (21 miles beyond Preston) with 1S45 catching up. Behind us, 1S46 was hard on our heels at Galgate with 1S42 near Brock (around 7 miles beyond Preston). Under these conditions, drivers usually regulate their speed to try to keep seeing 'single yellow' signals so as to avoid coming to a complete stand but, at 11:32, we had to stop at a 'red' signal (PN217).
The 'Railcam.UK' signalling diagram showed 1S40 setting off from Lancaster which, once the signalling 'overlaps' were satisfied, would allow 1S45 its turn at the platform. At 11:36, the signalling diagram showed 1S45 moving forward, allowing our 'red' at PN217 to clear and my train to quietly trundle further north. At 11:40 we came to a stop again, this time at signal PN226, the last signal before entering Lancaster station. This signal controls two routes - to the Down Main, the through line for trains not stopping at Lancaster and, via a left-hand turnout, to the Down Passenger Loop serving platform 3. To give the driver 'advance notice' of this signal, a Banner Repeater was installed in the rear of signal PN226.
In the days of semaphore signals, Banner Repeaters for 'stop' signals comprised a round frame, illuminated to show a white background, in front of which a black centre-pivoted arm was placed. The distinctive appearance was intended to remind drivers that this was not a signal to be obeyed but advance warning of a signal. If the signal was 'on', the black arm remained horizontal but when the signal was 'off', the arm was pivoted electrically to a diagonal position. In some locations, the semaphore 'stop' signal being repeated also carried a 'worked' distant signal lower down the post or doll. In such cases, an additional banner repeater, distinguished by a notched arm was provided under the stop signal Banner Repeater to mimic the appearance of the following signal.
Nowadays, Banner Repeaters are formed from Light Emitting Diodes (LEDs) presenting displays on a flat screen at the front of a square metal box. An array of white LEDs shows a white disc, with an unlit dark bar either horizontally or diagonally to indicate the state of the following signal. But if, as at Lancaster, two routes ahead of the repeated signal have differing speed limits, two Banner Repeaters may be fitted side-by-side, as a 'splitting repeater' with the repeater for the faster route mounted higher, in imitation of the way when semaphore signals applied to multiple routes ahead, the higher the signal arm on each doll, the higher the permitted speed on that route. Banner repeater PN226 BR at Lancaster is a 'splitting repeater'.
Modern signalling uses 3- and 4-aspect colour light signals which don't just authorise movement to the next signal but give information about the aspect displayed by that next signal. In a similar way, some LED Banner Repeaters can offer a 'third aspect'. As soon as the repeated signal changes from 'red' to 'yellow', the repeater changes from white disc with a horizontal dark bar to white disc with a diagonal dark bar. But when the repeated signal displays 'green', the white disc changes to a green disc, still with a diagonal dark bar.
We finally stopped in platform 3 at Lancaster at 11:42 which was crowded with lots of bewildered-looking passengers but we were away again within two minutes. Beyond Carnforth, we started to climb. We should have passed through Oxenholme at speed but, presumably because we had caught up with 1S45 ahead of us, we came to a stand at 11:55 at signal CE46 just south of the platforms at Oxenholme.

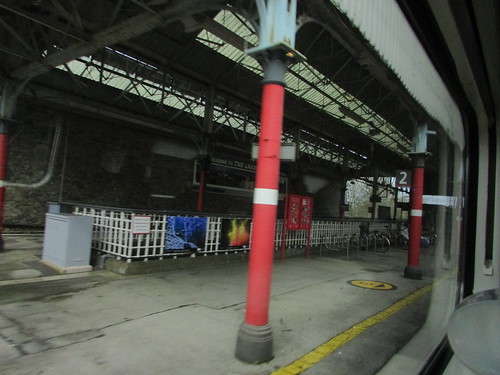
Oxenholme: View on Down side showing south end of platform 2 (Glasgow by Rail)

Gradient Diagram: Coppull - Oxenholme
Click for larger view
After a minute or two, we were away again and the climbing continued. After passing Grayrigg Loops at 12:04 there was a respite until passing Tebay at 12:07. Here the serious climbing started, with over four miles at 1 in 75 but we passed Shap Summit at 12.11.

Shap Summit: View on Down side showing Banner Repeater for signal CE137 (I'm afraid the actual display, diagonal bar on white disc is only visible in larger sizes of this shot).
We passed Harrisons Siding at 12:13 and arrived at Penrith, which markets itself with the phrase 'The Northern Lakes', at 12:21 leaving at 12:23, compared with the 'booked' times of 11:44/11:45½.

Penrith Station Down platform (Glasgow by Rail)
We reeled off the final 18 miles to Carlisle in around 14 minutes but came to another signal stop just south of the station, adding another two minutes to our lateness. At least I had an opportunity to admire the handsome, stone-built St. Nicholas Bridges crossing the myriad railway lines and graced by ornamental lighting fittings. Of course, additional modern LED road lighting on tall standards has been added which rather detracts from the effect. We pulled into Carlisle Citadel's platform 3 at 12:38.

Carlisle: St. Nicholas Bridges, just south of the station, is a stone structure with attractive lighting fittings (Glasgow by Rail)

Gradient Diagram: Oxenholme - Carlisle
Click for larger view
I was impressed that, before we left at 12:41, the Train Manager came through First Class herself distributing sandwiches but hot drinks required passengers to walk through the train to what used to be the Buffet Car but is now 'The Shop', so I didn't bother. Travelling on metals of the former Caledonian Railway, after 1½ miles, we passed Kingmoor Traction Maintenance Depot on the Down side, now used by Direct Rail Services.

Kingmoor Traction Maintenance Depot, Direct Rail Services, on Down side north of Carlisle (Glasgow by Rail)
My train accelerated past Carlisle (Kingmoor) Yard, also on the Down side, reduced to a shadow of its former self. The Kingmoor Parish Council site comments:-
"At a cost of 4.5 million Kingmoor New Yard was one of the largest and most ambitious projects undertaken during the modernisation of British Railways. The site chosen for the Kingmoor New Yard was a strip of land alongside the old Caledonian main line to Glasgow which was purchased in 1956 with work beginning 3 years later in 1959. The yard was fully operational in 1963. In the mid 1960’s Kingmoor Yard was very busy. The peak number of trains handled in a day was 134 whilst the largest number of wagons sorted was 4,050".
In the 1960s, British Railways abandoned the idea of being a 'full service' freight operator accepting single wagon loads and concentrated on 'block loads' making largely redundant a number of modern marshalling yards around the country, including Kingmoor.

Carlisle: Kingmoor Yard, view on Down side of Main lines, showing Snow Plough on siding between No. 1 and 2 Departure Lines (Glasgow by Rail)
Just 10 miles after leaving Carlisle, we passed the site of the worst accident in U.K. railway history at Quintinshill. On 22nd May 1915, a double collision involving three passenger trains killed 224 passengers and 3 railway servants, injuring 242 passengers and 4 railway servants. The full accident report can be found on the invaluable Railway Archive site here.
My train had been 39 minutes late leaving Carlisle and, in an attempt to help passengers get to their destinations following what was now being called the "disruption between Lancaster and Preston", the Train Manager had been issued with a Special Stop Order to make an additional call at Lockerbie. We arrived at Lockerbie, with its pretty stone-built station buildings largely ruined by an ugly modern platform canopy, at 12:58. A flurry of passengers got off and we set off again at 12:59, now 40 minutes 'down'.

Lockerbie Station Down Platform.
We passed Beattock, 15 miles beyond Lockerbie, at speed and climbed for 9 miles to the summit on a varying gradient nowhere easier than 1 in 88 and 1 in 69 at worst.

Gradient Diagram: Carlisle - Beattock Summit
Click for larger view
The Beattock Summit is about halfway from Carlisle to Glasgow: All the hard climbing is done and, for Down trains, the prevailing gradient is now downhill.

Beattock: View on Down side (Glasgow by Rail)
The line passed through open country with small villages, all of which have now lost their station until the railway junction at Carstairs. Although it retains its station, my train did not deign to stop. Two miles beyond Carstairs, the single line branch from Lanark (population around 10,000) joined on our left. At Carluke, we slowed again, 'Railcam.UK' showing that we were now behind a local train from Lanark, 2B77. I feared that this train might precede us to Glasgow but, at Law Junction a couple of miles later, the local train branched right onto the Wishaw line and our speed picked up again. We rushed through Motherwell then Uddingston and hastened past Newton's two platforms serving the Hamilton Circle Lines.

Approaching Newton Station, viewed from Down Main.
The view is now more urban and, after the Carmyle line joins on our right, the last four miles to Glasgow Central are quadruple track. At Polmadie, the Alstom UK Traincare Depot extends on both sides of the running lines.

Polmadie Down Sidings.
After Larkfield Junction, we pass through one of two Eglinton Street Tunnels and slow on the approach to Eglinton Street Junction.

Glasgow: Approaching Eglinton Street Junction on Down Slow. The overbridge in the background carries the City Union Line over the West Coast Main Line.

Glasgow: Approaching Bridge St. Junction on line 2. Signal gantry shows signals GG5221 for Line 4 (Down) and GG5223 for Line 3 (Reversible). There are similar signals for line 2 (Down) and line 1 (Reversible). The former Glasgow Central Signalling Centre (used from 1972 to 2008) is visible in the background on the right.
Finally, we rumbled over the Clyde Bridge at the approach to the platform and came to a stand at curving platform 1, under Glasgow Central's impressive overall roof. We had arrived!
I'm afraid it took me until 2021 to write about the rest of the day and my rather quick tour of Glasgow using the Glasgow Subway in the post Glasgow by Rail (part 2).

Glasgow Central Station: Crossing the Clyde Bridge approaching the station.

Glasgow Central Station: View from 'Pendolino' arriving at platform 1.

Gradient Diagram: Beattock Summit - Glasgow.
Click for larger view
Related Posts on this Website
The following post describes a trip over the same route to Carlisle earlier in 2019:-
Whitehaven by Rail
My pictures
Where necessary, clicking on an image above will display an 'uncropped' view or, alternately, pictures may be selected, viewed or downloaded, in various sizes, from the albums below:-
The journey that day is divided into two albums:-
Glasgow by train.
Glasgow by rail (return).
These pictures have also been added to various albums each covering a roughly-defined geographical area. Within each album, photographs are normally arranged by date taken. Thus, by searching through the appropriate album, you can find changes through time. Travelling to Glasgow added pictures to a number of albums as we moved through various areas.
West Midland Railways (Wolverhampton).
Stafford Area rail.
Crewe Area rail.
Liverpool area rail (Winsford-Weaver Jn).
Warrington Area rail.
Wigan's Railways.
Railways around Preston.
Lancaster area rail.
Carnforth railways.
WCML through Cumbria.
Carlisle's Railways.
Scottish Railways.
Glasgow Central Station.
There is also an album with historical Gradient Diagrams.
Gradient Diagrams.
[Link to Part 2 added 14-Feb-2021]
On Saturday 23rd March 2019, I made a day trip to Whitehaven on the Cumbrian coast. This followed day trips earlier in the year to Blackpool on 17th February 2019 (post here), Llandudno on 23rd February 2019 (post here), Morecambe on 2nd March 2019 (post here) and New Brighton on 16th March 2019 (post here).
Like the earlier trips mentioned above, this journey was intended to observe changes since my previous visit on 21st June 2014 when I travelled the whole of the Cumbrian Coast Line from Carnforth through to Carlisle. described in two posts (Part 1 and Part 2). Although I'd changed trains at Whitehaven in 2014, I made only a brief excursion out of the station because of the timing of a connecting service taking me further north.My report at the time commented "I decided to defer my exploration of Whitehaven to another trip". For the March 2019 trip, less time was available and the winter timetable was in operation with, I thought, fewer trains so I decided to simply visit and explore Whitehaven, only travelling on the northern part of the Cumbrian Coast Line between Whitehaven and Carlisle. I settled on the trains outlined below and successfully ordered tickets from the Virgin Trains website.
Getting there
These were the timings of the trains I decided to use:-
| Wolverhapton-Whitehaven |
Arrive |
Depart |
| Wolverhampton |
|
09:37 |
| Carlisle |
12:00 |
12:08 |
| Whitehaven |
13:15 |
|
| Whitehaven-Wolverhapton |
Arrive |
Depart |
| Whitehaven |
|
14:38 |
| Carlisle |
15:41 |
16:08 |
| Wolverhampton |
18:32 |
|
The first part of the trip involved a Virgin Trains 'Pendolino' from Wolverhampton to Carlisle (reporting number 9S47). The southern part of the route was fairly familiar to me although when my coach stopped just level with the '158' milepost (distance from Euston) on platform 11 at Crewe, I didn't recall noticing it before yet it had clearly stood there for some time.
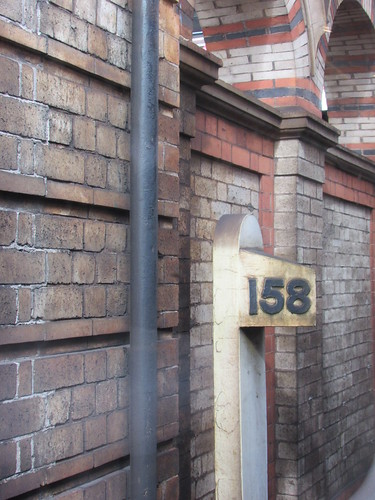
Crewe: Milepost and polychrome brickwork on platform 11.
At Lancaster, my coach stopped next to the British Transport Police office, the station's Defibrillator (in a rather rusty case) and the Blue Plaque commemorating Joseph Locke (1805-1860), Engineer of the Lancaster and Carlisle Railway which opened 15th December, 1846 (The line from Lancaster to Preston had opened a few years earlier, in 1840). A Policeman and Station Cleaner appeared to be enjoying a joke.
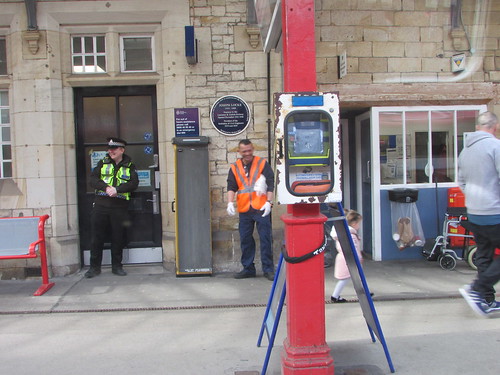
Lancaster platform 3 with policeman and cleaner.
Continuing north after our station stop, we were soon through Carnforth where the Cumbrian Coast Line diverged on our left and we headed into the fells with the gradients predominantly uphill. My train swept through the rather gloomy trainshed at Oxenholme where the single line to Windermere diverged to the left.
Oxenholme platform 2 looking towards the Windermere platform.
As we continued north, the gradient toughened to around 1 in 104. Kendal was laid out on our left then the climb continued until Grayrigg, where there are still goods loops on both Down and Up lines.
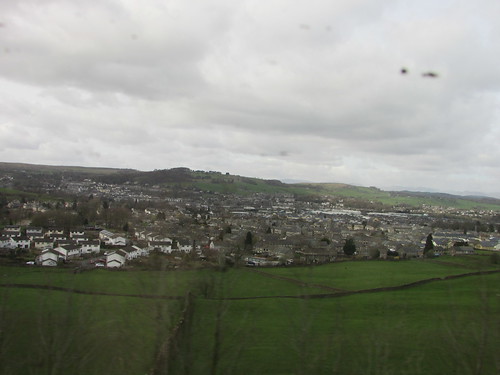
Kendal, viewed from West Coast Main Line.
Beyond Grayrigg, the route was easier and undulating until Tebay where, in steam days, most northbound trains stopped to pick up a banking engine (typically a 2-6-4T). The station, loco shed and signal box which once controlled the branch to to the east are all gone but a reversible loop and Engineer's sidings remain on the Down side.

Passing the Up and Down Goods Loop on the Down side at Tebay, with 3 Engineers sidings beyond.
Beyond Tebay, the 4 miles at 1 in 75 uphill to Shap Summit (quoted as 916 feet above sea level) presented serious problems to enginemen in steam days, even with a 'banker', because all the power to move the train depended upon the skill of the fireman in releasing the thermal energy stored in coal to generate steam. Today's drivers of electric trains can expect power to be available on demand from the Overhead Line Equipment, generated at some remote power station and our ascent appeared effortless.
Near the summit, on our left, is Shap Blue Quarry, operated by Cemex to supply aggregates. Beyond Shap Summit, the remaining 31 miles to Carlisle is downhill (apart from a couple of short adverse sections around Penrith). About one mile further on, we passed the huge processing plant of Tata Steel's Shapfell Limestone Quarries on the right.
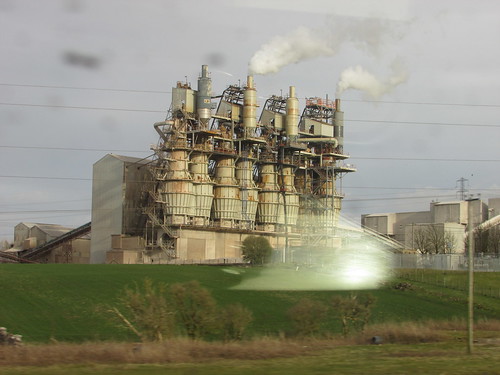
Shapfell Limestone Quarries, Hardendale, on Up side.
Another three miles took us past Hanson Aggregates Shap Quarry. Hanson are now part of the HeidelbergCement Group but I remember the quarry's pre-Hanson incarnation as 'Harrisons' which lent its name to the long-gone signal box on the main line there called Harrisons Siding. I actually visited the quarry once. In the post Visiting Steelworks I described my firm's involvement with Electronic Vibratory Feeders and the visit to the quarry was to help commission equipment our Client had installed there.
We sped under the modern bridge carrying the M6 motorwayover us then, about 5 miles further on, we crossed over the M6.

Penrith: Crossing M6 just south of station: view on Down side.
Deceleration indicated that the driver was preparing for our stop at Penrith.

Penrith: Down Main platform
After restarting from the station stop, we soon spooled off the remaining 18 downhill miles to Carlisle. Like Crewe, the major junction at Carlisle had interested me as a child, but it was too remote for me to visit. Just as Crewe had its complex of Independent lines for goods traffic, so Carlisle developed a network of avoiding lines for freight trains. As we approached Citadel Station, with the Maryport line converging from the left, both routes crossed over the once-important Upperby and Newcastle Goods Lines.

Carlisle: View on Down side entering Carlisle from Penrith. Left: Goods Lines from Upperby, Right: Newcastle Goods Lines. The bridge carries the Maryport and Carlisle Lines.
Finally, we rolled past Carlisle Power Signal Box which, like Warrington and Preston Power Boxes passed earlier in the journey, a Westinghouse-supplied installation with 'NX' control panel.
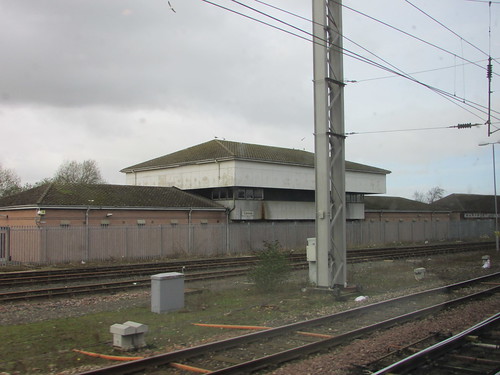
Carlisle Power Signal Box.

Carlisle: South end of Bay platform 2, viewed from Down train arriving at platform 3.
Right time, my train gently came to a stand in Carlisle platform 3 and the Class 156 Diesel Multiple Unit which would take me to Whitehaven (reporting number 2C52) was already in the adjacent bay platform 2. Although the weather was rather dull, I took a few pictures before boarding my train, including the one below.

Carlisle platform 3, looking south, showing rear of my train from Wolverhampton.
The Barrow train set off on-time at 12:08 and curved away from the West Coast Main Line I'd just arrived on, crossing the Upperby and Newcastle Goods Lines. We passed the cleared site which was once Currock Wagon Shops, with just rows of dug-up track formation and a few capstans (which moved wagons with ropes) evidencing the site's former use.

View from 2C52 leaving on Maryport and Carlisle Line, showing site of former Currock Wagon Shops.
After around 3 miles, we passed Dalston station but, unlike most services, we were not booked to stop and hurried past Dalston Oil Terminal into a stretch of pleasant farmland, punctuated by periodic user-worked level crossings. After around 7 miles we stopped at Wigton, after passing the first semaphore distant signal I'd seen that day.
Wigton was host to a large manufacturing plant but, at the time, I couldn't work out what was made there. Afterwards, I found out that Innovia Films is a major manufacturer of packaging films, particularly 'BOPP' which is Biaxially Orientated Poly Propylene (who knew?).
Innovia Films manufacturing facility, Wigton.
Wigton signal box, a manually-operated B.R. Standard pattern, is still in use presumably as a 'Fringe Box' to Carlisle and retaining a number of semaphore signals. The rest of my journey to Whitehaven would be controlled by manual signal boxes and mainly semaphore signals.
The next station was Aspatria where, like Dalton, we were not booked to stop. I was surprised to see a large Sealy plant. I knew the name but couldn't place the product at the time so it was only afterwards I found out that Sealy claim they're the "biggest bed brand in the world" with the first cotton-filled matresses being made by Daniel Haynes at a business in Sealy, Texas, over 100 years ago. Next to Sealy, we passed another large plant for 'The Lake District Creamery', operated by First Milk, a wholly British farmer-owned dairy co-operative.
Aspatria: We didn't stop but I just glimpsed the large Sealy plant through the trees.
Maryport retained its elderly signal box in a modernised form with 2-aspect colour light signals and 'Clamp-Lock' point operation. It also supervised a full barrier crossing about a quarter of a mile beyond the station using Closed Circuit Television.

Maryport Station Signal Box.
Another couple of miles took us to Flimby station, right next to the sea. It retained what appears to be the original footbridge and two platforms and has one of the squalid, modern 'bus shelters' but nothing else, so I was unsurprised that we didn't stop here, either. For other trains, Flimby is a 'request stop'. I understand that Sea Defence Works have been necessary on the line from Flimby to Workington.
Before we reached Workington, we passed the huge mill, surrounded by large wind generators, operated by Iggesund Paperboard which makes 'Incada' folding box board (FBB).

Workington: Iggesund Paperboard mills.
After crossing the broad River Derwent we came to a stand in Workington's Up Platform, where I admired, once again, the station buildings while the train crew was changed.

Workington station Up Platform buildings.
We left Workington, with its derelict sidings on our left and Workington Main No.2 signal box on our right. I noticed that the former steelworks site on our right is spawning new housing estates by Persimmon Homes.
After a couple of miles we passed Harrington station, once again without troubling to stop, although most trains during the day do pause at this rather attractive village. I gather that Sea Defence Work has also been necessary both north and south of Harrington.

Harrington viewed from Harrington Viaduct Up side (Whitehaven railways).
Between Harrington and just north of Whitehaven, the line runs on a 'shelf' between the sea (to the west) and the cliffs (to the east). This line was originally double track throughout but a combination of coastal erosion and crumbling cliffs has required significant sea defence work combined with stabilisation of the cliffs. In places the cliffs had been 'pinned' with steel rods or were covered by heavy gauge netting to minimise the effect of rock falls. The base of the cliff had been protected by Gabions (steel cages filled with stones or rock) or pre-cast concrete blocks. Despite this work, in the worst affected section, the double track singled for just over three quarters of a mile to squeeze its way through. The line then became double again through Parton station to Whitehaven. Remote control of this signalling complication was provided from the elderly but modernised signal box at Whitehaven, Bransty Junction, using 2-aspect colour light signals and 'Clamp-Lock' point operation.

Civil works near Parton, landward side, showing steel rods, netting and gabions. Note paraglider flying above the cliffs (Whitehaven railways).
We were not booked to stop at Parton either, although most other services regard it as a 'request stop' so we continued into Whitehaven station, stopping in the single through platform.

Parton village, just south of station, viewed from Up side.
My train was booked to arrive at 13:15 and leave at 13:17, giving the driver just two minutes to leave his cab, walk to the 2-aspect colour light signal on the platform, telephone the signalman to ask for the single line token to St. Bees, open the Token Cupboard, extract the token from the electric token machine, lock the Token Cupboard, check that the signalman had 'cleared' the signal, replace the telephone handset and return to his driving cab to await the Guard's 'Right Away'.
 Whitehaven railways: Driver of 2C52 obtaining token for single line to St. Bees.

Whitehaven railways: Class 156 forming 2C52 to Barrow ready to leave Bransty.
I watched until the train had disappeared into the inky blackness of the 1,283 yard single line tunnel leading to Whitehaven's other station, Corkickle. Now bathed in bright sunshine, I left the station and walked down the hill for my brief exploration of Whitehaven. I'll tell you more when I can.
Related Posts on other Websites
Cumbrian Coast line (Wikipedia).
Tata Steel (Shapfell Limeworks).
Innovia Films.
Sealy.
First Milk.
Iggesund.
Related Posts on this Website
The following posts describe my previous visit to the Cumbrian Coast in 2014:-
Furness and the Cumbrian Coast (Part 1)
Furness and the Cumbrian Coast (Part 2)
My pictures
Where necessary, clicking on an image above will display an 'uncropped' view or, alternately, pictures may be selected, viewed or downloaded, in various sizes, from the albums below:-
In making my (often quite poor) pictures available on the internet, I have divided them into various albums each covering a roughly-defined geographical area. Within each album, photographs are normally arranged by date taken. Thus, by searching through the appropriate album, you can find changes through time. So, my trip to Whitehaven added pictures to a number of albums as we moved through various areas.
The journey:
West Midland Railways (Wolverhampton).
Stafford Area rail.
Crewe Area rail.
Liverpool area rail (Winsford-Weaver Jn).
Warrington Area rail.
Wigan's Railways.
Railways around Preston.
Lancaster area rail.
Carnforth railways.
WCML through Cumbria.
Carlisle's Railways.
Whitehaven railways.
Workington Main station (and surrounds).
The destination and non-railway pictures:
Cumbrian Coast Scenes.
Whitehaven.
The Battlefield Line is normally closed after the Christmas and New Year Services until Easter. This respite provides an opportunity to undertake more major permanent way maintenance operations prior to another season commencing.
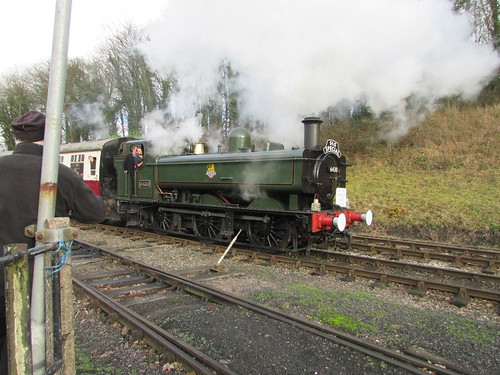
But, in 2019, with hired-in '54XX' Pannier 6430 remaining on site until a photographic charter at the beginning of March, it was decided to additionally run trains around the School Half-term Holiday in February. 6430 was to operate four round trips on Saturday/Sunday 16/17th February, Wednesday 20th February and Saturday/Sunday 23/24th February. In addition, the Diesel Multiple Unit ran four round trips on Tuesday 19th February and Thursday 21st February.
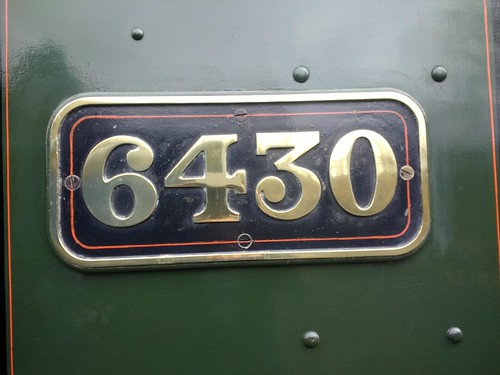
Pannier Tank 6430: Brass cabside number plate.
I was happy to volunteer as a driver during this experiment. 'Pannier' 6430, built in 1937, had arrived during 2018 in time to participate in the October Steam Gala (the first of my two reports on the Steam Gala is here). At the end of 2018, sister engine 6412, built in 1934, joined 6430 and both locomotives had operated the Battlefield Line 'Santa Specials'. I'd had a couple of days driving 6412 and there's a brief report on the 'Santa' trains here. On 1st January 2019, before 6412 left the site, 6412 and 6430 'top and tailed' a 4-coach service commemorating the last train between Monmouth and Chepstow sixty years earlier. There's a post on that re-enactment here. So, the Half-term Holiday trains were my opportunity to drive 6430 before she left Shackerstone for a visit to the Severn Valley Railway.
Last Train Monmouth-Chepstow Re-enactment: 6430 leaving Shackerstone with the second top-and-tailed train of the day.
The Great Western 'Panniers'
My post outlining the extensive Great Western 'Panniers' fleet is here. The most numerous were the '57XX' class (whose numbering spilled over into 6700, 8750, 9700, 7700 and 9600 series) I'd previously worked on five 'Panniers' from that group (5764, 5786, 7752, 7760, 9600) and also on one of Hawksworth's '94XX'class (9466) but I'd not had a chance to try the '54XX' class until the 2018 'Santas', when I drove 6412 and then, during the Half-term Holiday, I drove 6430.
The 54XX/64XX/74XX Panniers

"5400" (Railway Publishing Co. Ltd. 1938)
Click for larger view
In 1932, Collett built 25 of the '54XX' class as replacements for a number of elderly 'Panniers' which had been auto-fitted for passenger working. Whilst the '57XX' introduced by Collett in 1929 had 4 foot 7.5 inch diameter wheels, the first batch of '52XX' had 5 foot 2 inch diameter wheels, presumably to improve their top speed on passenger trains. Whereas the 'do-anything' '57XX' had lever reversers (more convenient when frequently changing direction during shunting but heavy when 'linking up' with steam on), screw reversers were fitted on the '54XX'. In addition, whilst the '57XX' had a flat grate (normally fired 'saucer-shape'), the '54XX' had a sloping grate (responding to a thicker fire at the back). A welcome change was the use of underhung laminated springs on the trailing coupled axle, rather than the dual coil springs projecting into the cab of the '57XX' which made the footplate rather confined.
These engines were quite well-received but a following batch of 40 (the '64XX') had smaller 4 foot 7.5 inch diameter wheels, apparently to improve hill-climbing on steeply-graded lines in South Wales. They were also auto-fitted.
A final batch of 50 locomotives (the '74XX') were not auto-fitted but provided with 180 p.s.i. boilers.
The following views show the Link Motion between the frames on 6430 and the screw reverser in the cab of sister engine 6412.

Pannier Tank 6430: View from left side showing (L-R) Right Crank near front dead centre, four Eccentrics and Left Crank (90 degrees 'behind' right crank). The green painted pipe at the top is the Balance Pipe linking the two Pannier Water Tanks.

Pannier Tank 6430: Link motion, view looking left from right side with curved Expansion Links in the foreground with Eccentric Rods extending to left and black-painted Vacuum Pump bolted to inside of left frame in background.

6412, showing Screw Reverser
Initially, I was only rostered on Wednesday 20th February but, at the last minute, I was also drafted in as driver on the first day of operations, Saturday 16th February when Jamie W. was Fireman and Steve W. was Cleaner. We had an enjoyable day carrying out four round trips to Shenton. The same timetable was repeated on my second 'turn', when Ritchie M. was firing. Both days were very enjoyable, with pleasant weather and, I thought, very reasonable passenger numbers.
I was pleased to add two of the '64XX' class to my list of locomotives worked on. These are capable, versatile engines.
Related posts on other websites
There's further information on the '54XX' class and the sub-classes in Wikipedia here and in the Great Western Archive pages Introduction and Details of Allocation
here.
Related posts on this website
G.W.R. 0-6-0PT 'Pannier' tank locomotives
Water, water, everywhere
Santa Specials at the Battlefield Line 2018
Last Train Monmouth-Chepstow Re-enactment.
All my Battlefield Line posts.
My photograph albums
Where necessary, clicking on an image above will display an 'uncropped' view or, alternately, pictures may be selected, viewed or downloaded, in various sizes, from the albums listed:-
6412 GWR Pannier Tank.
6430 GWR Pannier Tank.
All my Battlefield Line pictures.
