Catchem's Corner Signal Box lay on the Stour Valley Main Line from Wolverhampton High Level to Birmingham New Street. The adjacent signal boxes were Monmore Green (1021 yards in the Wolverhampton direction) and Spring Vale Sidings (1474 yards in the Birmingham direction).
The double-track line was more-or-less straight on a rising gradient through Monmore Geen and past Catchem's Corner on an embankment, curving left through Ettingshall Road and Bilston Station and on to Spring Vale Sidings. The signal box controlled the access to Ettingshall Road Goods Depot which was at a lower level than the main lines, necessitating a fierce gradient on the access sidings. At the time of my visits, this was quite a busy depot as the immediate area was home to a number of large engineering works, notably John Thompson.
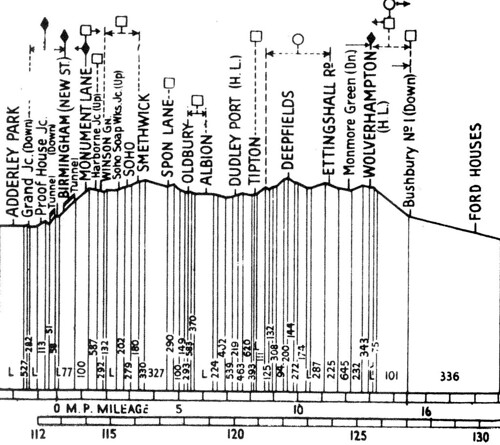 Gradient Diagram of Stour Valley Line.
The signal box, situated on a broad embankment on the down side of the main lines, was a standard L.M.S. pattern with a brick base, wooden top, gable roof and with the lever frame on the side of the box away from the track.
The L.M.S. lever frame placed all the interlocking on the operating floor in a compact form, behind the levers. The catch-handles on the levers were the 'trigger' pattern fitted behind the lever (like an old-fashioned car handbrake). To reduce the walking the signalman had to do, L.M.S. practice placed all the main running signals near the centre of the frame. Bracketed from the roof on a series of bars the block shelf ran the length of the lever frame and accommodating various electrical repeaters, two L&NWR Block Signalling Instruments and a Block Switch. The Signal Box Diagram was suspended above the block shelf, showing the layout of points and signals controlled by the signal box together with the distance to principal features from the box and a gradient diagram. Heating was provided by a coal stove situated in the middle of the glazed wall nearest the track. The floor was covered with heavy-duty brown linoleum.
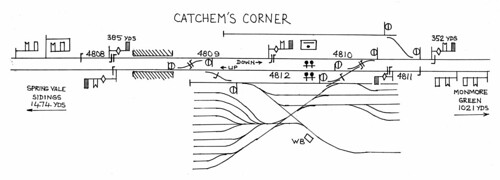 Click here for larger image.
Sketch plan of area controlled by Catchem's Corner Signal Box.
I didn't have a camera of my own at that time so I have no pictures of the box. If I produced any sketches at the time showing the track layout, they don't appear to have survived (it was around fifty years ago), so the simplified sketch above is made from memory, combined with information from the John Swift diagrams (see 'References' below).
Ettingshall Road Goods Depot and Sidings
There were no facing points on the main lines so access to all sidings was by drawing ahead and setting back. The main sidings, crane roads and goods sheds were reached by setting back from the Down Main but there was another group of sidings which could be used by Up trains attaching or detaching.
On the Down side, there was a single, long siding reached by drawing ahead and setting back. I think that this was probably a addition during World War II, to act as a refuge for a Down freight train which Wolverhampton was not ready to handle, allowing the main line to be cleared for more important trains.
Ettingshall Road and Bilston Station
This was a modest affair served by stopping trains. It had two wooden platforms flanking the main lines and the main station buildings on the Up side were also wooden. Access to each platform was by long ramps from Parkfield Road, which crossed under the railway a few yards on the Birmingham side of the station. As far as I remember, there was an electric bell operated from the signal box to alert the station staff to an approaching stopping service.
Down Signals
Down Outer Distant was mounted underneath Spring Vale's Down Home on a short LMS tubular post outside Spring Vale box.Up Signals
Down Inner Distant was mounted underneath Spring Vale's Down Starter - a distinctive 'Gallows' signal with the arms on a wooden cantilever to the right of a lattice main post [see Note 1].
Down Home 1 was an LMS tubular post.
Down Home 2 was a very short LMS tubular post, just outside the box, with Monmore Green's Down Outer Distant carried underneath.
Down Starter was an LMS tubular post, with Monmore Green's Down Inner Distant carried underneath.
Up Outer Distant was mounted underneath Monmore Green's Up Home on a LMS tubular post.Detonator Placers
Up Inner Distant was mounted underneath Monmore Green's Up Starter on a LMS tubular post.
Up Home was an LMS tubular post [see Note 2].
Up Starter was Upper Quadrant on a tall wooden post - the post almost certainly a survivor from the previous L&NWR lower quadrant arrangement. A Distant for Spring Vale was carried underneath.
Emergency Detonator Placers on the Up and Down main lines were operated from two levers in the centre of the lever frame.
Block Instruments, Block Control, Track Circuit and Signal Repeaters
Two L&NWR Block Signalling Instruments and a Block Switch stood on the Block Shelf. The block instrument connected to Spring Vale Sidings had a larger bell dome, giving a lower tone, allowing the signalman to distinguish that block bell from the one to Monmore Green, which had a smaller bell dome and a higher tone. The Block Switch allowed Catchem's Corner to "switch out", so that the block section extended between the signal boxes on either side which remained "switched in". Much later, I remember working Tipton Station box when the next box was Wolverhampton No. 1 (because Bloomfield Jn., Deepfields, Spring Vale, Catchem's and Monmore Green were closed).
Three track circuits covered the two main lines within 'Station Limits' and, outside the first 'Stop' signal in each direction, there was a 'Berth' track circuit (probably 200 yards in length). If 'Line Clear' had not been obtained from the next signal box, the 'Berth' track circuit held the home signal electrically locked until an approaching train had been 'brought under control'. The state of each track circuit (Clear/Occupied) was shown by electromechanical indicators fixed to the front of the block shelf. There were certainly repeaters for the weight bars of the distant signals (slotted with the arm above - see the article Slotting). I can't remember whether any of the stop signals had arm repeaters, or which signals had lamp repeaters. There's a general description of signal repeaters in the article Signal Arm, Slot and Lamp Repeaters.
Hours of Opening
In common with a number of signal boxes on the Stour Valley at the time, Catchem's Corner was normally open from 6.00 a.m. Monday to 5.50 a.m. Sunday.
Historic Events
The splendid 'Railways Archive' site has a PDF of the report following an accident at Catchem's Corner in 1912 here. It gives a fascinating insight into how the railway was then, plus clearly showing how a moment's lapse of concentration can have disastrous consequences.
In 1965, after I'd stopped visiting Catchem's Corner, John Thompson shipped a series of loads called the "Heaviest Single Load carried by British Railways" through the Ettingshall Road Goods Yard. There's a detailed article with photographs about these loads in 'BRILL' (see 'references ' below). I did signal one of these loads through Tipton Curve Junction and I've described that here.
Notes
[Note 1] Near the end of mechanical signalling on this line, this signal was replaced by a conventional tubular post, with a 'Shunt Ahead' arm underneath. This later arrangement is shown in the post Railway Signalling: Spring Vale Sidings Box.
[Note 2] Near the end of mechanical signalling on this line, a motor-operated distant for Spring Vale Sidings was placed underneath the Up Home. This later arrangement is shown in the post Railway Signalling: Spring Vale Sidings Box.
References
For a track diagram produced by John Swift showing Catchem's Corner, refer to the Signalling Record Society publication 'British Railways Layout Plans of the 1950's', 'Volume 11: LNWR Lines in the West Midlands' (ISBN: 1 873228 13 9).
There's nothing left now except plain double track - see 'Railway Track Diagrams Book 4: Midlands & North West', published by Trackmaps (ISBN: 0-9549866-0-1).
'Keep Big Loads off the Roads - a record of the single heaviest load carried by BR' in 'British Railways Illustrated' ('BRILL') Volume 9 Number 3, December 1999.
