Saturday 29 December 2012

Railway Signalling in Burma - Part 2: Colour Light Signals & Motor Points

The British built the extensive metre gauge railway network in Burma. I've not travelled widely on the railways in Burma, but I try to keep a look-out when in the country.

Colour light signals and power-operation of points are in use at Yangon Central Station and around Yangon's Circle Line. I've also seen colour light signals on a brief visit to Mandalay station.

Colour Light Running Signals

Signal 'R101' on Platform 3 at Yangon Central Station. A multi-LED lamp has replaced the original filament lamp.

Running signals are 2-aspect or 3-aspect, with some 'searchlight' types within Yangon Central Station. Position light subsidiary aspects are provided where necessary. In places, multi-LED lamps have replaced the original filamentary lamps.

Route Indicators

Following British practice, Route Signalling (rather than Speed Signalling) is in use. In general, routes are indicated by a 'Line of Lights' but there are a few Theatre-Type route indicators.

Rear view of two 3-aspect signals with 'Line of Lights' route indicators at Pazundaung.

2-aspect colour light signal with theatre route indicator on the Down platform at Pha Yar Lan. Note the two side lenses (sometimes called 'pigs ears' in the U.K.) for the benefit of a driver stopped at the signal.

Ground Signals

To control shunting movements, position light ground signals are provided.

Position light shunting signal R64, location case and two point machines in Yangon Central Station.

Point Operation

In colour-light areas, points are electrically-operated using point machines. One type of machine is shown in the picture above. The picture below shows another type of point machine at Pa Ywet Seit Gone.

Point machine at Pa Ywet Seit Gone.

Photographs

  Burma: Colour Light Signals & Motor Points.

The above set of pictures is part of a Collection Railways in Burma.

[Remarks on theatre-type route indicators clarified: 18-May-2016]

Friday 28 December 2012

Railway Signalling in Burma - Part 1: Semaphore Signals

In the 19th century, Myanmar, then known as Burma, was administered as part of 'British India'. The British built the extensive metre gauge railway network so it’s not surprising that the signalling installed largely followed British practice.

But the surviving semaphore signals are a very odd collection. I imagine that this is at least partly the result of Burma being cut-off from the West during the 50 years of military rule. What's visible now gives the strong impression of being cobbled-together on a 'make-do-and-mend' basis from whatever was available.

The British Legacy

I've not travelled widely on the railways in Burma, but I try to keep a look-out when in the country. The best example of a 'typically British' signal I've seen so far is at Bago.

A 'typically British' lattice-post bracket signal at Bago.

Although the stop signal arms are red with a white band on the front, a further embellishment is provided in Burma. There are two circular 'spots' in white, one on the left, the other on the right of the white stripe. A small square in the 'spots' reveals the red arm colour. It's hard to resist the conclusion that this elegant bracket signal was built in the U.K. and shipped out to Burma (although the mixture of upper-quadrant main arms and lower-quadrant subsidiary arms is puzzling).

Made in Burma

Elsewhere, signals show little standardisation as if each application was built from scratch with whatever was to hand.

A curious stop signal in between Bago and Kyaikto.

A fairly extreme example is shown above. First, the signal post appears to be a rolled section, probably 'T' profile. A pivot for the signal arm has been fitted right at the top of the post and there is no finial. The signal arm looks 'second-hand' and it carries the two 'spots' described above. It appears to be bolted to a casting which would normally include the 'spectacle' carrying coloured glasses allowing the signal to display a coloured indication at night. In this case, the casting has no spectacle but the shape of a typical lower-quadrant 2-aspect spectacle frame has been made out of steel rod. I can't see the function of this frame - the 'spectacle frame' is too thin to improve the signal sighting, no signal lighting is provided so there are no coloured glasses and it's certainly not aesthetically satisfying. A lower-quadrant signal arm mounted like this just looks 'wrong' (and this arm-and-spectacle combination is a mirror-image of a British lower-quadrant). The signal in the picture is displaying a (very poor) upper-quadrant 'Off' indication. The signal is controlled by a conventional wire and pulley system from an associated single-lever ground frame. Pulling on the wire lifts the balance weight and the balance weight bar moves the push rod so as to lift the arm. A signal ladder has been provided, but it's of rather lightweight construction.

There seem to be endless variations on this theme. Some signal arms are tapered towards the pivot (as in typical American practice). The two white discs with the square 'hole' are still provided but, particularly on tapered signal arms, one 'spot' is sometimes deformed into an oval. Sometimes, a spectacle frame is provided, cut from steel sheet. Although all the signals I've seen are apparently 2-aspect, these cut-out spectacles appear with both two- and three- holes. No lighting is provided and there are no coloured spectacle glasses.

Upper quadrant signals at Bago with 'lower quadrant' arms.

At Bago, there are two signals of this pattern side-by-side, one with a 2-hole cut-out spectacle, the other with 3-holes. Both these arm-and-spectacle combinations are as in British practice (not mirror image) so, when arranged as an upper quadrant, look very odd when 'Off' (and couldn't easily provide the normal feature of the spectacle by changing the colour of the signal indication at night).

These two signals (like many others) are lattice-post - the remains of earlier signals, I suspect. Lattice posts look odd without a finial but most of them have disappeared. Other variations on signal posts include steel tube and, particularly for taller posts, two rolled sections (or rails) connected to form a built-up post. The example below has a built-up post surmounted by a tubular section and a finial. The arm of this signal has a nicely-proportioned spectacle made out of rod. As far as I can see, the push rod from the balance weight bar mounted fairly high would actually operate the arm as a lower-quadrant but the arm remained stubbornly 'On' as we rolled past! I'm not sure I'd be happy to use the rather lightweight signal ladder provided on this tall signal.

Tall signal with built-up post and tubular section.

Motor operation

Between Yangon and Bago, there a pair of motor operated semaphore signals - a down distant followed by a down outer home. Both signals had tapered (American-style) arms with 3-aspect spectacles and the rear of the arms was black with the chevron or bar white!

The Bracket Signal

Most of the network remains single track with passing loops, although around Yangon and on main lines there's double track which is still being extended.

At passing loops, there's normally a splitting home signal at each end of the station, situated at the toe of the points, allowing movements onto either Main or Loop line.

Typical 2-doll bracket at a passing loop between Bago and Kyaikto.

The picture above shows a typical 2-doll equal bracket. The main post and platform is fabricated from rolled sections but the dolls are lattice construction. The signal arms and pivots appear second-hand but the 'spectacles' are fabricated from rod - that on the left appears to be covered with gauze. Back blinders (which, on a signal with lighting, obscure a white 'back light' when the arm is 'Off') have been fabricated from sheet and rod, but there is no lighting. The arms are arranged as lower-quadrant and the right-hand arm is (sort of) 'Off'. The arms are operated by push rods from rocking shafts on the signal platform. The rocking shafts are operated by push rods from the ground, interlocked with the loop points. Normally, a single lever operates the signal with the appropriate arm 'selected' by the points interlock. The disc on the main post was once a speed restriction sign. The 'pointsman' is displaying a steady green flag.

Upper-quadrant 2-doll bracket signal at entrance to loop from the south at Naba.

Elsewhere, similar 2-doll brackets are provided as splitting home signals at the entry to loops but with the signal arms arranged as upper-quadrant, as the example shown above.

Photographs

Burma: Semaphore Railway Signals.

The above set of pictures is part of a Collection Railways in Burma.

Road Repairs

The Wirtgen W250 Cold Milling Machine.

A stretch of road near me in Brewood had been 'patched' many times over recent years. Apart from the remarkable number of private cars the village seems home to, this road carries our bus service, the delivery vehicles servicing our local shops and a terrifying variety of agricultural machines, often with large trailers. As a result, 'patching' gave only brief improvement before the surface started breaking up again.

At the beginning of November, a circular was put out by the Council saying that the road in question was being closed for 8 days for essential work. So I was not surprised when I got up on 8th November to hear the muffled roar of a large diesel engine. I was quite impressed by the sight of the large yellow machine parked outside which was producing the sound. I recognised it as a 'Road Plane' and had a vague idea of its function in removing an old road surface but realised I knew little more and had not seen one operating. I had a closer look and spoke briefly to the machine operator as he filled the machine's water tank from a Fire Hydrant. The sheer size of the machine, carried on four tracked 'bogies', was notable as was the proliferation of colour computer screens provided to control the vehicle.

The machine was labelled as a Wirtgen product but it was being operated by Power Plane Limited. The machine was labelled as a 'W250' and the Power Plane website has brief details here, with links allowing download of two Wirtgen Documents in PDF format - the Technical Specification for the machine and a description of its use.

Before long, the machine in Brewood was demonstrating its ability to remove the old road surface by Cold Milling. I found the speed and accuracy of the process impressive.

The W250 at work.

In 1961 Reinhard Wirtgen, then aged 20, set up a haulage firm with one lorry. He developed the business into a construction firm, developing hydraulic shears for demolishing concrete structures and producing his own machines for road repairs. In 1970 he introduced 'Hot Milling' as a method for removing worn road surfaces and later 'Hot Recycling' as a method of repairing roads. 'Cold Milling' was introduced in 1979 and the business gave up contracting to concentrate on building machines at Windhagen, Germany. The Wirtgen Group now supplies machines worldwide and, in addition to Cold Milling machines, produces machines for Soil Stabilisation, Cold Recycling, Hot Recycling, Slipform Paving and Surface Mining. I'm afraid my ignorance of these techniques is almost total but the Wirtgen Site is a useful primer.

The W250 made short work of removing the old road surface, allowing other machines to lay the replacement surface. It was the massive yet sophisticated W250 which captured my imagination, but I should perhaps mention the Bomag BF600P Asphalt Finisher. Links on the Bomag webpage allow download of a leaflet and datasheet for this machine.

The Bomag BF600P Asphalt Finisher.

Bomag is a German company started in 1957 but it is now part of the much larger French group Fayat.

Photographs

Cold Milling Machine for Roads.

Thursday 27 December 2012

H.M.S. Belfast

This is the view upstream from the bridge of H.M.S. Belfast, with the twin towers of Cannon Street station visible in the distance.

H.M.S. Belfast is a Light Cruiser of the 'Town' class ordered from Harland and Woolf in 1936 and commissioned in 1939. She served during World War II, including at the Battle of North Cape. After the War, she spent a number of years in the Far East. Following action during the Korean War, she was placed in reserve in 1952. In 1955, it was decided to modernise the ship which was re-commissioned in 1959. She was placed in reserve again in 1963 and, with the threat of scrapping, a trust was set up to preserve her. Wikipedia has an article about H.M.S. Belfast here.

Subsequently, she became 'the largest accessioned object' in the collection of the Imperial War Museums (there's a little about Museum Collections and 'accessioning' here).

H.M.S. Belfast arrived in the Pool of London in 1971, to become a floating museum. It wasn't until 5th December 2012 I actually made a visit! I was surprised to find a large vessel moored alongside the museum ship - the S. A. Agulas. I later found out a little more about this ship (see below).

The Quarterdeck of H.M.S. Belfast, showing the Silver Bell.

The tour of H.M.S. Belfast is 'self-guided', but a helpful 'audio guide' is included in the admission price. I found the tour absorbing but tiring. If you do the full tour, there's a lot of stair-climbing. I was surprised how much of the ship is open to visitors. You can descend to boiler rooms and engine rooms, ascend to the Admiral's Bridge and the Ship's Bridge, see how the large armaments were fed with shells from the bowels of the ship and understand a little of how people ate, slept and worked on board. The ship is populated with quite life-like dummies illustrating all aspects of seamens' lives. To my surprise, I am able to strongly recommend a visit.

Aerial view looking upstream from Tower Bridge showing H.M.S. Belfast. London Bridge Station is in the centre with H.M.S. Belfast moored in the Thames to the right of the station. Picture taken 25-Mar-2009. Click here for high-resolution version of this picture. This is one of a set of pictures 'London from the Air'.

S. A. Agulas

View taken from H.M.S. Belfast showing the stern of S. A. Agulas and helicopter deck. The Tower of London is in the left background.

On my return home, I was able to find out a little more about the ship and its visit to London.

She is a South African ice-strengthened ship built in Japan, completed in 1978. It was a polar research vessel until the S. A. Agulas II was commissioned in March 2012 to take over this role, since when it has become a training ship. See the Wikipedia article. I traced the ship's recent movements from the useful site MarineTraffic.com (live information on the S. A. Agulas is here). She'd arrived at London on 29th November 2012 and then moved to the mooring alongside H.M.S. Belfast where I saw her. There's an interesting stop-frame video of this movement on You Tube here. The ship displayed two website addresses - www.seeingisbelieving.org and www.thecoldestjourney.org which explained the ship's current mission.

Seeing is believing is "is a global initiative to help tackle avoidable blindness" set up in 2003 as a collaboration between Standard Chartered Bank and the International Agency for Prevention of Blindness.

The Coldest Journey is an attempt by Sir Ranulph Fiennes and a team of explorers to cross Antarctica in winter with the aim of raising ten million dollars for Seeing is Believing. The progress of this expedition is being reported in a Blog on the The Coldest Journey website.

References

Imperial War Museums Guidebook for H.M.S. Belfast ISBN 978-1-904897-93-4.

Photographs

H.M.S. Belfast.
(Poor lighting in many parts of the ship made it difficult for me to take decent shots: the Guidebook listed above is full of excellent colour photographs).
London from the Air.

Wednesday 19 December 2012

Bago to Kyaikto by Train

During my trip to Burma in 2012 (described in a series of posts here), I travelled by train from Yangon via Bago to Kyaikto. This post describes the journey from Bago to Kyaikto with a bit more technical detail. The first part of the journey, from Yangon to Bago, is described here. For this description, I've assumed the 'Down' direction is away from Yangon (although I've found one source which contradicts that). I've called the two signal boxes at Bago 'South' and 'North', based on the geography, but I don't know their official designation.

Journey made on Saturday, 8th September 2012

This post describes the second half of an uncomfortable (but interesting) journey from Yangon to Kyaikto.

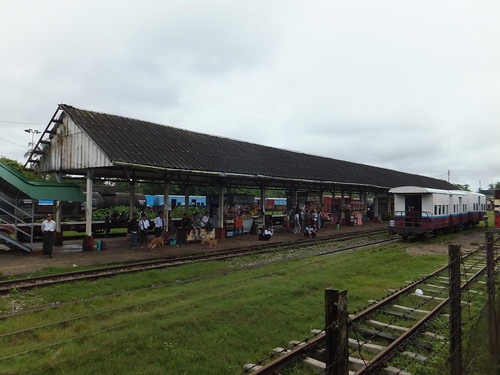
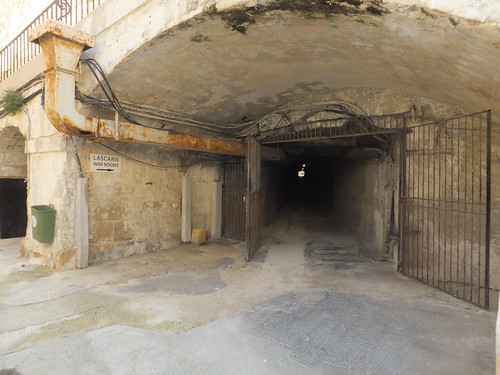
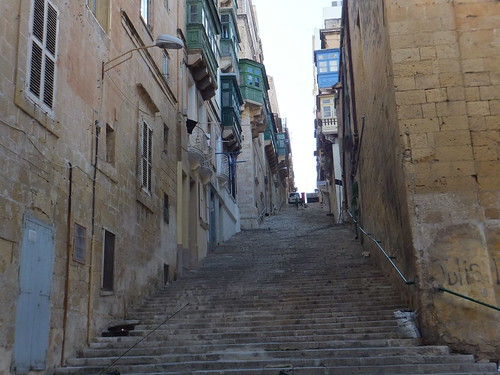
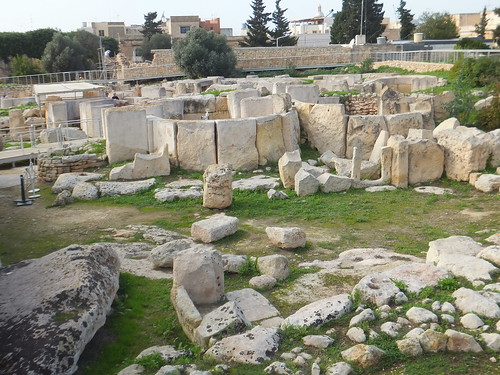
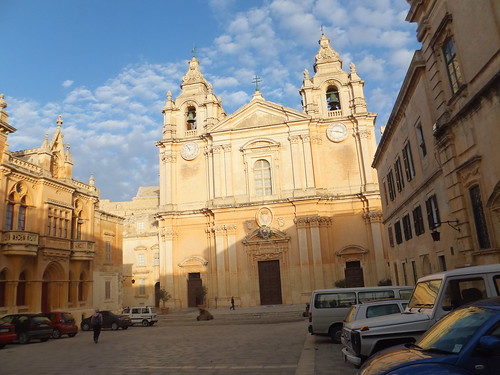
Bago Station. Four-wheel coaches in the central siding, freight vehicles in the background.

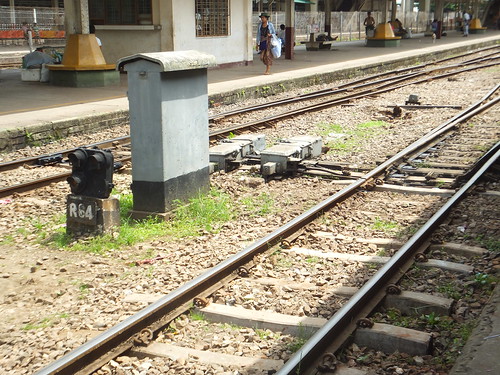
Bago is still an important station and has two mechanical signal boxes, one at each end of the station. When we stopped, large numbers of passengers got on and off. At least some of the people getting off were 'hawkers' selling drinks, food and all sorts of things to passengers. I presume they intended to catch the next train heading towards Yangon to continue the "at-your-seat service".

Passengers (and 'hawkers') getting on and off our train at Bago.

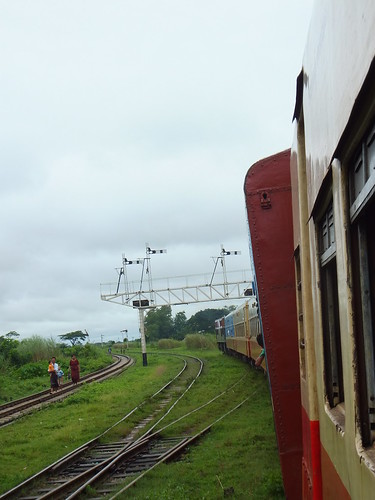
After a brief stop, our train continued, swinging violently over the pointwork near the North Signal Box as we made our way to the line to the Mawlamyine.

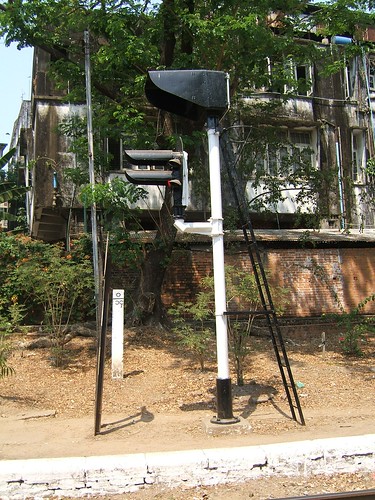
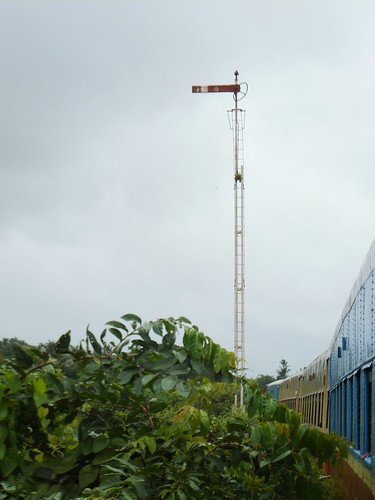
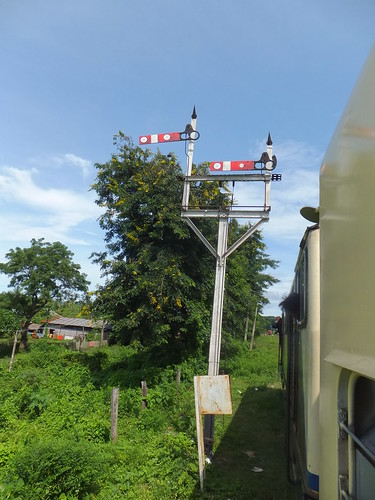
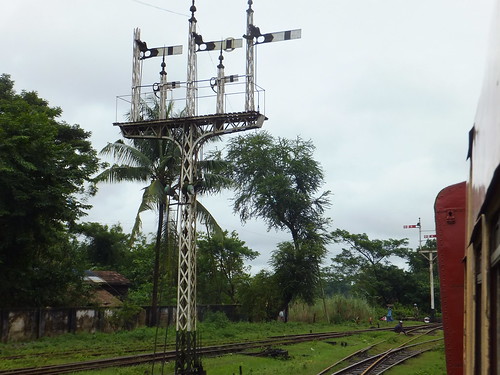
A magnificent 5-doll lattice-post bracket signal.

I managed a couple of shots of a magnificent 5-doll lattice-post bracket signal with 3 upper-quadrant main arms (the centre one with a ring which I assume means 'Goods Line') and two lower-quadrant miniature arms. All the arms had proper spectacles but no glass in the spectacles and no lighting. Balance weights (like most of the semaphore signals I've seen in Burma) were fitted at high level. Amazingly, four of the five dolls retained their elegant finials. From its style, this signal must have been imported from the U.K.

Leaving Bago on the line to Mawlamyine.

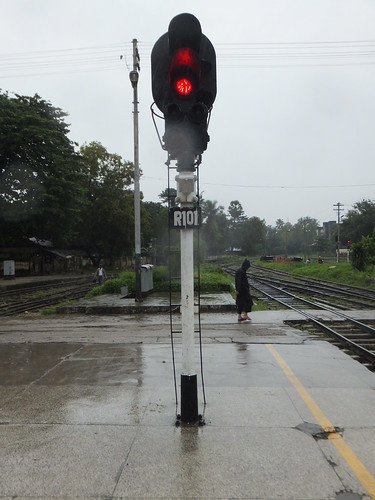
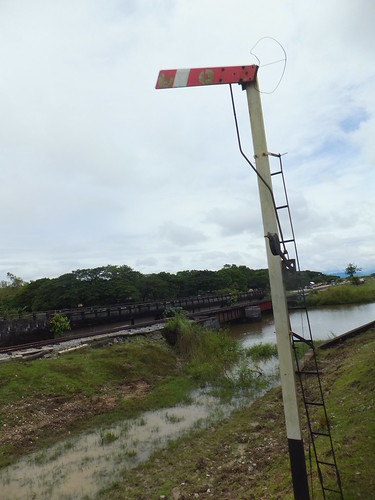
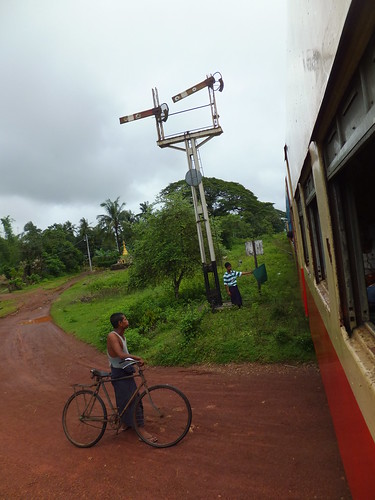
We passed under a steel truss gantry signal carrying what I presume are the Up Home signals for the North Signal Box. The signal dolls were lattice post but I couldn't get a proper look at the complete structure. Bago had one more puzzle for me. We were now travelling on the rightmost of three lines where the two on our left apparently formed the double-track to the north. Where you would expect the North Signal Box down starting signals, there were, indeed, two lattice posts (neither with finials), both fitted with the weird 'lower quadrant arm arranged as upper quadrant' I'd seen before, one with a 3-aspect spectacle, the other a 2-aspect spectacle!

Bago North Signal Box down starting signals.

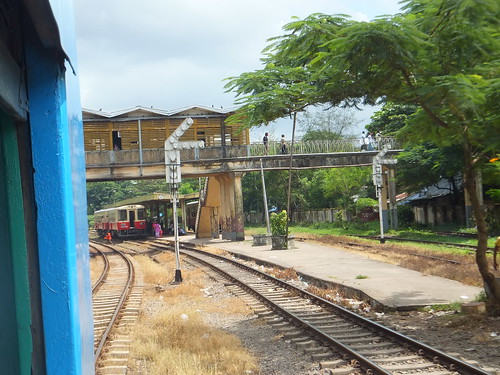
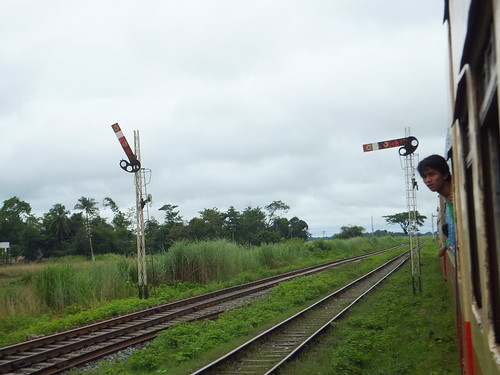
It would take another three hours to reach Kyaikto on the single line, making our way through a number of stations with passing loops, sometimes taking the left track, sometimes the right. We made brief stops at some of these stations. About an hour out of Bago, we stopped at a slightly larger station with the normal passing loop and a third loop line presumably originally intended for loading/unloading goods vehicles because a single-lever ground frame controlling a trap point was provided at each end of the station. There was also an abandoned water column. Leaving this station, I almost missed our passage over a Scherzer Rolling Lift Bridge. After a further half hour of travelling, another line appeared on our left and trailed into our route. I think this formed a connection further north with the line from Bago to Mandalay. About two hours out of Bago, we stopped for a moment at a station where the loop line was blocked by a single open wagon. After another twenty-five minutes, we stopped at another station where the other line was occupied by a Yangon-bound train waiting for us to arrive, headed by D.1116.

DD.1116 heading towards Yangon with a passenger train waits for us to clear the single line.

After a further half an hour, we arrived at Kyaikto where I got off exhausted with being thrown about.

If anyone can offer any clarification of Myanmar Railways practices, it would be welcome.

Train Timing and Photograph Locations

As yet, most of the stations are unidentified. There's a table below showing approximate journey time from leaving Yangon (hours:minutes), photo reference (prefixed 'DSCF') and brief description. There are links to the Sets containing these pictures in 'Photographs' below.

 
Elapsed Time Photo Ref Description
1:54 6009 Bago South Down Outer Home
1:55 6011 Bago South Down Home Gantry
1:57 6019 Bago Station
2:01 6021 Leaving Bago Station
2:02 6025 Bago North Up Home Gantry
2:12 6027 Down Home Bracket
2:13 6028 Station A
2:32 6032 Down Home Bracket
2:32 6033 Station B
2:33 6034 Ground frame exiting loop
2:48 6035 Down Outer Home
2:48 6036 Down Home Bracket
2:50 6037 Trap Point Ground frame
2:52 6038 Station C
2:54 6039 Trap Point Ground Frame
2:54 6042 Up Home Bracket
2:55 6043 Rolling Lift Bridge
3:13 6044 Down Home Bracket
3:22 6046 Down Outer Home
3:24 6048 Junction Ground Frames
3:22 6049 Junction Ground Frame
3:24 6050 Junction Ground Frame
3:35 6054 River Bridge
3:40 6056 Approaching Station
3:41 6057 Station D
3:41 6058 Station D
3:44 6059 Up Home Bracket
4:02 6065 Station E
4:03 6066 Leaving Station E
4:04 6067 Leaving Station E
4:24 6068 Arriving Station F
4:25 6069 Station F
4:25 6070 Station F
4:26 6071 Up Home Bracket
4:39 6072 Down Outer Home
4:40 6073 Down Home Bracket
4:42 6074 Station G
4:53 6075 Kyaikto Down Distant
4:54 6076 Kyaikto Down Outer Home
4:56 6077 Kyaikto Down Home Bracket
4:58 6079 Kyaikto Station

Photographs

Bago Station.
Bago to Kyaikto by Train.

[Revised 20-Dec-2012]

Monday 17 December 2012

Santa Specials - 2012

Most preserved railways operate some sort of Christmas Service. For young people, this often includes a chance to meet Santa and receive a present, for grown-ups perhaps a mince pie accompanied by mulled wine. Railways that operate dining trains usually provide the opportunity to take a full meal on the train. The revenue that these initiatives bring in can be crucial to the finances of a railway.

MOSI

About 25 years ago when I first became a railway volunteer at what was then the Manchester Museum of Science and Industry (MMSI) but is now the Museum of Science and Industry in Manchester (MOSI), we ran trains at Christmas using a DMU Trailer Car for passengers, hauled by Agecroft No. 3. The trains were discontinued when the cab-less 'Planet' replica became our only steam motive power and the semi-open 4-wheel coaches were the only passenger rolling stock.

The situation for footplate crews (if not for the passengers) improved with the commissioning of 'Agecroft No. 1' and MOSI re-introduced Christmas trains in December 2011. In 2011, I wasn't able to do any of the pre-Christmas trains, but I was driver on 29th December, described here. Operating with the two semi-open 4-wheel coaches and usually a 20-ton brake van on the rear for the guard, these trains proved popular and were repeated in December 2012.

In 2012, I was rostered a couple of times, on Saturday 8th December and Saturday 22nd December.

On 22nd December, the battery electric locomotive shunts 'Agecroft No. 1' onto its train, while Dave looks on.

On the 8th December, the weather was dry, rather cold but with some sun. Dave was Fireman and his wife, Eileen, was Guard. Matthew was Operating Officer. As expected, 'Agecroft No. 1' performed well. She has been repainted in what I believe was the R.S.H. standard ex-works livery (where the customer did not specify a special livery) and looks quite handsome. Plenty of visitors braved the cold weather and took a trip by train so we were kept busy all day.

Saturday 22nd December did not go as planned. It poured with rain and was very gloomy. Once again, Dave and Eileen were Fireman and Guard but, this time, Gordon was Operating Officer. 'Agecroft No. 1' had been left on the pit on Friday night, with a warming fire in the firebox but the incessant rain had cooled the boiler down and it was about half past eleven before we'd steam. While Dave was seeing to the fire, Gordon and I performed the necessary shunt using the Battery Electric Locomotive. The 'Battery' was standing next to the two semi-open coaches in the Power Hall, so we coupled the coaches on, released the handbrakes on the coaches and made sure the coach brakes were released by kicking the brake blocks. The 'Battery' has recently received a complete new set of batteries which has given her a new lease of life. Shunting should always be carried out at low speed so it was never necessary to use more than second notch (with the two traction motors in series). We tied-down the coaches just clear of the running line so that we could close the yard gates and the electrically-operated door on the power hall. Then we 'unhooked' the 'Battery' and moved to the pit to attach 'Agecroft No. 1', by now 'brewing-up' quite nicely. We then shunted the steam locomotive to the head of its train, Dave attached the coaches and we moved the whole consist back to the pit so that I could 'oil round' and carry out the daily examination. Dave uncoupled the battery electric shunter and Gordon drove it clear.

It was still raining hard as I oiled 'Agecroft No. 1' and the term 'drowned rat' soon described my condition. It's amazing just how wet you can get oiling even a small locomotive. Going into the pit to oil the inside Stephenson's Link Motion provided something of a respite because the boiler acted as an umbrella but the pit drainage seemed to have trouble dealing with all the water so I was splashing about in a couple of inches of water. Another of my sayings is "Anybody can work on an engine in good weather - it takes a Railwayman to do it in bad weather" so I pressed on.

As the boiler pressure came up, I gently moved the train back into the platform and onto the 20-ton Brake Van stabled at the buffer stop. Dave coupled the brake van onto the coaches using the red-painted Emergency Coupling. As its name implies, this coupling is usually used when the normal coupling has failed and it is fitted between the two drawhooks and not permanently attached to either vehicle. The two 'D' links are a different length from normal couplings to allow fitting between drawhooks and this means that the Emergency Coupling may also sometimes be employed where use of the standard couplings would allow too much slack, as in this case.

Dave couples the 20-ton Brake Van onto the coaches, using the red 'Emergency Shackle'.

Coupled up, I attempted a brake test. When conveying passengers, there must be an effective continuous brake which can be applied by both the Guard and the Driver (and applied automatically in the case of the train becoming divided). There's an earlier article describing brakes here. Admitting steam to the Ejector on the locomotive allows the regulation vacuum to be created in the Train Pipe which runs the length of the Train. Normally, a 'locomotive only' brake test should be carried out before leaving the shed, as described in another earlier article:-
The driver should also check that the vacuum ejector for the train brakes is capable of creating the correct partial vacuum (21 inches of mercury for this locomotive) and that there are no blockages in the brake pipes to the flexible hoses on the front and rear bufferbeams. If time is short, this last test is sometimes deferred until the locomotive is actually in traffic but this is not to be recommended.
Sadly, on this occasion, 'Agecroft No. 1' struggled to create even 16 ins/Hg so we carried out various tests looking for leaks on the train or flexible hoses not made correctly. Then we carried out the 'locomotive only' test and checked around the Vacuum Ejector and the drain provided to release condensate from the the ejector exhaust. We carried out a 'Test Run' without passengers to see if that would provide any more information. The brakes worked correctly, as they should, with the system and brake cylinders operated at '15 inches' (it's the pressure difference between the top and bottom of the piston in the brake cylinder which operates the brake) but the braking effort is reduced when the correct vacuum is not obtained. Gordon correctly decided that we would have to cancel the planned passenger operation and so, after three hours of getting everything ready, we disposed of the engine and put everything back. As the rain was still lashing down, it was almost literally an "early bath". We'd not been able to diagnose the fault although Dave thought that the Vacuum Ejector system on the locomotive might have had some recent changes.

MOSI Photographs

There's a (very small) set of photographs here. This set is part of a larger collection of photographs of the Museum here.

Peak Rail

In 2012, I was rostered a couple of times, on the first day of Santa Trains on Sunday 2nd December and on Sunday 16th December.

'Sapper' on arrival at Matlock Riverside on 2nd December 2012.

Although Peak Rail's normal service trains run through to Matlock Town, the 'Santa Specials' terminate at Matlock Riverside. Including the 2-coach 'Palatine' Dining Set, they are 7-coach trains and, traditionally, they are top-and-tailed, although it is possible to work the service with one locomotive as has happened at times, for instance, where a diesel locomotive has proved difficult to start in the morning (details).

On the 2nd December, I was rostered on popular visitor 'Sapper' whilst 68013 was undergoing repairs to the combination brake valve. By the time I arrived, Derek and Colin had matters well in hand, but they explained that the heavier-than-forecast frost had caused them some problems because the locomotive had been left on the outside pit. This is the standard arrangement, to avoid having to drag the locomotive outside the shed before lighting up. However, on subsequent 'Santa' days, the motive power remained in the shed overnight and a member of staff was rostered early to move the locomotive (or locomotives) onto the outside pit with the diesel mechanical 'shed pilot'. The only problem I had was that 'Sapper' was reluctant to move when we were ready to come "off shed". I'm never sure what's most susceptible to ice build-up but a bit of judicious application of steam in both fore gear and back gear soon got us moving, allowing us to shunt across to the stock and start steam heating.

'Sapper' worked at the Matlock end of the train, facing south, with 'Penyghent' at the north end. The weather was sunny but cold and we carried out our booked working during the day without incident.

Derek and Colin look quite cheerful as they await departure from Rowsley.

My second 'turn' was on Sunday, 16th December. '68013' was back in traffic (sporting her new brake valve), paired with 'Sapper'. Harvey and I were on '68013' at the south end of the train facing south and Roger and Rob were on 'Sapper' at the north end facing north. Every train was fully booked and the 'Palatine' was at full capacity for Christmas Lunch.

68013 ready to leave Rowsley.

Once again, we performed the four round trips to Matlock Riverside without incident, apart from some late running because Santa had so many boys and girls to see as he worked his way through the train with his Helpers who carried the sacks of presents.

Since commencing the Jan Ford's World blog, I've written about Santa Trains each year from 2007 onwards. You can find all these posts here.

Peak Rail Photographs

There's a set of photographs Peak Rail Santa Trains 2012. This set is part of a larger collection of photographs at Peak Rail here.

[Additions 23-Dec-2012, 25-Dec-2012]

Wednesday 12 December 2012

Return to Malta (Part 8)

Events of Saturday 30th November 2012

Rain had been forecast for the day we were leaving so when I decided to have a final walk to Ghajn Tuffieha Bay, I took a packable raincoat. There was a fairly strong wind producing much larger waves than earlier in the week and rain seemed to be 'spitting'. However, I still enjoyed the exercise. Returning to the hotel past Ghajn Tuffieha Tower and along the cliff path, the rain was getting worse and the raincoat proved a wise addition. By the time I reached the hotel, the rain was sluicing down so I spent the rest of the morning working on the computer as heavy rain battered the windows. Fortunately, by the time we were ready to leave the hotel, the storm had passed.

Dean drove us to the airport at Luqa and returned the hire car. After check-in there was plenty of time in hand before boarding our Air Malta flight back to Heathrow.

It had been a very enjoyable Return to Malta for me. I was surprised at the extent of the, I suppose, inevitable changes which had occurred. My visit to the Lascaris War Rooms (described in Return to Malta (Part 7) induced me to find out more about the suffering and bravery on the island during the second world war and I've referenced a book and a film in that article.

References

During my stay, I'd acquired a number of publications about Malta which are listed below.

'Top 10 Malta & Gozo' published Dorling Kindersley (ISBN: 978-1-4053-6091-3)

I'm not a great fan of the 'Top 10 beaches ... towns ... temples ... bars & restaurants' format but there is a lot of good information in here. There are maps in the fold-out front cover and rear cover, plus a curiously-shaped pull-out map and guide which is plasticised.
'Malta History & Tradition' published BDL Publishing (ISBN: 978-99957-20-96-4)
A slightly more conventional approach produced in Malta with excellent photographs. There are maps in the fold-out front and rear covers.
'AA/Macmillan Malta and Gozo Traveller's Map' published AA/Macmillan (ISBN: 0-7495-0062-X)
This double-sided fold-up map is inexpensive and fine for most purposes.
'The mAZe Street Atlas Malta and Gozo' published Uptrend Publishing (ISBN: 978-99932-99-12-7)
This is a detailed 'A to Z' style street atlas with comprehensive street indexes produced in Malta and suitable for serious navigation.
Photographs

The photographs on this trip are grouped into a number of 'sets' on Flickr. Links in earlier posts take you to these 'sets'. All the 'sets' form a 'collection' on Flickr titled Malta.

Saturday 1 December 2012

Return to Malta (Part 7)

Events of Thursday 29th November 2012

Ann and Dean had made arrangements for the day so I decided to travel to Valletta on the Route 44 Arriva bus (see their website here). The bus left from a stop just outside the hotel at 08:50 and took about an hour to reach Valletta. The route took in a number of small towns where the streets appeared quite unsuitable for buses but we got through unscathed. The bus was fitted with a passenger information indicator showing route number, destination and name of the next stop. This was backed up by computer-controlled voice announcements. I was quite impressed that the displayed information changed correctly throughout the journey.

Valletta Bus Station

On my first visit to Malta, the buses (then individually owned) left from a series of stands arranged in a circle around the Triton Fountain. Now, the buses go around the fountain to a dropping-off point before moving into either a bus parking area or a series of new stands with a dozen or so stands angled to a concourse. Buses drive into the stand, pick up passengers and then back the loaded bus out of the stand, hoping to avoid all the other movements of buses arriving and departing. I had hoped that this type of bus station had been thoroughly discredited by now but apparently not. Each stand has a sign facing the bus driver reminding the driver (in English and Maltese) to check his mirror before reversing and seek assistance if in difficulty. One would have hoped such instruction would be redundant. The bus station at Valletta is clearly new and a series of ugly, bright orange kiosks set in a line along the concourse were still being fitted out by builders.

Part of the new bus station in Valletta.

Entering Valletta

Valletta is built on a peninsula thrusting north-east with Marsamxett Harbour on the left and Grand Harbour on the right. The older buildings are 16th century, built by the Order of Saint John of Jerusalem (the 'Knights Hospitalers'). The city lies inside massive walls and bastions (the sticking-out bits of wall with a pointed plan which improve the ability of defenders to resist outside attacks).

Most passengers arriving at the new bus station walk through the City Gate area, now a breech in the huge walls following demolition of the previous City Gate in 2011. Major building work is in progress to create a complex comprising a new Parliament Building, Open Air Theatre, Freedom Square and Gate all designed by Renzo Piano. This work is on the site of the former Royal Opera House destroyed by bombing in the Second World War. Once past the building site, you enter Triq-Ir-Repubblika (Republic Street), a wide pedestrian thoroughfare which runs through the centre of the city to Fort St. Elmo at the tip of the promontory. A grid of streets and passages extends on both sides of Republic street. Somewhat bewildered by the activity in the City Gate area, I made my way to one of the most famous buildings in Valletta, Saint John's Co-Cathedral.

Saint John's Co-Cathedral

The external appearance of the building is austere but inside redecoration has resulted in a riot of the Baroque.

Externally, Saint John's Co-Cathedral is austere ...

... internally, it's a riot of the Baroque.

In addition to its religious function, Saint John's Co-Cathedral serves as an important museum. Even the (highly recommended) Cathedral Website refers to the Cathedral as "one of the most popular cultural attractions visited by tourists in Malta". In the Oratory, two famous paintings by Carravagio are displayed together with other works of art. There are Galleries of Tapestries, Sacred Vestments and Choral Books.

Exploring Valletta

I was happy to explore on foot, walking towards Fort St. Elmo and then turning right to view Grand Harbour from the Siege Bell Monument which commemorates the victims of the Second World War Siege. I continued walking along the waterfront, past the Fish Market and then went up a series of steps behind waterfront properties leading to a sign to Lascaris War Rooms, with a modern apartment block and elderly offices on the landward side. It all looked rather improbable.

Grand Harbour viewed from the Siege Bell Monument. The Cunard cruise ship 'Queen Victoria' is berthed on the right.

Lascaris War Rooms

I entered the offices which are now in use by various government departments but, I guessed, originally military. A photocopied sign to 'Lascaris' led me to the upper floor and a small square where a further sign confirmed that a pedestrian tunnel cut through the rock was the route.

The tunnel leading to the Lascaris War Rooms.

Some distance down this tunnel, I found an open door on my left. I had arrived! Having paid my admission fee, I was ushered into an adjacent room where a small group of visitors were waiting for the tour to start. We were in a complex of rooms cut into the rock deep underground below Upper Barracca Gardens.

One room had been converted into a cinema where we watched a black and white newsreel film from the Second World War describing the convoys which just managed to avoid the collapse of Malta under the fierce Axis bombing. It was this bombing which led to the award of the George Cross collectively to the people of Malta. Our well-informed guide then led us through a series of rooms which have been restored to their World War II appearance, using original furniture and fittings.

In World War II, the defence of Malta and all Allied offensive operations in the Mediterranean was directed from this top-secret location which had an Operations Room for each of the services, supported by various offices and a meeting room. The accommodation was modest. Documents were produced by typewriter, communication was by primitive-looking direct-line telephones with a cord switchboard to handle other calls.

The army control room, with its large wall map showing Sicily. Malta is right at the bottom of the map.

The highlight of the tour was probably the large RAF Fighter Control Room with its large (original) map table. As we stood on the balcony, looking down on the map table, we were shown another wartime film of the work of the Control Room.

The RAF Fighter Control Room.

Next, we entered the Naval Control Room, supervised from a curious glass-fronted wooden office on the balcony. Beyond this, there was a room holding small memorabilia. The original function of this room was not known, so it has been restored in 'bland museum' style. We saw a passage going on to other parts of the complex but water ingress may prevent these areas being opened to the public.

The oddly-shaped map table in the Naval Control Room.

Post-war, the complex became Mediterranean Fleet HQ until 1967 and then NATO used it for ten years as a Strategic Communications Centre.

I found this a fascinating visit and followed up afterwards by obtaining the book and film listed below in 'References'. I left the War Rooms through the second tunnel entrance, climbing up to Upper Barracca Gardens near to the Bus Station.

Starting in 2009, the restoration of the complex was carried out by Fondazzjoni Wirt Artna (the Malta Heritage Trust) which operates a number of heritage sites, described on their website. The Lascaris War Rooms website is not yet developed at the time of writing.

Casa Rocca Piccola

Based on Ann's recommendation, I visited Casa Rocca Piccola. This has a fairly modest frontage on Republic Street but inside opens out into a large private dwelling. It was built in the 16th century for Don Pietro La Rocca, a Knight of Malta. It is the ancestral home of the present 9th Marquis de Piro who describes it as "the only privately owned Palazzo open to the public in Valletta". Part of the frontage has been converted into a restaurant specialising in Sicilian cuisine called 'La Giara' and another part forms the Casa Rocca shop selling local craft and with an excellent selection of books on Malta.

I paid the admission fee in the shop and was told a tour would be starting in a few minutes. Shortly, I was directed to a charming internal courtyard with trees, statues and a colourful resident parrot.

The courtyard at Casa Rocca Piccola.

There were just two of us for the tour - an English-speaking French lady and myself. We were joined by an elegant young lady guide who led us into the house and up the main marble staircase to the first floor. An elderly gentleman passed us and wished us "Good Afternoon". From his proprietorial manner, I correctly deduced that this was the current Marquis whose home we were in. I say 'elderly' but I realised afterwards that he was only one year my senior. We went into a pleasant sitting room overlooking the street. Next, we visited the private chapel, still in use today. To make the chapel appear larger, there is a trompe l'oeil painted on the ceiling giving the illusion of a large dome.

The private chapel at Casa Rocca Piccola.

We passed through a series of rooms, part museum, part home. A small dining room with a heavily-carved wooden table and chairs appeared to be the present family dining room. Later, we came to the formal dining room, an impressive room filled with light from windows along one side overlooking the courtyard. The table was set for ten diners with the family's porcelain, cutlery and glassware.

The formal Dining Room at Casa Rocca Piccola.

The tour took us through a number of rooms, some large and formal, some small and intimate (like the family archives room) before we descended to the ground floor using the main stairs.

The Main Stairs at Casa Rocca Piccola.

Finally, what else should a Maltese Palazzo with a private chapel have? Private air raid shelters, cut into the rock 100 feet below ground - a large one accommodating 150 people and a smaller one for the family. Having explored these constructions, a separate exit led us out to the courtyard, concluding a fascinating visit. See the Casa Rocca Piccola website

A walking tour of Valetta

I didn't manage the Harbour Cruise I'd hoped to do. I'd established that Captain Morgan Cruises operate the harbour cruise, starting from Sliema. But I was told that the public ferry from Valetta to Sliema had been cancelled 'due to bad weather'. I decided to explore on foot and descended the long flights of steps to reach the public ferry terminal where the Sliema Ferry docks. Although the waters of Marsamxett Harbour seemed calm, the timetable board carried a 'CANCELLED' sign. Of course, I could have taken a bus to Sliema but, looking across Marsamxett Harbour to the modern skyline of Sliema, I decided that I was becoming too tired and that it was time to return to the hotel.

Valetta is full of charming aspects ...

... but I find Sliema appalling.

I made my way back to the Bus Station where I found the correct stand and the electronic display confirmed I had just a few minutes wait for the Route 44 bus. A bus arrived, displaying the correct route and destination but, almost immediately, the display went to 'SORRY NOT IN SERVICE' and the driver got out to have discussions with some sort of Inspector. When he returned, he set a different route and destination, loaded a few passengers and departed. I looked again at the electronic display and the bus I was waiting for had magically been erased, giving me almost half an hour before the next service. "This", I thought, "is more like the Arriva I know". I passed the time with a walk to nearby Upper Barracca Gardens, overlooking Grand Harbour. I returned in time for the next bus. Again, a bus arrived carrying the correct route and destination. To my surprise, both the electronic display on the stand and on the bus went blank. The driver got off to check his bus display, looked puzzled, and got back on to re-cycle everything. This time, he produced a display of '*****' but, by the time he'd got off to check, it had gone blank again. He re-cycled the equipment a few times, failing to produce any display. He got off again saying "It's gone crazy". While we chatted, the correct display suddenly re-appeared. Both relieved, we boarded the bus, followed by a few other passengers. However, I noticed that the internal 'Next Stop' display wasn't working, nor were there any voice messages throughout the journey. After a couple of stops, the bus was packed. At the next pick-up, I heard a passenger complain that she didn't know what bus this was, so I presumed the displays on the outside of the bus had stopped working again.

In the 'old days' it was conventional for the Maltese to complain about their owner-driver buses which were, indeed, rather clapped-out. Now, it seems, they complain about the service provided by multi-national Arriva. This, I believe, is called 'progress'.

Traffic was heavy as we made our way through various towns (Msida, Birkirkara, Mosta, Mgarr) back to Golden Bay but, once on the bus, I wasn't too worried. Back at the hotel I met up with Ann and Dean and captured the sunset. The following day, we would fly back to England.

Sunset at Golden Bay.

References

The book 'Malta Convoy' by Shankland and Hunter is a factual account of the 'Pedestal' Convoy to Malta in 1942 (ISBN: 0-00-632964-0).

'Malta Story' is a 1953 black and white film starring Alec Guiness and Jack Hawkins re-issued as a DVD by ITV. Covering similar events to the book in a fictionalised manner, it gives a good impression of the work of the Lascaris War Rooms (using a replica of the War Rooms re-created in Pinewood Film Studios).

Photographs

Round and about Valletta.
Lascaris War Rooms.
Casa Rocca Piccola.

All the photographs on this trip form a collection titled Malta.

[Additions 9-Dec-2012, 10-Dec-2012, 12-Dec-2012]

Friday 30 November 2012

Return to Malta (Part 6)

Events of Wednesday 28th November 2012

A Day with History

Ann was spending the day at the Spa so Dean and I decided to visit some of the very old temples.

Hagar Qim and Mnajdra Temples

We drove to Hagar Qim where there is a new visitor centre, not there when Dean last visited about 12 years previously and certainly not there when I visited in what now seems pre-historic times. The Mnajdra Temples are a few hundred yards walk away, so the visitor centre serves for both temple complexes. Both sites are in the care of Heritage Malta (see their website).

Both Dean and I were impressed with the interpretation of the history of the temples. The various people involved in the studies of the temples are mentioned with their various theories but there's a frank admission that we may never have a complete understanding of the temple builders' intentions.

A model of the Hagar Qim Temples in the visitor centre illustrates the theory regarding the alignment of stones to catch the sun at the solstice.

The 'orientation' included a rather 'arty' high-definition video which wasn't very informative - Hagar Qim is 5,000 years old and Mnajdra 3,500 years old - that was it. We made our way down the path towards the six foot chain link fence topped with razor wire and lights which surrounded the temples. Admission to the compound was past a wooden checkpoint where a member of security staff carefully studied our tickets before entering information into a computer. It all felt rather like Berlin in the Cold War.

However, all that could be seen on the temple site was a large, white dome looking like an alien flying saucer. This was the European Union co-funded answer to the short-term preservation of the stones, which huddled, diminished, underneath. This takes us back to the old question of 'curatorial ethics' and what actions are responsible in looking after important artefacts. In Malta, the argument that the stones must be protected against rain and ultra violet while long-term conservation methods are developed has clearly won, depriving the present generation of the ability to sense the spiritual significance the constructions were meant to convey. The fabric dome is supported by huge steel arches which are visually intrusive once you are underneath the roof - it's impossible to see the stones in the context of the landscape.

The stones appear diminished by the protective shelter.

It's difficult to take any photographs which don't include parts of the roof structure or the various weather measuring instruments which are dotted around the inside of the structure to gather data on the effect of the roof. Visitors are constrained to only certain area by barriers which, whilst sad, is more understandable - much of the construction uses softer types of limestone where visitor-created abrasion literally wears the structure away.

'Porthole Stone' at Hagar Qim (and protective shelter).

Mnajdra lies a few hundred yards away from Hagar Qim, reached by a straight, modern causeway sloping downhill to a second fence, checkpoint and ticket inspection. The stones are hidden beneath their own protective structure, similar to that a Hagar Qim.

The causeway leading to Mnajdra's protective shelter.

Dean and I agreed that, for some reason, Mnajdra does not seem quite as diminished by its protective shelter as does Hagar Qim but we cannot agree with the 'Brief Guide' handed out to visitors by Heritage Malta which states:-
"Part of the charm of Mnajdra Temples lies in the fact that no modern development is visible from the site, so that it still may be appreciated in its original setting".
I don't know whether that terrible dissonance with reality is due to official myopia or casualness in updating the photographs in the brief guide (which show the 'flying saucer') whilst leaving the text unchanged.

Mnajdra, showing corbelled partial roof.

Despite the disappointments at Hagar Qim and Mnajdra, Dean and I agreed to look at one more Temple complex -Tarxien.

Tarxien Temples

In contrast to the open, cliff-top location of Hagar Qim and Mnajdra, the Tarxien Temples are situated in an urban area south-east of Valletta. The usual hard-to-follow series of road signs led us through a series of narrow streets to a stone-built ticket office providing the only visible evidence of the site.

General view of Tarxien Temple Site.

To my great relief, Tarxien has yet to receive a Protective Shelter, although a sign displayed as we entered the site confirmed that the European Union is co-financing such a shelter. An extended walkway has already been provided. This is a steel-framed structure with handrails and a wooden pavement which zig-zags around the site varying between a few inches and a few feet above the ground, eventually returning the visitor to the ticket office. The modernity of this walkway makes it visually intrusive but at least it achieves its aim of improving accessibility and the higher sections of the walkway make it easier to appreciate the site layout.

The modern walkway threads through the ancient stone temples.

The complex includes four temples built between 3600 B.C. and 2500 B.C. There is some rather unfortunate 'modern' restoration. The later temples incorporate impressive stone reliefs featuring spiral patterns and animals.

Carved reliefs at Tarxien.

Tarxien is hemmed in by by a modern church and cemetery, a wall separating a public road, a very tall stone wall (under repair at the time of our visit) separating a neglected garden and the ticket office. None the less, I enjoyed my visit.

We set off in the direction of our hotel. On the previous Monday, we'd cancelled a planned visit to Rabat and Mdina in order to visit the Aviation Museum so we decided to visit these locations before completing the journey to Golden Bay.

Domvs Romana, Rabat

We parked in Rabat near to the Roman Villa. It was my first visit to the museum site operated by Heritage Malta as 'Domvs Romana'. The exhibits are housed in a stone building, entered via an elegant Neo-Classical facade.

One of the mosaic floors in the Domvs Romana museum.

The mosaic pavements in the Domvs Romana are regarded as some of the oldest and best in the western Mediterranean. They were discovered in 1881 in the remains of a rich and sumptuously decorated town house of the Roman period. In addition to the mosaics, the museum houses a collection of Roman artefacts, statues and architectural stonework.

At the rear of the museum, there's an open-air site showing the foundations of the rear of the village and three adjacent houses.

The open-air site at the rear of the museum.

There are a few pictures of the museum in the 'Mdina and Rabat' set (link below).

Mdina and Rabat

Mdina was the original capital of Malta and the only fortified city on the island until the 16th century when the Knights of St. John moved the capital to Valletta because of its harbour and fortified their new capital. This led to a period of neglect for Mdina, ended by an earthquake in 1693 which caused serious damage. Rebuilding following the earthquake produced the dignified city which is little changed today.

Mdina's Main Gate.

Like many visitors, I was enchanted by the place. The streets are mainly pedestrianised, with pretty horse drawn carriages (with rubber tyres) quietly providing transport for less athletic visitors. The imposing Palazzo Vilhena now houses a Natural History Museum.

Palazzo Vilhena is now a museum.

St. Pauls Cathedral is topped by an elegant dome recognisable from miles away but not visible when close to the impressive frontage.

The frontage of St. Paul's Cathedral, Mdina.

With some reluctance, I tore myself away from this very attractive place and Dean and I completed our journey back to the hotel to meet Ann.

Photographs

Hagar Qim and Mnajdra Temples.
Tarxien Temples.
Mdina and Rabat.

All the photographs on this trip form a collection titled Malta.

[Revised 3-Dec-2012]