Tuesday, 13 December 2011

Traffic Movements at Tipton Curve, 1965

There's an introduction to Tipton Curve box here.

Tipton Curve, Saturday 22nd May 1965

In this case, I've located my Train Register covering these movements and a copy appears after the text. The original notes appear in italics with minimal editing, sometimes followed by my recent comments attempting clarification. The numbers in brackets have been added purely to assist in locating entries.

(1) '37' Up - Train of empty Iron Ore very fast, Class 8 tender first.
(2) A special of Ore goes 'down the Vale'.
(3) 'T23' comes from Bloomfield, with 350 h.p. diesel electric, cab leading, HG, Lowside and two tenders with sludge. The guard is on the footboard of the brake, waiting to 'unhook' but the train goes 'almost to Princes End' with an unfamiliar driver! The Engine and Brake returns to Bloomfield.
(4) Later in the day, when we re-open, a Trolley is being pushed 'Bang Road' from Tipton with an S & T Bridge Girder. No signal box knows anything so we stop him and make him clear our Track, to let us have an Electrification train down for Bushbury - engine, LMR Brake, Well Wagon loaded with transformers, Crane, Match Truck and BR Brake.

Monday, 12 December 2011

Santa Specials at Peak Rail 2011

I was steam locomotive driver on the 'Santa Specials' at Peak Rail on Saturday 10th December 2011. The schedule called for four round trips from Rowsley to Matlock Riverside with a maximum-length 7-coach train. The working was to be top-and-tailed with a steam locomotive at the south end and a main-line diesel electric at the north end.

Peak Rail stalwart 68013 is currently undergoing boiler work so 'Lord Phil' was originally planned to perform the steam diagram. Unfortunately, 'Lord Phil' has recently been 'stopped' for attention to the axleboxes. Fortunately, at short notice, Peak Rail was able to hire another 'Austerity' tank - 'Sapper' from the East Lancashire Railway.

'Sapper' on the outside pit at Rowsley being prepared for duty.

I'd not worked on 'Sapper' before and it's always interesting to have a different locomotive. Even though all 'Austerity' tank locomotives share the same basic layout, there's considerable variation in detail between different restored locomotives. I quickly formed the impression that the locomotive had received a competent and thoughtful restoration and I was not disappointed.

'Sapper' was 'brewing up' on the outside pit and Dave (Fireman) and the Cleaner had matters well in hand when I arrived (a little late because of a road traffic accident on the A6). I completed the 'oiling round' and daily examination then we moved the engine to the siding alongside the shed so that Chris could use the Bucket Loader to top-up the bunker with coal. 'Sapper' is provided with coal rails on the bunker so we were able to take a generous tonnage.

At the scheduled time of ten o'clock, we moved the engine across to the 7-coach train standing in the platform. Since the first departure was scheduled for 10:45, I was a little concerned that we'd seen no sign of a diesel locomotive crew, let alone any sign of the rostered locomotive, 'Penyghent', being drawn out of the shed for starting. I warned the fireman to be prepared to work the first train unaided.

We started to warm the coaches and we were delighted to find that we could set the carriage heating steam pressure to the specified 30 p.s.i. and it stayed as set. Since industrial locomotives didn't originally have carriage warming facilities, this facility is added during restoration and inappropriate control valves are sometimes employed, resulting in difficulties controlling the output.

Industrials also lacked vacuum brakes originally so, again, a variety of approaches may be found when this feature has been added. 'Sapper' retained the original arrangement of a steam brake valve mounted on the fireman's side, with a horizontal shaft across the cab with handles for applying the brake within reach of both fireman and driver. A 'Davies and Metcalfe' ejector had then been added in front of the driver for creating and applying the vacuum brake on the train but this is not a 'Combination' brake as would normally be fitted to passenger engines with steam brakes on the engine. In a 'Combination' brake, application of the vacuum brake will automatically proportionately apply the steam brake to the locomotive. Since 'Sapper' lacks this refinement, it may be advisable for the driver, when stopping a train with the vacuum brake, to also make a steam brake application to prevent the locomotive from 'bouncing' against the train as it comes to rest.

I decided to assume that we were 'going on our own' and I carried out a functional vacuum brake test on the 7-coach train. First, 21 in/Hg of vacuum is created in the train pipe which should ensure that all train brakes are off. This vacuum is destroyed and the length of the train is inspected, ensuring that all brake blocks are 'on' (or, rather, that all brake blocks on the non-platform side of the train are 'on'). If this is satisfactory, vacuum is re-created and the whole train is inspected again to ensure that all brake blocks are now 'off' and clear of the wheel tyres, with the exception of the Guard's Brake composite coach, where the Guard's Handbrake will keep the brakes applied. In this case, correct operation of the vacuum system can be determined by ensuring the the piston in each brake cylinder is 'up' when the vacuum brake is applied and 'down' when the vacuum brake is released.

While all this was going on, the locomotive had been feeding steam for carriage warming. It takes a while for this steam to work its way through the train and the cleaner had opened the steam heating shut-off cock on the rear coach to assist the process. Eventually, clouds of steam vented from the the steam heating hose on the rear coach, indicating that steam was passing throughout the train. I was intending to shut the open cock on my second walk testing the brakes, but the Guard just beat me to it.

We heard that the diesel crew had failed to start 'Penyghent' because of battery problems and that an attempt was being made to start the Class 31. We were asked to take the first departure on our own, which we were happy to do, since the destination was Matlock Riverside (where we could run round our train for the return journey), not Matlock Town. For the Santa trains, only Rowsley station is used by passengers and seats are pre-booked for a round trip.

On receipt of the Guard's 'Rightaway', we set off with our seven coaches. 'Austerity' tanks are powerful locomotives so a trailing load of around 250 tons barely taxes the engine which can be worked quite lightly. Church Lane's Up Home signal was already off as we approached and we surrendered the Church Lane-Rowsley single line staff to the 'Bobby' as we passed the box. Soon, we were braking for our booked stop at Darley Dale.

'Sapper' pauses at Darley Dale with the first Up service of the day.

The crossing gates opened, the bracket signal came 'off', the Guard gave the green flag and we were off again, collecting the Darley Dale-Matlock single line staff from Signalman Jack Hinks as we passed. Our progress to Matlock Riverside was quite restrained - there's currently a ten miles an hour 'slack' (speed restriction) most of the way. Although there was some snow on the hills, the valley we were running in was free of snow. The sun was out and it was a pleasant day, apart from the bitter wind blowing straight into the cab on the driver's side.

We made a gentle approach to Matlock Riverside where there's a temporary speed restriction of 5 m.p.h. whilst the re-signalling work is in progress. We came to a stand fairly well along the patform - there's not much margin for error at Matlock Riverside when running round seven coaches but we had no problem and were soon 'tied-on' to the train for our bunker-first run back to Rowsley.

The trip back to Darley Dale was uneventful and I intentionally stopped with the leading coach clear of the platform. Six coaches will fit in the platform but longer trains need to stop further forward to avoid complaints that the rear of the train is still occupying the track circuit protecting the facing points.

'Sapper' ready to leave Darley Dale on the first Down train of the day.

We headed back to Rowsley still unaware of whether the 'Class 31' would be ready to join us. As we approached the station, we could see the '31' in the headshunt, beyond the 'END OF SINGLE LINE' board. We uncoupled from our train and, having confirmed that the diesel would stay where it was until we were clear, dropped forward clear of the loop handpoints and run round the stock.

The remaining three round trips of the day were 'top-and-tailed', as originally intended but with the '31' substituting for 'Penyghent'. We lit the paraffin engine lamps for the last trip - it was already getting dark. We carried two white lights, one above each buffer, on our way to Matlock (signifying an express). To return, I removed one white lamp and inserted the red shade in the other so that we were carrying the required tail lamp.

The last train of the day standing at Darley Dale before being hauled back to Rowsley by the '31'. Note the red tail lamp on the buffer beam.

Every train was filled to capacity during the day. Commercially, the 'Santa Specials' are very important to most preserved railways. But I hope people find them good fun as well - I do.

Tuesday, 6 December 2011

List of Traffic Movement Posts

I've written a number of posts describing some of the railway traffic movements in the West Midlands in the 1960s. Most of the observations are based on working (unofficially) in signal boxes. As I've located my original rough notes, I've written them up as this series of posts (as time permitted). Some of the posts cover many hours of observation, some are merely fragments. The tables below list these posts in date of observation, earliest first. I've separated posts covering the Stour Valley Line from those at Sedgeley Junction on the South Stafford Line. Links in the last column should get you to the individual posts.

Stour Valley Line

Location Date Click on link
Journey May 1960 Steam Special
Watery Lane Tuesday 17th October 1961 Stour 2
Watery Lane Saturday 4th November 1961 Stour 2
Watery Lane Thursday 16th November 1961 Stour 3
Watery Lane Saturday 2nd December 1961 Stour 3
Tipton Monday 29th January 1962 Stour 3
Dudleyport Saturday 17th February 1962 Dudleyport
Bloomfield Jn. Saturday 24th March 1962 Bloomfield Jn. 1
Bloomfield Jn. Saturday 7th April 1962 Bloomfield Jn. 1
Journey Tuesday 19th June 1962 Sunday Stroll
Bloomfield Jn. Saturday 28th July 1962 Holiday Time
Bloomfield Jn. Saturday 11th August 1962 Bloomfield Jn. 1
Dudleyport Friday 24th August 1962 Dudleyport in the Dark
Watery Lane Friday 12th October 1962 Watery Lane 1
Bloomfield Jn. Saturday 3rd November 1962 Bloomfield Jn. 2
Watery Lane Saturday 23rd November 1963 Reading the Runes
Bloomfield Jn. Friday 2nd October 1964 Traffic Movements
Tipton Station Friday 2nd October 1964 Traffic Movements
Tipton Wednesday 7th October 1964 Tipton
Deepfields Saturday 17th October 1964 Deepfields 1
Deepfields Saturday 24th October 1964 Deepfields 2
Tipton Curve Saturday 27th March 1965 Heaviest Load
Tipton Curve Saturday 22nd May 1965 Tipton Curve
Tipton Curve Saturday 10th July 1965 Tipton Curve

South Stafford Line

Location Date Click on link
Sedgeley Jn. Sat 8th December 1962 Sedgeley Jn. 2
Sedgeley Jn. Sat 15th December 1962 Sedgeley Jn. 2
Sedgeley Jn. Sat 22th December 1962 Sedgeley Jn. 3
Sedgeley Jn. Mon 24th December 1962 Sedgeley Jn. 3
Sedgeley Jn. Sat 29th December 1962 Sedgeley Jn. 4
Sedgeley Jn. Sat 12th January 1963 Sedgeley Jn. 4
Sedgeley Jn. Sat 26th January 1963 Sedgeley Jn. 4
Sedgeley Jn. Sat 9th February 1963 Sedgeley Jn. 5
Sedgeley Jn. An Evening in February 1963 Sedgeley Jn. 5
Sedgeley Jn. Sat 23rd February 1963 Sedgeley Jn. 6
Sedgeley Jn. Wed 20th March 1963 Sedgeley Jn. 7
Sedgeley Jn. Sat 23rd March 1963 Sedgeley Jn. 7
Sedgeley Jn. Friday 29th March 1963 Sedgeley Jn. 8
Sedgeley Jn. Monday 15th April 1963 Sedgeley Jn. 9
Sedgeley Jn. Saturday 20th April 1963 Sedgeley Jn. 10
Sedgeley Jn. Saturday 4th May 1963 Sedgeley Jn. 11
Sedgeley Jn. Friday 10th May 1963 Sedgeley Jn. 12
Sedgeley Jn. Saturday 18th May 1963 Sedgeley Jn. 13
Sedgeley Jn. Saturday 25th May 1963 Sedgeley Jn. 14
Sedgeley Jn. Monday 3rd Jun 1963 Sedgeley Jn. 15
Sedgeley Jn. Tuesday 4th June 1963 Sedgeley Jn. 16
Sedgeley Jn. Saturday 8th June 1963 Sedgeley Jn. 17
Sedgeley Jn. Friday 14th June 1963 Sedgeley Jn. 18

Monday, 5 December 2011

Reading the Runes: Decoding Train Register Books

In the post 'The Train Register Book', I talk about the log books kept in signal boxes recording exactly what happens. But some of my friends have suggested that the bald list of timings is hard to make sense of. Let's look at a Saturday morning at Watery Lane back in 1963 to try to make things a little more clear.

Watery Lane after conversion to a Shunting Frame, still retaining the rather forbidding appearance of 'A.R.P.' boxes.

It's certainly important to understand the facilities provided at the signal box and have some idea of its relationship to the adjacent signal boxes. Watery Lane is described here. It may be useful to be able to refer to the Working Time Tables for passenger and freight trains, Freight Train Trip Notices and Special Traffic Notices but, for now, let's ignore that complication.

Ideally, you need to be familiar with the 'Regulations for the Signalling of Trains', the significance of all the bell codes and any special local regulations but, again, let's leave all this to one side for now. 'The Signal Box' is an excellent site for signalling information and all the bell codes then in use are listed here.

My train register book for the morning is shown below. Remember, the DOWN and UP pages are side-by-side in the train register book itself.

(Click on page for an enlarged view)

I booked on at 6.15 a.m., having travelled from Wolverhampton on the local train to Tipton and then walked to Watery Lane. The official signalman, my friend Tom, had booked on earlier and relieved the 'night man'.

The first train was a down local - a DMU. I accepted the train (a '3-1') from Dudleyport at 6.21, placed my block instrument at 'Line Clear', releasing Dudleyport's signals and immediately obtained 'Line Clear' from Tipton, allowing me to clear my Down signals. At this stage, I'd leave the Level Crossing Wicket gates unbolted, allowing pedestrians to continue crossing. Normally, these would be bolted on receipt of 'Train Entering Section' ('2') from the box in the rear. The road crossing gates at Watery Lane were always left open for rail traffic, unlike Tipton, where the gates had to be worked each time. At 6.23, the train started away from its Dudleyport stop and Dudleyport sent 'Train Entering Section' ('2'). I flipped the commutator to 'Train on Line' and sent 'Train Approaching' ('1-2-1') to Tipton. This is his cue to wind the gates and get his own down signals 'off'.

Around the same time, I accepted an Up express from Tipton ('4') and 'sent it on' to Dudleyport so that I can clear my Up signals. The Down local passes at 6.24 a.m. and the Up express two minutes later. Because of the short distance to Tipton, I wait for 'Train Out of Section' ('2-1') from Tipton before 'clearing back' to Dudleyport. On the Up, I give 'Train Out of Section' to Tipton at 6.26 a.m., as soon as I've a quarter of a mile clearance beyond my Up Home and Dudleyport 'knocks out' a minute later.

Five minutes later, I 'take on' a Light Engine ('2-3') on the Down Loop - the parcels engine returning to Wolverhampton for another train. There's 'nothing about' on the down so we 'turn him out' and he scuttles off to Wolverhampton.

At 6.57 Tipton offers an Up Local and at 7.0, Dudleyport has a Down Local. After these trains pass, there's another Up Express offered at 7.13. As he passes, Dudleyport offers pick-up freight T73 ('3') on the Down Loop. A Down Express is taken on at 7.23, so we have to let T73 come to a stand at our Down Loop Home Signal. The Down Express passes at 7.35 and the Up Local which has been 'on the block' since 7.30 passes at 7.38. At the same time, another Down Local is accepted from Dudleyport. After this local passes, there should be a margin for T73. We get 'Line Clear' from Tipton and 'Block Back ('2-4' Blocking Back Inside Home Signal) to Dudleyport to protect the freight as he stops and shunts in the Down Sidings at Tipton. At 7.59, Tipton offers an Up Local, which we refuse for 3 minutes. The most likely explanation is that T23 (the Tipton Shunt) wanted to draw out from the Up Sidings and then immediately push back on another road a raft of wagons too long to be shunted without 'coming out main line'. A 'running move' like this could fairly legitimately be done without 'Blocking Back' for protection. The Up Local passed at 8.04. Soon after Dudleyport had given 'Train Out of Section for this train, he 'Blocked Back' on the Up, possibly so that the Dudley Parcels could load or unload on the Up Platform for the convenience of the station staff. At 8.10 Dudleyport offered us a Parcels on the Down Main and as he sent 'Train Entering Section', he also cleared the 'Block Back' on the Up.

At 8.18 we 'take on a local on the Down and, a minute later, an Express on the Up. These pass us at 8.23 and 8.25, repectively. We refuse the Up Parcels at 8.37, accepting him a minute later. I assume this was because of T23 doing another 'main line shunt'. We 'get the road' for the parcels on the Up Loop but Tipton cancels the parcels at 8.42 and offers a following Up Local instead. So we cancel the Parcels on the Loop ('3-5') to Dudleyport and offer a '3-1' Up the Main instead. The Up Local passes us at 8.45. Presumably, Tipton realised that he hadn't time for the Up Parcels to complete its work in the platform and tuck itself in the Up Loop at Watery Lane without seriously delaying the Up Local. He had two possible ways of shunting the parcels out of the way - putting it 'across the road' onto the Down Main or setting it back onto the branch from Princes End. Since he didn't 'Block Back' to Watery Lane on the Down, I assume he set the train back onto the Branch, under protection of a '3-3' ('Blocking Back Outside Home Signal').

Shortly after the Up Local has gone, we 'Block Back' on the Up to Tipton, whilst T23 does some serious shunting main line, but we clear the 'Block Back' at 8.51 and accept the Up Parcels which this time goes up the Main to Dudleyport. At 8.52, we accept T42 from Tipton, which is routed up the Loop. On the down, we 'take on' a Local at 8.54 which passes at 9.00.

All is quiet for a while, until we accept a Parcels on the Up at 9.26, pass at 9.27 and at 9.40 a Down Express, pass at 9.49. At 9.52 we take on an Up Express which passes at 9.56. At 10.10, we 'Block Back' to Tipton for 9 minutes. The Local on the Down is briefly refused - I imagine because T23 is completing a 'running move' into the Down Sidings to be ready for a short journey to Bloomfield Junction. After Tipton has 'knocked out' for the Down Local at 10.23, we offer T23 as a Light Engine ('2-3'). The Up Express at 10.25 is briefly refused, presumably because fetching T23 out of the Down Sidings at the Watery Lane end will briefly foul the Up Main but there's no damage done and the express passes at 10.32. We take on another Up Express at 10.41 which passes at 10.44. T23 then returns on the Up, this time as an Engine and Brake ('1-1-3'), at 10.58. It looks as if he immediately starts shunting main line again as we Block Back to Tipton from 11.00 to 11.03.

On the Down, we accept a Local at 10.53 and receive 'Train Entering Section ('2') at 10.56. It appears that the Stockport Parcels has finished his work in the Bay at Dudleyport, and we get a '1-3-1' down the Loop at 10.57. After the Down Local, we 'get the road' for the Stockport from Tipton and turn him out main line.

Light Engine '0D97' passes on the Up at 11:21 and, a few minutes later, pick-up freight T90 comes down the Loop, to wait at our signal until the down express (taken on at 11.30) has passed. We turn out T90 but Block Back to Dudleyport (from 11.39 to 11.47) so I assume that T90 stopped at Tipton to attach/detach vehicles from the Down Sidings. Before T90 had finished, Dudleyport sent the 'Shunt' ('1-5-5': 'Shunt Train for Following Train to Pass'). We forwarded the 'Shunt' to Tipton who gave 'Train Out of Section' at 11.47 allowing us to remove the 'Block Back' also at 11.47 and accept a down train of Empty Coaching Stock ('2-2-1') which passed at 11.48. At 11.49 we accepted the Up Local from Tipton which passed at 11.56.

We accepted another down pick-up freight (T68) from Dudleyport at 12.04 and he passed at 12.09, to stop at Tipton. As soon as he'd passed, we 'got the road' on the Up Main for T23 light engine which had been waiting in the Down Sidings for a margin to return to shed (either Bescot or possibly Monument Lane). Meanwhile, T68 had presumably left his brake van main line and reversed his train into the Down Sidings at Tipton. He then returned to his brake van main line and, like T23, was anxious to scarper. Tipton put a 'Wrong Direction Movement' on the block ('2-3-3'). This can only be used where authorised but the complexity of the working around Tipton meant that such moves were authorised. So T68, Engine propelling his Brake, returned to Watery Lane in the wrong direction on the Down Main ('bang road') with Tipton maintaining his block indicator for the Down Main at 'Train on Line'. With T23 having scuttled off at speed, Dudleyport had already 'knocked out' on the Up Main, so I was able to offer T68 as a '1-1-3' ('Engine and Brake') to follow. Having obtained a 'Line Clear', I could reverse the crossover to turn the engine and brake onto the Up Main and away. A 'Wrong Direction Movement' is unusual in that there must be a means for the box at the opposite end of the section from normal to indicate that the section is clear. This is the '5-2' bell code - 'Train Clear of Section' which I sent to Tipton, who then altered his block indicator from 'Train on Line' to 'Line Blocked' so that I could offer further trains in the 'Right' direction.

Meanwhile, I'd 'taken on' an Up express from Tipton at 12.16 so I sent the 'Shunt' to Dudleyport for T68. As soon as T68 had cleared Dudleyport, I obtained 'Line Clear' for the express and cleared our Up signals. The Up passed at 12.21, as Dudleyport offered an express on the Down. At 12.27, I 'took on' a 'Special' up parcels from Tipton at 12.27 which passed at 12.30, a minute before the down express passed. At 12.36, I accepted the down local from Dudleyport. This passed at 12.40. The up local was accepted at 12.49, passing at 12.57. At 1.00, Dudleyport offered another down local (and gave 'Train Out of Section' for the previous up local).

I obtained 'Line Clear' from Tipton for the down local and, at this point, my register stops. I'd just about five minutes to leave Watery Lane and walk to Tipton station so as to catch the approaching down local back to Wolverhampton at the end of an interesting morning.

Audio Visual Installations at the Museum of Liverpool

Click on any picture below to see the un-cropped image.

In the post 'Royal Visit to the Museum of Liverpool', I described the state-of-the-art Audio-Visual systems used around the museum, which use a number of high-definition flat screen displays and large, projected images. The picture below shows the facilities associated with just one exhibit - the locomotive 'Lion'.

At high level, there are three large displays using Panasonic projectors. In the above picture, views of Liverpool are being shown but, at other times, pictures of 'Lion' are projected. In front of the locomotive, three high-definition flat screens are provided. In the foreground, a pedestal has pushbuttons allowing visitors to select one of two presentations (with or without subtitles and signing).

The Liverpool Overhead Railway display shown above also has complex A.V. facilities. The are three high definition flat screens, three control panels with multiple selection buttons and six handsets.

All the A.V. systems are controlled through a comprehensive computer network around the museum provided by Cisco. I was able to visit one of the four equipment rooms in the museum where the A.V. control equipment is situated.

The left and right cubicles in the above picture are associated with control of the Audio Visual presentations. The central cubicle provides a 'conventional' computer network. The Audio Visual equipment includes BrightSign High Definition Media Players, Adtec 'signEdje' High Definition Digital Signage Players and WOTbOX Solid State Audio Players. A slide-mounted Laptop Computer allows diagnostics and programming of all features.

There's a small set of pictures of the A.V. equipment here.

Friday, 2 December 2011

Royal Visit to the Museum of Liverpool

Click on any picture below to see the un-cropped image.

The Museum of Liverpool nears completion in July 2011.

On Thursday 1st December 2011, Her Majesty the Queen, accompanied by His Royal Highness The Duke of Edinburgh, officially opened the Museum of Liverpool adjacent to the Pierhead in Liverpool. The museum first opened to the public on 19th July 2011, although not all the Galleries were complete at the time. On that occasion, I was not able to attend because of a trip to Russia but I believe a number of members of the Old Locomotive Committee (OLCO) were able to be there.

The Official Opening on the 1st December saw the unveiling of additional galleries - principally 'The Great Port' gallery in which the locomotive 'Lion' is displayed. John Hawley and Jan Ford were invited to the official opening, in recognition of their contribution to the Audio-Visual presentation describing 'Lion'. The filming of this contribution is briefly described in the post 'Lion Shoot'.

The Great and the Good arrived at the Museum around 08:30 for the Official Opening and refreshments were provided in 'The Waterfront Cafe'. At 09:30, visitors were directed to their allocated positions, prior to the arrival of the Royal Party at around 10:00. It had been arranged that the Queen and the Duke would make separate tours - the Duke was to visit 'The Great Port' gallery which has 'Lion' as the central exhibit.

'Lion' is the centre piece of 'The Great Port' gallery.

Although OLCO has never concealed its disappointment that 'Lion' would not be allowed to steam again, it has remained committed to assisting the Museum of Liverpool in the interpretation of the locomotive within the gallery. In acknowledgment of that support, Jan Ford (as current Secretary representing the entire membership of OLCO) was allocated to the small 'meeting group' at the entrance to 'The Great Port' Gallery whose members were presented to the Duke of Edinburgh. In reply to the Duke's question "What do you do?" I briefly outlined the role of OLCO as a "supporters' group" for 'Lion', independent from the museum. The Duke asked about the size of our membership and I replied "Around 70". After all the members of the 'meeting group' had been presented to the Duke, the Museum's Chairman, Phil Redmond, then led the Duke in a brief circuit of the gallery with the 'meeting group' following behind in case of further queries. The Duke's Equerry engaged me in a brief conversation about 'Lion' and soon the guests moved on to other galleries.

We then gathered in the large reception area until the Queen and the Duke had completed their separate tours. The Queen then unveiled a perspex plaque commemorating the official opening before she and the Duke were invited to sign the Visitors' Book. After receiving a posy from a seven year old boy and speaking briefly to the Mayoral Party and various Civic Officials, the Royal Party walked to the waiting limousine outside. The convoy of nine vehicles left just on 11:00.

Having unveiled the plaque (on the easel in the background), Her Majesty is invited to sign the Visitors' Book.

Light refreshments were provided to the invited guests under the designation 'Brunch'. The galleries remained open for the rest of the day solely for the invited guests and the front doors remained closed to the public. The following day was the first day of public access and large visitor numbers are anticipated.

So what of the Museum? I'm too much of a traditionalist to approve of what has been called rather unkindly 'The Dented Shoebox' architectural design (see heading picture)and I'm not too sure about the 72 million pound price tag. But I was impressed with the attempts made in all the galleries to convey information about the topic in a lively manner. This is largely based on the use of state-of-the-art Audio-Visual systems and, where appropriate, interviews with people who have experience of the topic and can provide 'Oral Histories'. For a little more information on the technology behind these Audio-Visual presentations, go to the post 'Audio Visual Installations at the Museum of Liverpool'.

As far as 'Lion' is concerned, locomotive and tender are displayed on a short length of ballasted bullhead track surrounded by stainless steel railings (see photograph above). There are a few labels attached to the railings with certain data about 'Lion' but most information is presented on a group of three high-definition flat-screen displays mounted at a convenient height on stainless steel posts along the right hand side of the locomotive. In the quiescent state, a series of black and white images is continuously presented on these three screens but a small pedestal allows either of two short colour productions to be displayed on demand by a simple button press.

The small pedestal allows selection of either of two presentations.

The first is called 'Railways are the future'. This is an imagined conversation taking place in 1838 during a journey by train between George Stephenson and a railway shareholder.

The second is called 'Lion takes centre stage - The Old Locomotive Committee discusses Lion'. This comprises ad lib 'pieces to camera' by John Hawley and Jan Ford filmed in the 'Lion Tavern' talking about 'Lion' and her history intercut with archive film of 'Lion' and 'snippets' from 'The Titfield Thunderbolt'. This presentation includes video of 'Lion' recorded during the Sesquicentenary celebrations showing the locomotive operating at Manchester Museum of Science and Industry, Birmingham Railway Museum and The Science Museum Wroughton Open Day.

In the picture above of 'Lion', you can also see three large projected images at high level. Normally, these cycle through various black and white images showing the Port of Liverpool and 'Lion'. I understand that, periodically during the day, these will provide a further presentation on 'Lion' but, on the day of the Royal Visit, this feature was not in use.

The preserved Liverpool Overhead Railway coach.

The preserved Liverpool Overhead Railway Coach is displayed at high level adjacent to 'Lion' on a short length of simulated overhead railway viaduct. There's a little about this railway here, with links to more pictures of this coach. Visitors to the museum can enter part of the coach from the first floor and sound effects are provided.

The large model of the docks and the route of the Liverpool Overhead Railway, viewed from the Dingle end (where the railway ran underground to reach Dingle Station).

Quite a lot of information on the Liverpool Overhead Railway is presented on the first floor of the museum. I was particularly taken with a large model of the route, where white lights (representing trains) move up and down the route, pausing briefly at each station.

Sadly, there was insufficient space to display the preserved Mersey Docks and Harbour Board 0-6-0 saddle tank in the museum (there are a few pictures of the locomotive in store here) but the Sentinel Steam Tractor is on show (my earlier pictures are here).

In the four months since the museum first opened, I understand it's attracted around half a million visitors. Now the additional galleries are open, it is anticipated that the museum will be even busier!

My camera coped poorly with the museum lighting conditions but I've nontheless posted the results in Royal Visit.

Tuesday, 29 November 2011

The Train Register Book

For well over a century, the Train Register Book has been a feature of railway signal boxes following British practice. When I started visiting signalboxes, the standard Train Register Book produced by British railways (B.R. 24847) had 49 double pages (DOWN/UP pairs) bound with card covers. In each signal box, this book lay open on a writing desk with the left hand page headed 'DOWN' and the right hand 'UP'. Printed rows and columns (rather like an accounting cash book) provided a framework in which every activity was faithfully recorded with the corresponding time.

The signal box wall clock would be mounted adjacent to the desk so that the time of each entry could be readily determined. Although the wind-up clocks were of good quality, they were manually synchronised each day with a Time Signal. At the boxes I visited, the Time Signal came from the local Traffic Control Office as a series of rings on the omnibus 'Control' telephone circuit at 9.00 a.m. On occasion, this Time Signal would not be sent at nine o'clock but it might then be sent at 10.00 a.m.!

The Train Register Book had various functions. Firstly, it served as an aide-memoire to the signalman. Provided the book was kept up-to-date, the signalman could refer to it at any time to remind himself of the current situation and it reduced the chance of signalman becoming confused and a train being 'forgotten'. What was then 'Rule 55' required the fireman of a detained train to actually walk to the signalbox to remind the signalman of the position of the train and ascertain that any 'protection devices' (like lever collars) were in use. Before returning to his train, the fireman would sign the Train Register Book as evidence of his visit. As electrical devices like Fireman's Call Plungers and Track Circuits were adopted, the need for these visits was reduced, although fireman might still appear at the box to beg hot water for a 'brew'. Secondly, the Train Register recorded the comings and goings as signalmen changed shifts or visitors like the supervising Station Master called. Thirdly, in the event of any serious incident, the Train Register Book (and those from adjacent signal boxes) would be taken away for analysis. By looking at the recent entries in the Train Register (Down trains on the left hand page, Up trains on the right hand page), anybody could gain a picture of what was going on at the time and this was a powerful tool in re-creating the circumstances leading to an incident.

Some signalman were assiduous in entering each event as it occurred - others would rely upon their memory to remember the timings for a number of trains before entering those timings in 'The Book'. At very busy boxes, a separate 'Booking Lad' would be responsible for maintaining the Train Register and he would usually deal with telephone calls as well.

The signal boxes I was familiar with in the '50s and '60s were more modest affairs where a solitary signalman carried out all the tasks. I obtained a blank Train Register Book to enable me to make my own record of my visits. Watery Lane was a typical example and my pages for 23rd November 1963 are reproduced below. (Click on either image to enlarge)

Of course, 'Down' and 'Up' pages should be side by side. My record stops at 1.00 p.m. when my friend Tom was relieved by the 'Late Turn' signalman but, of course, the actual box register would continue, shift after shift, day after day.

'Down' and 'Up' pages have an identical layout. Each horizontal row represents a train or event. Vertical columns are divided into five groups: 'Description of Train', 'REAR SECTION', 'Line', 'ADVANCE SECTION' and 'Remarks'.

Where manual block signalling is in use, the first column records the 'Is Line clear' bell code used - '3 pause 1' for an ordinary passenger train, '2 pause 3' for a light engine and so on. Alternately, where Track Circuit Block and Train Describers are in use, the first column shows the 4-character headcode for the train.

The second group of columns 'REAR SECTION' records the passage of a train from the box in the rear for a train coming towards us. There are three possible responses to an 'Is Line Clear' - accept the train normally under 'Regulation 4', accept the train conditionally under 'Warning' or 'Permissive' regulations (where authorised) or refuse the train ('Received but not accepted'). Three columns allow the response to be clearly recorded. The next columns allow the 'Train Approach' signal (authorised where there are 'short sections') to be recorded then 'Train Entering Section' (always sent by the box in rear as the train enters our block section) and finally 'Train out of section' (allowing the box in rear to offer a further train). The final three colums in the 'REAR SECTION' group allow the times to be shown for when a description is received, when a train arrives (if it stops) and when a train departs or passes.

Where there are additional lines in addition to 'Up' and 'Down' or where there are junctions to other routes, the 'Line' column is used to clarify the line over which a train runs.

The fourth group of columns 'ADVANCE SECTION' records the passage of a train to the box in advance for a train leaving us.

The final 'Remarks' column is used to identify a particular train, such as 'T73' for a freight trip or '1Z64' for a special.

There's a post linking to details of some of the periods when I was operating signal boxes (unofficially) here.

Of course, the Train Register (which recorded what actually happened) was supplemented by separate Working Time Tables for passenger and freight trains which showed what was supposed to happen. Then there were Freight Train Trip Notices and Special Traffic Notices so it was no wonder that confusion sometimes occurred. The railways became users of the Telegraph and then the Telephone quite early so that information could be disseminated and collected in a timely manner but railway telecommunications and the function of the Traffic Control Office is another story.

[Link to Jan's Train Register Book post added: 06-Mar-2021]

Sunday, 27 November 2011

A Trip to the Seaside (Part 2)

Click on any picture below to see the un-cropped image.

On 26th November 2011, I made a trip to Llandudno, on the North Wales Coast. In Part 1, I talk about the town: this part concentrates on the railway journey.

The first train in my journey was non-stop from Wolverhampton to Crewe - a 'Virgin' operated Bombardier-built 'Voyager' heading for Scotland. This made a surprisingly swift journey to Crewe where I had a short wait with a large contingent of passengers for the Arriva Trains Wales DMU to Chester.

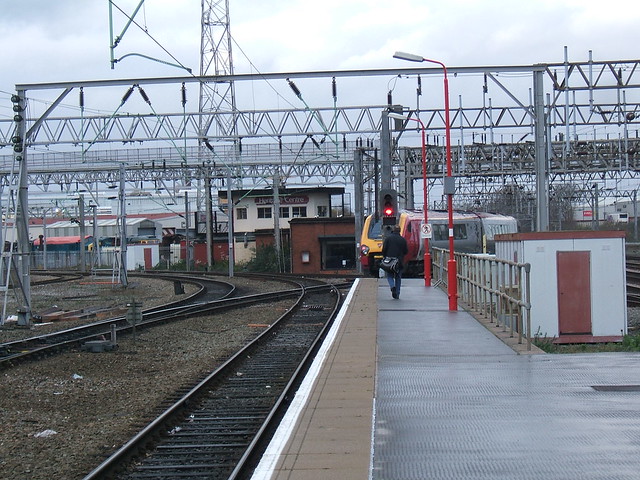
The much-simplified layout at Crewe North Junction, with the Chester Line diverging to the left. The 'Voyager' which brought me to Crewe is just departing on the Liverpool Down Fast.

Although Crewe is still a large and important station, it's a shadow of its former self, which was a 'Mecca' for me when I was young. There's a post on Crewe station here. I'll never get used to the platform renumbering which has taken place at Crewe (I grumble about this sort of 'Modernisation' in 'Zen and the Art of Platform Numbering').

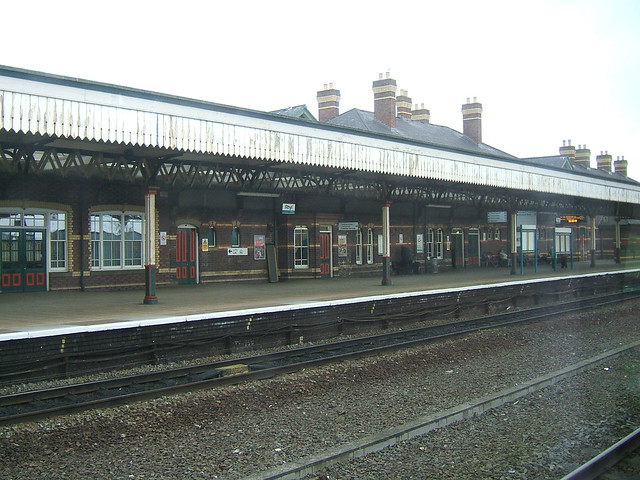
Chester station, showing two of the massive trusses which still support what remains of the overall roof. Note the modern apartments in the background.

The rather shabby Arriva Trains Wales DMU from Crewe to Chester was at least quick, so I was soon standing on the much-rebuilt Chester station awaiting another Arriva Trains Wales DMU from Manchester which would take me forward to Llandudno. The commissioning of the power box at Chester in May 1984 meant that the station lost its wonderful arrays of L.& N. W. R. lower quadrant signals. All the mechanical signalboxes were abolished, to be replaced by a Power Box whose architectural style quite defeats me. Great sections of the overall station roof have been swept away, apparently at random. Whilst the elegant station buildings provided by the Chester and Holyhead Railway in 1848 largely remain, the concourse area is now flanked by two curious modern structures which give me the impression of having been accidentally left behind by some alien civilisation.

The connecting train arrived (again, on time) and we were soon away on the last leg of the journey. The train I was on continued directly to Llandudno, avoiding a further change at Llandudno Junction which is often necessary nowadays. The route is now significantly simplified. There were originally four tracks to Saltney Junction (where the G.W.R. line to Wrexham diverged) and beyond but it's now only double track from Roodee Junction. The line to beyond Saltney Junction is remotely controlled from Chester Power Box. There is little sign now of Mold Junction and its Motive Power Depot but the turntable lives on elsewhere, now installed at Peak Rail (see post here). At Hawarden, the huge Airbus plant manufacturing wings appears on the left and at Shotton, on the right, the Corus steel processing plant. Originally, this was John Summers - a 'modern' integrated steel works. The Courtaulds plant has gone, replaced by a gas-fired power station. The modern, brick built signal box of Rockcliffe Hall which controlled the connections to Courtaulds has been replaced by a curious two-storey 'Portakabin'-style signal box next to the new overbridge which carries the approach road to the new cable-stayed road bridge over the Dee.

Fflint (it used to be 'Flint' when I was young) retains its simple Chester and Holyhead station building but has lost its L.M.S. pattern signal box. The next block post is Holywell Junction with its semaphore signals. The station has been closed for many years but the impressive Chester and Holyhead buildings remain. A curious sight on the way to Mostyn is the 'Duke of Lancaster' beached in a creek near the railway. This turbine-driven ship was commissioned in 1956 as a British Railways cruise ship and passenger ferry. It was modified to additionally carry cars on the Heysham to Belfast crossing and was finally taken out of service in 1979 to become a 'Fun Ship' in its present location. It now has a very neglected appearance. There's a 'Wikipedia' article on the ship here. The I remember the ironworks at Mostyn which closed in 1965 but Mostyn Docks remains successful (see article here). The L.N.W. signalbox at Mostyn still sits between the Up and Down Lines controlling the trains. The next box, Talacre, is about 3 miles further on at the far end of Mostyn Sea Wall. Talacre controls the connections to what was the Point of Ayr colliery. The colliery has gone, replaced by a chemical works. The next block post is Prestatyn, now served by a single island platform. I was delighted to find the standard L.N.W. standard wooden station buildings still in use and apparently being renovated but appalled at the huge new footbridge connecting the platform to the town. Painted dark green and with long approach ramps, the ugly steel bridge dominates the area.

The Up side station buildings at Rhyl.

The larger resort of Rhyl is a further three miles on. The scale of this station indicates its former importance but now it has just two platforms, a passenger loop on the down and a couple of engineers sidings. Two huge L.N.W. signal boxes once controlled the station. Rhyl No. 1 is still is use. Rhyl No. 2 is disused and forlorn but, I believe, Listed Grade 2.

The signalbox at Abergele & Pensarn.

The next station and signal box is Abergele & Pensarn, some four miles further on. Although the L.N.W. signal box has been modernised, the original appearance has been largely retained. The L.M.S. pattern signalbox nameboard used to read 'ABERGELE' but this has been replaced by a new board in the original style lettered 'ABERGELE & PENSARN'. It's about 10 miles to the next signalbox at Llandudno. There's still a station at Colwyn Bay but no longer a signal box. After a brief pause at Llandudno Junction, we set off on the sharply-curved line towards Llandudno. I well remember the diminuitive L.M.S. box at Llandudno Junction Crossing with its level crossing on the main road to Conway and beyond. This used to be a horrendous bottleneck until a road overbridge finally abolished the crossing and signal box in 1969. The estuary of the Conwy River is now on our left and Deganwy station is reached within a mile. New housing has sprung up on the left and extensive boat moorings - the old Quay is transformed. There's still a station at Deganwy and a signalbox to control the road crossing which now has lifting barriers.

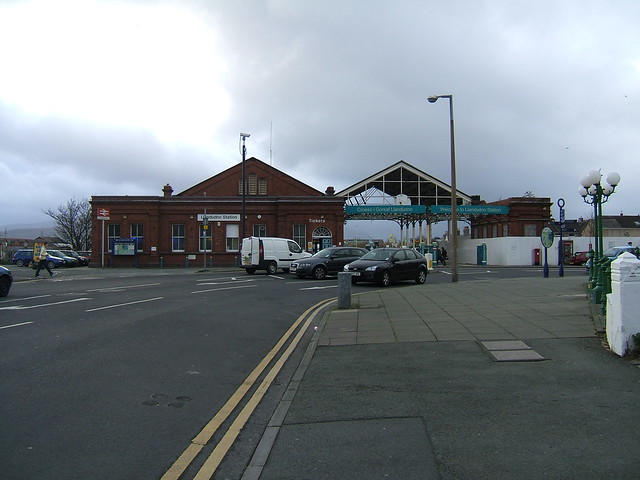
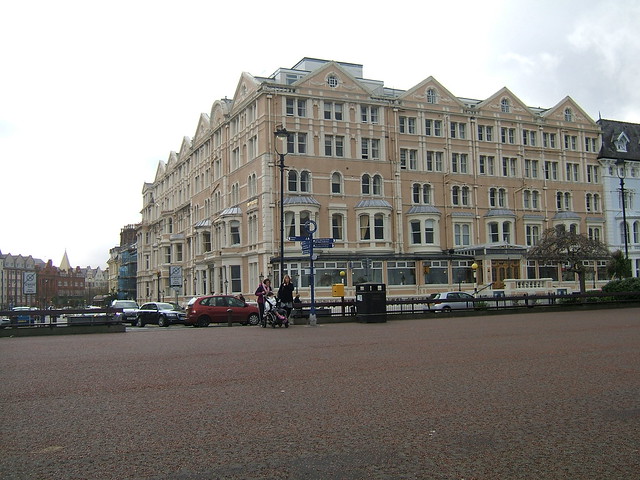
The present-day view of Llandudno Station from the road leading to the Promenade.

Less than two miles takes us to our final stop - the terminus at Llandudno. Llandudno No. 1 box was abolished in 1970 and Llandudno No.2 box at the station throat (renamed simply 'Llandudno') has had its 86 lever L.N.W. lever frame reduced to 34 levers! Platforms 1 to 3 are still in use but tracks serving island platform 4 and 5 are now sidings. The station buildings on the disused side of the station are now out of use or demolished. In addition, much of the station's overall roof has been removed.

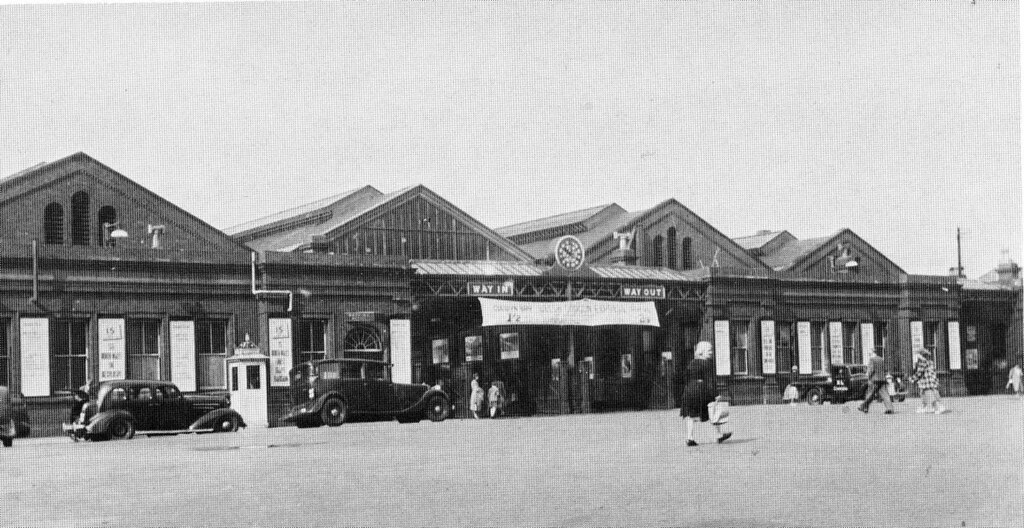
Llandudno station buildings in the 1950s (from 'An Historical Survey of Chester to Holyhead Railway Track Layouts and Illustrations').

There are a few railway photographs of this trip (including those in this article) here.

Crewe - Holyhead Gradient Diagram

The Irish Mail

The reason for building the North Wales Line was to improve communications with Holyhead - the premier port for steamers to Ireland. Mail was carried by train from the start and the 'Irish Mail' train between Euston and Holyhead became the stuff of legend. When I was young, there was still a service between Euston and Holyhead carrying the 'Irish Mail' headboard which connected with the steamers. On a number of occasions, I watched this train thunder through the 'Fast' lines at Stafford, usually with a 'Rebuilt Scot' in charge. The 'Emerald Isle Express' followed the same route, I think.

I also remember, on a visit to Holyhead, finding an Up service preparing to depart in the late afternoon with (I think) two or three Travelling Post Office coaches marshalled ahead of the passenger coaches. I was most impressed with the Post Box fitted in the side of the T.P.O. coach. On payment of a surcharge, the public could actually post letters here, right up to departure!

Holiday Traffic

The advent of railways allowed seaside holidays to become feasible for a much larger section of the population. The North Wales coast was within fairly easy reach of the Midlands and Lancashire, with resorts like Rhyl, Colwyn Bay and Llandudno growing to meet the demand. In summertime, the original double track main line was unable to handle the traffic. Certain sections were quadrupled (paired by direction) and additional signalboxes were introduced to shorten the block section and allow trains to follow on another more closely in a safe manner. The track layout and station buildings at places like Rhyl and Llandudno were redeveloped to cater for the holiday and excursion traffic.

Chester

Chester (General) station was originally shared by the L.M.S. and G.W.R. The L.M.S. lines from Crewe and Warrington converged here and continued along the North Wales coast. But the Great Western also reached Chester via Shrewsbury and Wrexham, to join the North Wales route just outside Chester at Saltney Junction. Trains towards Birkenhead (Woodside) could then either take the Chester Curve or reverse at Chester (General).

References

Goto North Wales Coast Steam for a marvellous collection of pictures from the steam era.

On the same '6G' site there's a wonderful page devoted to signalling titled 'Signalling around the Junction.

There's a splendid collection of photographs and plans in 'An Historical Survey of Chester to Holyhead Railway Track Layouts and Illustrations' published by Oxford Publishing Co. (ISBN: 0-86093-216-8).

You can find more detailed track and signalling diagrams of the route in the excellent series of publications from the Signalling Record Society 'British Railways Layout Plans of the 1950's'. North Wales is included in 'Volume 10: LNW Lines in North Wales, Chester and Wirral areas' (ISBN: 1 873228 12 0).

For details of what remained of this route in 2005, refer to 'Railway Track Diagrams' Book 4: Midlands & North West', Second Edition, published by Trackmaps (ISBN: 0-9549866-0-1). The First Edition of this book was published by Quail in 1988.

A Trip to the Seaside (Part 1)

The sweep of the bay at Llandudno, with the Great Orme in the background.

I've always lived in the Midlands of England, where the sea is around ninety miles distant so the sea became a source of fascination to me and visits to the sea were always prized. One of my favourite destinations then, and now, was Llandudno on the North Wales coast. In 'Steam around Morecambe' I explained that my visit to that Lancashire resort came about because my mother was responsible for a party of about 200 pensioners from the West Midlands on a week's holiday organised by a voluntary organisation. One of my early visits to Llandudno was similarly because my mother was looking after another large party of pensioners at the Welsh resort.

Llandudno has always seemed 'proper' seaside to me. There's a large, attractive bay framed between the Little Orme to the east and the Great Orme to the west. There's a wide promenade overlooked by a swathe of elegant Victorian hotels. There is still a splendid pier (when I was young, large pleasure steamers like the 'St. Tudno' docked at the seaward end). The town is still a good place to shop and many of the shops still sport verandahs over the pavement, lending a certain style. The cable-hauled Great Orme Tram still takes passengers to the summit of the Great Orme (in the season). Alas, the trams which ran through the town itself and out to Llandudno's second beach (the West Shore) are long gone. I'm old enough to remember the trams - after behaving quite properly in the town itself, the trams would suddenly dive off across fields and grind their way around the Little Orme to Rhos-on-Sea at the western end of Colwyn Bay. Llandudno still has its terminal railway station, although it's now a pale shadow of the station I remember from childhood, when steam-hauled excursion trains arrived from all over the place.

Over the years I've been back many times and on 26th November 2011, I decided to make another brief visit, before winter had us more firmly in its grasp.

My journey by rail was quite good and Arriva Trains Wales delivered me to Llandudno on time, just after eleven. I walked to the promenade, to enjoy the view shown in the heading photograph. The sea was quite placid although I could see waves breaking against the sea wall near the entrance to the pier. I walked along the promenade and then turned off into the town. Many of the hotels and boarding houses were closed for the winter and sported 'No Vacancies' signs.

Llandudno's attractive Town Hall.

The Town Hall was hosting an Antiques Fair, from which I emerged with a large Willow Pattern meat plate to add to my collection. The second hand bookshop I normally visit was closed but I found a shop with a splendid selection of discounted new books which proved irresistible.

The Imperial Hotel, Llandudno.

I then made my way back to the promenade and the Imperial Hotel where I decided to take lunch in the restaurant at the front of the hotel since it provides good views of the sea. A rainbow had appeared, its arc rising out of the sea to the east, climbing high into the sky and then diving behind the Great Orme. More prosaically, a noisy yellow-painted 'Sea King' helicopter from Air-Sea Rescue overflew the hotel. The battered haddock I ordered was excellent and I followed that with Fortes ice cream.

By the time I left the hotel after my leisurely meal, the sky was quite overcast and the wind had strengthened so that I made progress only with some difficulty. Accordingly, I decided to head back to the station and make my way home after a very enjoyable interlude.

More pictures of Llandudno.

Wednesday, 23 November 2011

Traffic Movements at Tipton Curve, 1965

There's an introduction to Tipton Curve box here.

Tipton Curve, Saturday 10th July 1965

All the signalling staff in the area have received redundancy notices and Wolverhampton Power Box is scheduled for commissioning on August 13th and 14th.

At 06:50 hours (the 24-hour clock was introduced with the summer timetables) I board the London in Platform 3 at Wolverhampton High Level. We depart on time and make a good start. We pass the new Monmore Green freight yard, with its access to both LM and GW routes, and slow for the slack at Catchem's. The remaining crossover and the Tip Siding is coming out tomorrow and most of the ballast is already removed in preparation. Spring Vales's new motor distant is 'on' but his mechanical distant is well 'off' and we roar past Stewarts and Lloyds. No freights in Spring Vale yet this morning. A burst of speed past Deepfields followed by a brief stop at Coseley station. A swift run down the bank to Bloomfield, passing under the colour light gantry, and we are soon slowing for Tipton. The signals show that the Curve box is open, and Tom is at the top of the box steps to wave in recognition.

I leave the station and take a brisk walk round to the Curve. A freight stands at the down home and the young fireman is just making his way to the box to sign the book. But the train has a long wait: by the time Hawkin Davies at Bloomfield takes him, the freight has chalked up 50 minutes standing time. The train was wired as Spring Vale but as 5288 finally blasts past, the driver mouths "Bloomfield" and he has a dozen loaded stone wagons at the front of his train. Bloomfield is advised and fortunately he has a margin to shunt the train, otherwise it would have been embarrassing. The train is shown as '55' but I think this is wrong. All the trip numbers have been altered again but trips are no longer shown in the Freight Book [Working Timetable of Freight Trains] but only in the Local Trip Notice, which I have only just got hold of. People seem to be using a mixture of old and new numbers.

We close the box and return to Tipton station by car. Tom wants his breakfast but hardly has he started to make arrangements than it's "Round the Curve". So I am presented with the key while Tom makes food arrangements. I take a gentle walk round to Tipton Curve box, being passed by 1D25. I notice the diesel had a cab door open at the rear - getting to be a habit! When I give a '1' to Bloomfield, prior to opening, he's so anxious, he immediately slaps a '4-1'. Apparently, Deepfields has turned out '37' in front of the up local! The freight makes rather painful progress towards me, 5090 tender first with a grim-faced driver and a long train of ore empties and coke empties. The up local is delayed - oh well! A telephone conversation confirms that there's nothing else about, so I close, check with Princes End that they're tested through and walk back to Tipton Station.

Before we can finish the bacon sandwiches Tom's obtained, George Lewis (at Tipton signal box) gives three rings on the station bell and tells Tom "Round the Curve". I walk out onto the platform and '23' is just going down to Bloomfield. Des leads on his brake van and he confirms that he's going round the curve. The 350 h.p. diesel grinds past - no tail lamp - oh well.

Tom and I walk round the Curve and find that '23' is the only reason for our curtailed refreshments. In due course, '23' comes round from Bloomfield - D3089, cab leading, very dirty and still carrying the old lion-astride-a-mangle-wheel motif (no headlamp, of course), 5 minerals, a loaded sludge tender, 1 mineral and the B.R. brake. The driver stops a bit sharp and the brake van, which has been cut loose by Des working from the van footboard, stops well outside the home signal. The rest of the train is drawn forward and reversed into the Tip Siding. All the mineral wagons are empty, apparently, and we have no idea what they are for. "Engine and Brake Princes End then back to Bloomfield" calls Des. I get the road and pull off, deliberately pulling the starter before the home. Tipton Curve is unusual in lacking the sophistication of sequential locking. As the train pulls rapidly away, Tom says "I think I'll have a ride to Princes End". He dashes down the steps and leaps onto the speeding brake van, much to the amusement of Des.

After '23' has departed, I forget to 'knock out' [give 'Train out of Section'] to Bloomfield, who comes on the phone rather concerned and very confused. When I 'clear back', he offers a '4-1' and I realise he's got '55' which he wants to clear before the express. 'T23' returns from Princes End and comes to a stand at our home because Bloomfield won't take the E&B. '55' storms past with his usual train from Ettingshall Road, after pausing at a very poor branch starter at Bloomfield. Bloomfield manipulates the starter for some time before putting it back and pulling off up the main - he's apparently in some trouble, one way and another. He's already stopped most down trains at his home, for some reason. At last, Bloomfield accepts '23' and he scoots off. As soon as Bloomfield gives 'Train Out Of Section', we close the box.

A copy of the Train Register enties is below:-

DOWN

UP

For variety, we walk round to Bloomfield Junction, rather than back to Tipton. '23' has finished whatever he was doing there and is ready to return to Watery Lane, so we 'blag' a lift. On arrival, Watery Lane puts us 'inside' on the Up. There's a large bridge girder on wagons stabled there, awaiting installation (I don't know where) so we take the opportunity to clamber over it, examining its construction.

Then, it's a short walk to a friendly reception at Tipton Station box, where I spend a few hours working the box. But that's another story.

[Text and Train Register entries added 5-Jan-2012].

Tuesday, 22 November 2011

Death of the Dudley Line

I started to write this article back in June 1964, using a typewriter. For some reason, I never finished it but below I reproduce what exists, without change and under the original title.

Dudley is to lose its final rail services. Two short years after the closure of the Wolverhampton (Low Level) to Dudley line, the remaining services are withdrawn. The Dudley to Birmingham (Snow Hill) finishes on Saturday June 13th 1964; the Walsall service, originally to close on the same day, is now reprieved for a month. And so, a round trip is arranged to tour the sentenced lines and on Wednesday June 10th I set out, bright and early, with the following itinerary carefully arranged:-

Station arr. dep.
Wolverhampton H.L. ... 5.58 am
Dudleyport 6.11-1/2 6.34-1/2
Dudley 6.39 6.44
Walsall 7.00 7.14
Dudley 7.31 7.50
Dudleyport 7.53 8.08
Dudley 8.11-1/2 9.00
Birmingham S.H. 9.25 9.55
Dudleyport 10.16 10.20-1/2
and hence to Wolverhampton

Wolverhampton (High Level) station was in a state of quiet disorder, owing to the ensuing Modernisation. Alrteady boxes No. 1 and No. 3 had disappeared and Platform 1 had just been brought back into use after a confusing period when down trains used platform 2 and up trains platform 3. The 5.58 local was in platform 2 and, after 1M16 type 4 hauled and running early pulled up in 3, we got the road and left for Dudleyport. The run was uneventful but the new concrete cable troughing and the well-advanced Track Section Cabins at Deepfields, Bloomfield's down starter and Tipton point to the changes overtaking the main line.

The friendly booking clerk at Dudleyport seemed quite unruffled at supplying a return Walsall, a return Snow Hill and three returns to Dudley at 6.15 in the morning and so I was soon down the Low Level, awaiting the first connection. The diesel twin arrived on time from Walsall and rumbled off up the 1 in 39, past Sedgeley Jn. where Quiyum was on duty. The driver kept up a reasonable speed over the junctions, past Conygree Siding, onto the straight section which crosses the New Road and up to Dudley East's home, which remained resolutely on until we had come to a stand, when the subsidiary aspect cleared. Once in the platform, the train quickly emptied of its few passengers and drew down to Dudley South, to be crossed to the up side and Platform 4.

6.44 and the train left for the quick trip to Walsall. We run down to Dudleyport at a cracking pace, then gingerly descend through the cuttings, past the fairy-tale box at Horsley Fields which hides coyly in the recess in the cutting and into Great Bridge, an utterly squalid collection of huts hiding at the rear of a dirt platform. In the yard, the diesel-electric shunter positions steel coil wagons, which are in circuit working to Great Bridge and are another sign of the present attitudes to bulk freightage and the like. Fully fitted wagons too! The train starts away, past the goods shed and past Eagle Crossing. A bus waits reluctantly for us to pass and the hand-worked crossing gates hang at an angle, adding to the general appearance of decrepitude which is only offset by the new paintwork of the box. We rattle past a few wagons left on the Long Siding and pass Gols Hill Crossing. The box was burnt down a few months ago but has been rebuilt in the original (L.N.W.) pattern and repainted. A pity this course was not adopted at Tipton Curve when the Pigeon Loft was erected!

As we approach Wednesbury, we enter a thick pall of smoke from the neighbouring industries. On the left, the Princes End line can be seen rising uphill and disappearing under the roadbridge near the Ocker Hill cooling towers. T55, with a Class 8 at the head end, is just starting up the bank, with the diesel-electric shunter from Wednesbury giving assistance. Wednesbury station already looks derelict. Part of the station is already out of use, with doors boarded up and windows smashed. After a brief pause, the train starts away and the signalman in No. 2 rises from his register to give "section". The train accelerates through the cutting, past No. 2's starter, still an L.N.W. lower quadrant but now shored up by a sleeper. The line levels out past the tiny box at Mestycroft and we speed on towards Bescot Curve. Just past the junction, the line is shrouded by the massive columns of a flyover under construction, to take the M6 southwards. We soon rattle over the crossings at Pleck, where the box now stands side by side with the shell of the massive new Walsall power box.

Walsall environs are busy at 7.00 am. Two light engines stand by the P. Way Frame, awaiting duty, a Brit. pauses with stock in the carriage sidings and a 2-6-0 shunts the Midland yard. Nearer the station, a diesel shunter groans in the down sidings and another 2-6-0 contemplates a parcels turn. We pull under the massive gantry at No. 2 and stop in platform one. A diesel parcels unit draws out of the adjacent bay and then our twinset pulls out to reach platform 2. The over-anxious signalman offers a '3-1' then, realsing his mistake, cancels and offers stock. Meanwhile, a Birmingham multiple unit rolls into No. 4 and quite a crowd of passengers entrain. But the Dudley train, with so little time left, commands a sizeable patronage and by the time I board for the return journey, it is uncomfortably crowded.

And there, I'm afraid, the article stops.

Riding the Brake

These are the notes I made at the time of a brake van ride from Tipton Curve to Wednesbury and back. There's more about Tipton Curve here and a description of Princes End here.

Saturday 12th December 1964

It's usually a fairly quiet day for the 'Porter Bobby' at Tipton Curve Junction, but today I am lucky enough to arrange a trip to see '23' shunt Austin's. '61' used to come down as a '2-2-3' ('Train requiring to Work in Section') and spend an hour working at the siding but the work is now done by '23'. The Second Man for the diesel shunter arrives at Tipton after 10.0 a.m. and, waiting at Tipton Station, I watch '23' grind away up the bank to Bloomfield with Bolsters and Open Wagons. This is the cue for Tom and I to get round 'The Curve' and wait for '23'.

After 1G05 and 1G06 have passed on the Up Main, '23' heads round the sharp curve from Bloomfield with the 350 h.p. diesel electric, cab leading, two All-Steel Open Wagons and a S.R. 20-ton Brake. The train is brought almost to a stand and then allowed forward, so that the writer can make a rather undignified leap onto the footboard of the brake van, as the train accelerates away for Princes End.

The brake van is provided with two padded seats and duckets, diagonally opposite one another. I am soom installed in one of them, facing the friendly Guard, Des Jones ('Jonah'). The permanent furniture is completed by the brakewheel and the diminuitive stove. There is also a metal locker which doubles as a footrest and a shunting pole is propped in one corner.

We are soon approaching Princes End: the crossing gates open as we near and the 'pegs' come off. The train passes the L.& N. W. lower quadrant Starter and we commence the descent to Wednesbury.

The Guard comments favourably on his brake, S56240 - "It's nice and snug, rides well, brakes evenly and got lamp brackets on the wall" (the last feature prevents accidents to spare lamps when the van is jerked). He decides to keep it as the 'Residential Brake'.

We are coming down the bank past Wednesbury Number 1's fixed distant. The Guard comments on what a "wicked bank" it is to descend with a load on. He recalls seeing a 'Class 8' and a train of coke run out of control, right through Wednesbury station, whistle 'popping', finally stopping halfway up the bank to Mestycroft with the coupled wheels locked. The engine ended up with half inch flats on the tyres and a frightening 'rattle-thump-rattle-thump" as he moved!

We pass through the so-called Princes End Tunnel, an elongated road bridge, and emerge in the shadow of a cooling tower at Ocker Hill Power Station. Our train draws up to Wednesbury's Outer Home (or is it Home 1?) which remains stubbornly 'on'. Des points out the sidings.

On the left, protected by the signal at which we're standing, are Bagnall's Sidings. This is a steel stockyard, with three curving sidings (2 loaded, 1 empty) populated by BBCs. The freight is steel bars.

On the right are the sidings to Ocker Hill Power Station. The facing lead from near the junction fans, after a short neck, into six roads. At the other end of the yard these lines, plus a short Cripple Siding, converge into a single line which splits up into the Power Station. Number 1 siding (nearest to us) in the Empty Road, the remainder are Inwards Sidings, crammed with loads of slack. As we watch, a 'Class 8', facing the Power Station, backs from the bottleneck onto a train of Empties and subsequently sets back onto his Brake Van waiting in the Neck. Des confirms from Chris, the Bushbury Guard with the empties, that it's a train of 'Pools' for Littleton's and he admires the neatness of the move, which he has not seen before. He also correctly surmises that the train will set back onto the Down Line, in front of us, since the signal to leave the Neck only reads to the Down. Setting back onto the Up, although sometimes done, requires a hand signal.

We patiently wait while the train of empties backs clear of the connection to the Power Station and sets off bravely up the bank to Princes End. In a few minutes, the engine blasts past, working hard, slipping momentarily just as he draws level. While I watch the wagons rumble by, there is an awesome jerk and we are on the move.

'23' stops just short of the 'Western' bridge (where the Wolverhampton Low Level to Birmingham Snow Hill main line crosses over the South Stafford line). The handbrake is partially screwed down, to hold the Brake Van as the engine and two wagons are uncoupled and draw away, clear of the connections to the Down Sidings. The Wednesbury Shunters crowd round and uncouple the two wagons from the diesel. The diesel gives the wagons a 'shove' and then stands by the signal box as the wagons roll sedately into the sidings, rumble like thunder passing under the bridge and contact sharply with the wagons we have come to pick up which are standing on the 'Front' road. Throughout these operations, the Wednesbury shunt engine (a 'Class 8') stands obediently clear on another siding. Our diesel returns and, without much ceremony, buffers up to the Brake (and its passenger). Once attached, the engine and brake are drawn forward, clear of the points, and propelled over the rough trackwork onto our train. Our train is now twelve wagons strong: the original two wagons loaded with spoil and lumps of iron now augmented by ten 16-ton mineral wagons. The diesel draws the whole collection into the Down platform and the Guard calls for "Full Brake". The engine is unhitched and draws away to Wednesbury Number 2 box, where he is turned onto the Middle Road. The diesel creeps past his train as a long freight rolls through the station on the Up and out on the Great Bridge Line. Our engine is soon coupled onto the train and draws out of the station, holding up the road traffic waiting at the level crossing a minute longer.

We head back up the bank to Princes End. On emerging from the tunnel, I am amazed to see an express approaching from the other direction! It turns out to be the S.L.S. Special 1Z65, touring the Midlands with the last two 'Super Ds' in service. 49340 and 49361 are impeccably turned out and both cabs sport the yellow cab diagonals (not to work under overhead lines south of Crewe). Even the coaching stock, which sprouts heads and arms along its length, is clean. The passenger train slows as it enters the tunnel and the engines whistle in chorus to signal their approach. Nostalgia apart, the train was not shown in the 'W1' Weekly Notices or the Supplement so it had earlier been brought to a stand at Watery Lane because nobody knew what it was! We proceed about our mundane busines and are soon drawing up to Princes End crossing, with assistance from the van brake. The Secondman goes to 'Sign the Book' and the Guard goes to explain what he's about. This gives me about ten minutes of quiet in the van to contemplate the lonely life of a freight guard then the train draws over the crossing and stops with the Brake opposite the box. The van brake goes on hard and the engine and wagons draw away with the Annett's Key required to get into Austin's. Within a quarter of an hour, the engine is back and coupled up, the Annett's Key is returned to the box and we are whining back to Tipton Curve.

There's time to complete the Guard's Journal:

Wednesbury arr. 11.15 (that is, commence shunting)
det. 2 att. 12 (note that the two all-steel count twice)
Wednesbury dep. 11.25
P. End arr. 11.50 det. 12
P. End dep. 12.5

When we get back to Tipton Curve, Tom keeps the home signal 'on', to allow me to drop off and then the engine, now facing Tipton, rumbles back to Owen Street with his Southern Region Brake. Incidentally, the '4-armer' home signal was recently moved further away from the junction as, in its original position, it was starting to slip down the embankment, presumably due to the underground fire in the embankment.

The 'Express & Star' carried this report of the S.L.S. Special.