skip to main |
skip to sidebar
In the post Early Days of the Mersey Railway I outlined the construction of the tunnel and, in 1886, the opening of the line using steam traction.
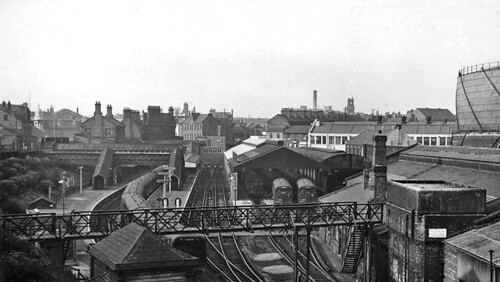
Initially, there was only one station on the Liverpool side of the river, underground at James Street, accessed from street level by three large hydraulic lifts. From here, the railway line descended on a gradient of 1 in 27 under the river before climbing at a gradient of 1 in 30 to Birkenhead Hamilton Square station. Like James Street, this station was underground, accessed from street level by three large hydraulic lifts. The line continued south in a tunnel to the railway's headquarters at Birkenhead Central which was located in a cutting with retaining walls. The line extended south in cutting and tunnel to the final, sub-surface station at Green Lane.
At Shore Road, Birkenhead and Mann Island, Liverpool huge, steam-powered pumps were provided to keep the tunnel free of water.
At the time of the railway's opening, extensions to the line were already in hand. In 1888, the first to open was a branch in a tunnel from Birkenhead Hamilton Square to Birkenhead Park, to make an end-on connection with the relocated terminus of what became the Wirral Railway. This allowed through-running of Mersey Railway trains to and from locations on the Wirral, although locomotives were exchanged at Birkenhead Park. The extension from Green Park via cutting and tunnel to the surface station Rock Ferry and, on the Liverpool side, from James Street by tunnel (on a gradient varying between 1 in 31 and 1 in 34) to an underground station below the Liverpool Central station of the Cheshire Lines Committee were both opened in 1891.
Beyer Peacock supplied eight 0-6-4 and ten 2-6-2 condensing tank locomotives to operate the line.

Beyer Peacock 0-6-4 condensing tank for Mersey Railway (The Engineer)

Beyer Peacock 2-6-2 condensing tank for Mersey Railway (Railway Archive)
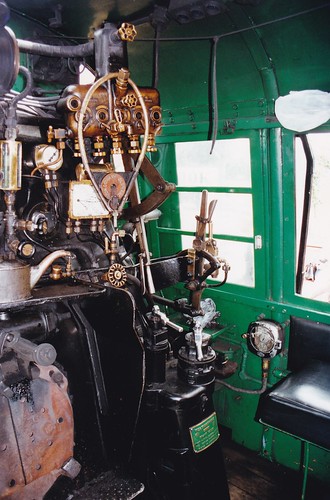
The condensing feature was used when travelling in tunnels. On arrival at Liverpool Central, a second locomotive was attached to the rear to form the departing train whilst the incoming engine uncoupled, 'dumped' the heated tank water, refilled with cold (conventional boiler feed injectors fail to operate reliably with hot water) and prepared to take out the next arrival.
Trains comprised eight 4-wheel passenger and one 4-wheel brake coach, each 27 feet in length.
With the extensions to the line in place, the railway offered good connections and a faster crossing than the ferries but using steam operation, conditions in the tunnels were foul, despite the massive fans provided, and revenue decreased, forcing the railway to continue operations in receivership.
Salvation came in 1903 in the form of an American, George Westinghouse, who was able to propose conversion to electric traction, using a fourth rail system operating at 650 volts d.c. Power was provided by three 1,650 h.p. generators driven by steam located in the pumping station at Shore Road, Birkenhead. Two, smaller 300 h.p. generators were also provided for lighting and other purposes.
Spacious bogie coaches to American design formed the replacement electric trains and these became popular with passengers, although no heating was provided. Air brakes were fitted but without compressors on the train, so periodically crews had to re-charge the train air receivers from an 'air main' at stations. All through-running at Birkenhead Park ceased.
At the railway 'Grouping', the Mersey Railway remained independent but the Wirral Railway became part of the L.M.S. empire. The Mersey Railway continued its role unchanged until 1938 when the L.M.S. electrified the Wirral lines (using the third-rail system). Running rights for the new L.M.S. electric multiple unit trains to operate to Liverpool Central and for the Mersey Railway electrics to serve the Wirral were established. The elderly Mersey Railway electrics required refurbishment to serve this extended role. Facilities to change between third-rail and fourth-rail current collection were provided, together with heaters and on-board electric compressors for the brake system.
Railway Nationalisation in 1948 finally brought an end to the Mersey Railway's independence and it became part of British Railways London Midland Region. But, repainted and renumbered, the Mersey Railway's electric trains carried on until 1956 when LMS-design electric multiple units started to replace the elderly vehicles. The last was withdrawn in 1957.
In 1977, the ambitious 'Liverpool Loop' scheme was opened by British Rail. This extended the line beyond Liverpool Central station so as to serve Liverpool Lime Street station by a reversing loop.
In recent years, I've looked at stations on the original Mersey Railway as part of a study of the modern Merseyrail system and there are notes below on three of those stations.
Birkenhead Central
The railway's headquarters at Birkenhead Central were fitted into a cramped location below ground level bounded by a cutting on one side and retaining walls abutting the gas works on the other. The station provided two through platforms, a south-facing bay, the 3-road steam locomotive shed and a carriage shed, as shown on the fragment of the 1912 Ordnance Survey map below. The right hand edge of the map shows the LNWR/GWR joint line which ran from Birkenhead (Woodside) to Chester (General). The large Engine Shed in the lower half is actually two engine sheds side-by-side for the LNWR and GWR.

Birkenhead Central station 1912: Birkenhead 25 inches to 1 mile map (National Library of Scotland)
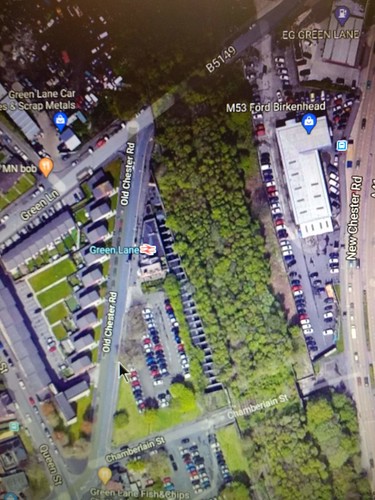
The modern satellite view below shows what has survived. The platforms and station buildings are still there but the bay platform has become a siding. The carriage shed has been re-roofed and, in a different form, extended. The Mersey Railway steam locomotive shed has gone, as has the adjacent gas works (although some of my pictures from 2014 reveal abandoned steelwork which formed part of one of the access stairs to a rolling lift gasholder which I believe replaced the column-supported designs shown on the 1912 map). The large LNWR/GWR locomotive shed has gone and the area is overgrown.

Birkenhead Central station: satellite view (Google Maps)
Below, a few illustrations of Birkenhead Central over the years.

Birkenhead central in steam days, drawn by T. Raffles Davison (Mersey Railway)
Birkenhead Central, 1961 (Photo: Ben Brooksbank CC BY-SA2.0)

Merseyrail: Birkenhead Central in 2014, showing former carriage sidings.
Green Lane
The railway is below street level with a tunnel to the north leading towards Birkenhead Central and a short tunnel to the south, leading towards Rock Ferry. There are two platforms, set in a rectangular excavation with the retaining walls beautifully-executed stonework. A series of plate girders span the station and the spaces between these girders are partially infilled by brick arcading but only above the southbound track, giving the station a rather 'lopsided' appearance. I presume this was to support trackwork leading to the LNWR/GWR steam locomotive sheds serving the joint Line from Chester to Birkenhead Woodside which ran slightly to one side of Green Lane above ground level. Quite generous station buildings were provided at street level.

Birkenhead Green Lane station 1912: Birkenhead 25 inches to 1 mile map(National Library of Scotland)
The modern satellite view below shows that the railway is little changed. The multiple plate girders bridging the station are clearly visible. The whole of the area where the joint line once ran is abandoned andvery overgrown with vegetation. The station buildings with their wedge-shaped plan remain.
Green Lane station: satellite view (Google Maps)
Below, pictures illustrating changes at Green Lane over the years.

Green Lane station in steam days, looking north, drawn by T. Raffles Davison (Mersey Railway)

Green Lane station, Merseyrail in 2020, looking south, showing stonework, overhead plate girders, partially infilled by brick arcading, and short tunnel towards Rock Ferry.
Rock Ferry
The 1891 southwards extension of the Mersey Railway to the surface station at Rock Ferry offered platform-to-platform interchange with the through platforms on the LNWR/GWR Joint Line which ran from Birkenhead (Woodside) to Chester (General). Mersey Railway trains ran to two terminal platforms provided with a middle engine release siding. North of Rock Ferry Station, at Union Street, connections were provided between the Mersey Railway and the Joint Line but I believe these were originally not much used.

Rockferry station 1912: Birkenhead 25 inches to 1 mile map (National Library of Scotland)
The modern satellite view below shows the major changes to the railway. The two terminal platforms of the Mersey Railway survive but the engine release road is now removed. The four tracks of the Joint Line have gone, but the Mersey Railway route has been slewed to occupy the trackbed of the Western pair of Joint Lines. The trackbed of the Eastern pair of joint lines was retained for a time to provide connections to the Birkenhead Docks railway system, but these are out of use. The island platform serving one terminal platform and the northbound through platform is re-roofed but not much changed. The southbound through platform is modernised and the associated access footbridge is new.

Rockferry station: satellite view (Google Maps)
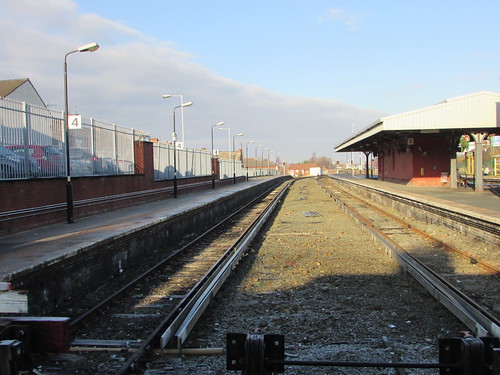
Rock Ferry station in 2016 - terminal platforms 4 and 3, looking north. There was originally a 'middle siding'.

Rock Ferry station in 2016, view looking north from footbridge.
Thomas Raffles Davison
The pencil sketches of Birkenhead North and Green Lane above are the work of Thomas Raffles Davison (1853-1937), a prolific architectural illustrator, journalist, editor and occasional architect. There's a Wikipedia article about him here.
Books
[1] ‘The Line Beneath The Liners: A hundred years of Mersey Railway sights and sounds’ by John W. Gahan, published by Countyvise (ISBN 0 907768 40 7 and Avon AngliA Publications (0 905466 57 8).
[2] ‘Chester to Birkenhead including the Helsby Branch’ by Vic Mitchell and Keith Smith (Middleton Press 2012) ISBN 978 1 908174 21 5.
Posts on this website referring to Merseyrail
Early Days of the Mersey Railway 8-Oct-2013.
Day Trip to Liverpool 24-May-2010.
By rail to Liverpool (Part 2) 24-Mar-2014.
Birkenhead and New Brighton by train (Part 1) 19-Feb-2014.
Birkenhead and New Brighton by train (Part 3) 24-Feb-2014.
Railways around Birkenhead 28-Feb-2014.
More Merseyrail 21-Oct-2014.
Return to Liverpool 19-Mar-2020.
Quite a few of my posts relate to Merseyside. Your can display all these posts, in reverse date-of-posting order, by selecting Label 'Merseyside' or click here).
My pictures on the Merseyrail network
Where necessary, clicking on an image above will display an 'uncropped' view or, alternately, pictures may be selected, viewed or downloaded, in various sizes, from the albums below:-
Albums showing stations discussed in this post:-
Birkenhead Central Station
Green Lane
Rock Ferry
Merseyrail.
Profile - 'Cecil Raikes' (The locomotive).
At the end of 2001, I made my first Round the World Trip, cryptically referred to as 'RTW1'. I hadn't started 'blogging' then, so I'd written very little about the trip. The pictures I'd taken were 35mm and scanning has proceeded very slowly. But (only 18 years later) I decided to add the following description of my afternoon at a preserved railway.
During my time in Auckland on that trip, I travelled by car to Glenbrook Station on the Glenbrook Vintage Railway. In the run-up to the New Year, they were operating their large 'Ja' class locomotive. New Zealand built in 1949, this 3 foot 6 inch gauge 4-8-2 has many American features, including a Vanderbilt tender.

Ja1250 preserved at Glenbrook Vintage Railway (Photo: G.V.R.).
A board, displayed at Glenbrook Station, gave a brief specification of Ja1250.

Brief specification of Ja1250 (Glenbrook Vintage Railway, 2001)
I purchased a ticket at the booking office and enquired about the possibility of a footplate ride. "Ask the driver" I was told. When I explained to the driver and fireman my involvement in steam preservation in England, I was immediately welcomed aboard. There was also a young trainee firing. I offered to "work my passage" by firing and thought, for a moment, I'd offended some protocol by the vehemence of the driver's refusal. But then he explained "It's all downhill this way - you can have the shovel on the way back!".
The driver (the locomotive is right-hand drive) kept a look-out for the guard's 'right away', given by whistle and green flag, just like the U.K. I noticed the Australian-made Westinghouse brake stand incorporating driver's brake valve for both the air brakes on the train and 'straight air' brake on the locomotive.

Waiting for the guard's 'right away' (Glenbrook Vintage Railway, 2001)
The boiler backhead had a number of interesting features. The Steam Fountain was placed on the fireman's side of the cab, so both injector steam cocks were that side - a convenient feature that I don't think appeared in British practice until Bulleid. The most of the exposed steam pipes were lagged. The boiler pressure gauge was dual-faced, electrically-fit and mounted on a bracket perpendicular to the backhead to improve viewing by both driver and fireman. Below the pressure gauge were dual gauge glasses and an electric gauge lamp. A large oil feeder sat on the warming tray above the 'Ajax' firedoors, with their manual operating handle. These are often called 'butterfly' firedoors because of the pivoting action of the doors. At high level in front of the driver a large 'Detroit' 5-feed hydrostatic (sight-feed) lubricator was fitted. A large hoop hooked onto the filler plug of the lubricator carried the single line tablet for the line we were about to travel from Glenbrook to Pukeoware. To the right of the lubricator, a pull-out regulator hung from the roof. A trigger lever worked a catch in a toothed quadrant to hold the regulator in the position set. Immediately in front of the driver was the brake gauge, also fitted with an electric lamp. To the right, the reversing lever which American's call the 'Johnson Bar', was miniature and fitted with a trigger lever working a catch in a toothed quadrant implying power operation.
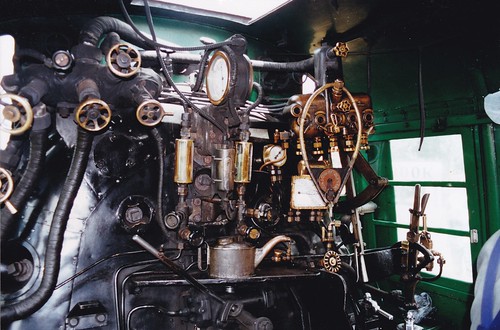
Ja1250 boiler backhead (Glenbrook Vintage Railway, 2001)
Electricity is provided by a generator which feeds the large headlamps provided front and rear and the various other lamps. I spotted a Train Recorder mounted on the the inside of the cab side sheet on the driver's side. I didn't have time to absorb all the other details in the cab (including what appeared to be another lubricator with 4-feeds) before we set off, with the engine working tender-first. Easy steam was sufficient to give a reasonable speed downhill and the trainee fireman was firing lightly. 'Ajax' firedoors are intended for power operation and I was impressed that this feature was working on Ja1250, foot pressure on a small floor-mounted treadle swinging the doors open as the loaded shovel blade approached the firehole. A small air cylinder on the backhead above the firehole provided the power to operate the firedoors.
In the U.K., Bullied fitted 'Ajax' firedoors to his 'Pacifics', powered by a small steam cylinder. I've worked on two preserved Bulleid 'Pacifics' ('Canadian Pacific' and 'Taw Valley') but the power operated firedoors weren't in use on either and a former British Rail fireman told me that was not uncommon during his time on the Southern Region.
Ja1250 cab view with 'Ajax' firedoors bottom left (Glenbrook Vintage Railway, 2001)
The line led through attractive, wooded farmland, not unlike England. Whistling, we passed over a minor road crossing, no barriers, just warning signs on the road.

Approaching Morley Road level crossing (Glenbrook Vintage Railway, 2001)
All too soon, we arrived at what was then the end of the line. I climbed down to watch the locomotive being uncoupled - flexible hoses on the air brakes isolated and the palm couplings separated, then the Norwegian-pattern 'chopper' coupling disconnected.

Ja1250 being uncoupled from its train (Glenbrook Vintage Railway, 2001)
The locomotive was then set-back into the headshunt, points reversed, and run forwards along the run-round loop, closely watched by the passengers, particularly those in the end vehicle - an open, converted bogie freight wagon.

Ja1250 setting back into headshunt (Glenbrook Vintage Railway, 2001)
 The train included an open, converted bogie freight wagon (Glenbrook Vintage Railway, 2001)
During the run-round, the locomotive stopped to take coal from an adjacent coal heap, using a small jib crane fitted with a grab. The crane was air operated by connecting a long hose to the brake hose on the locomotive and using the compressor on the locomotive to power the crane. I'd come across locomotive turntables using an air motor powered from the engine being turned (in the U.K., because of the original predominance of vacuum brakes, vacuum tractors were the norm) but I'd not encountered other equipment powered in this way. The 'Ja' then completed the run-round and was coupled-up for the return journey.
I'd been invited to see if I could make the 'Ja' steam on the way back to Glenbrook, where the gradient was reported as 1 in 50. The fire looked in good shape, but I decided to thicken it a little in the hope of bringing the pressure near to 'blowing-off' by the time we set off. There was plenty of 'Strongman' hard coal in the tender, in a convenient size for shovelling, so the challenge was to synchronise operation of the foot treadle so that the firedoors opened before the shovel blade tried to enter the firehole and keep pressure on the treadle until the shovel blade was completely withdrawn. Quite quickly, I managed to get a reasonable rhythm and found the experience delightful, musing that it was a distinct improvement on the usual arrangements in my country! I was gratified to see the boiler pressure respond to my treatment and, on the ascent back to Glenbrook, my usual 'little and often' treatment produced satisfactory results. The trainee decided to deal with the live steam injector, so I didn't get a chance to master setting the unfamiliar pattern in use. We arrived back at Glenbrook and I let the trainee have the fire back, thankful that I'd not disgraced myself.

The 'Ja' class had a good supply of 'Strongman' coal in the tender (Glenbrook Vintage Railway, 2001)
I stayed on the footplate as the crew ran Ja1250 round its train, ready to take the next service, then I thanked them for their kindness and reluctantly returned to the platform.

The crew on Ja1250 during my visit (Glenbrook Vintage Railway, 2001)

Ja1250 leaving Glenbrook (Glenbrook Vintage Railway, 2001)
 Ja1250 leaving Glenbrook. Note the design of the Guard's ducket window (Glenbrook Vintage Railway, 2001)
Whilst the service train was down the line, two motorised inspection trollies were raising funds for the railway by offering rides the length of the station. I was tempted, but declined.

Motorised Inspection Trolley (Glenbrook Vintage Railway, 2001)
Only much later did I discover that, in 1967, the original Strongman deep mine, near Greymouth on New Zealand's South Island, had suffered a disaster which killed 19 miners. It was replaced by the Strongman 2 mine which operated from 1994 to 2003.
My pictures
Glenbrook Vintage Railway
At the end of 2001, I made my first Round the World Trip, cryptically referred to as 'RTW1'. I started blogging at the end of 2006 and produced a very short post on 'RTW1' which you can find here. My pictures from that trip existed as prints which I intended to scan but work has proceeded very slowly. In 2020, I finally scanned the pictures from my trip to Rangitoto Island when I was in Auckland back in 2001 and decided to add the following description.
I was staying in the Heritage Hotel, Auckland, a conversion of Farmers Department Store built in the 1930s which appealed to me. Farmers are still trading but in a different location in Auckland. My room had a view of Auckland Harbour Bridge which I would have found impressive, had I not a couple of days earlier completed the Sydney Harbour Bridge Climb experience.
 View of Auckland Harbour Bridge from The Heritage Hotel (Auckland, 2002)
But what I had found impressive was the brooding presence of Rangitoto Island, with its symmetrical, conical volcano rising 260 metres above the sea, around 10 km away. Rangitoto erupted 600 years ago and is regarded as 'dormant'. Before 9.00 a.m., I was aboard a modern, catamaran Fullers ferry in the shadow of Auckland's Ferry Building for the 30 minute trip to the Wharf on Rangitoto Island to get a closer view.

Ferry Building and HSBC building: Rangitoto and Motuihe Islands by ferry (Auckland, 2002)
As the ferry powered away from the dock, it started to rain, quite seriously. I was travelling on the upper, open deck so I sheltered under the section with a canvas sun roof above, but cold rain was sluicing in from the sides. This was not quite how I had imagined Auckland.
Auckland in the rain: Rangitoto and Motuihe Islands by ferry (Auckland, 2002)
We called briefly at Devonport Pier and then continued to the wharf at Rangitoto. The rain ceased as quickly as it had started, so I felt quite cheerful as I disembarked.
I followed the single track away from the wharf to a junction, where a signpost pointed inland to a 'Summit Track'. With no obvious alternatives and nowhere to make enquiries, I set off to the summit on a decent track which ascended through lush, green bush. Periodically, I'd turn to check the view towards the mainland. The skies over the mainland still looked troubled but I was dry and the cooler temperature was helpful as I continued upwards. Eventually I reached a viewpoint, with a neat boardwalk, seats and fences around a central, wooden pylon. There was also a derelict, blockwork hut which might have once been a shop but had been daubed 'Danger - Keep Out'. The area clearly allowed for a number of visitors to take their ease, but I was quite alone (the camera's self timer allowed me to record my first volcano ascent).

Jan at summit of Rangitoto: Rangitoto and Motuihe Islands by ferry (Auckland, 2002)

View of Cheltenham and Auckland from summit of Rangitoto: Rangitoto and Motuihe Islands by ferry (Auckland, 2002)
The crater rim path led me all around the top of the volcano before I started to descend. A sign to 'Lava Caves' led to a a different path bringing me to a series of fissures in the volcanic rock but I didn't explore far into the darkness within.

Crater rim path, Rangitoto summit: Rangitoto and Motuihe Islands by ferry (Auckland, 2002)

Lava Caves, Rangitoto: Rangitoto and Motuihe Islands by ferry (Auckland, 2002)
I completed my descent the area near the wharf and found the 'Rangitoto Volcanic Explorer' - a tractor hauling a passenger coach which gets visitors near the summit. It was not running during my visit but might have run later. I was happy that I'd made the ascent unaided.

The Rangitoto Volcanic Explorer was not running during my visit: Rangitoto and Motuihe Islands by ferry (Auckland, 2002)
There seemed nothing further to detain me on the island so I decided to board the next ferry to arrive and travel on to Motuihe Island. Before we departed, I managed to snatch a picture of the bridge.

Bridge of modern catamaran ferry: Rangitoto and Motuihe Islands by ferry (Auckland, 2002)
As we sailed around Rangitoto to reach Motuihe, I proudly surveyed my achievement from afar.

Rangitoto Volcano viewed from ferry: Rangitoto and Motuihe Islands by ferry (Auckland, 2002)
Motuihe is a small island (179 hectares in area). It was first settled by the Maori, then farmed by Europeans for a century before becoming a quarantine station for Auckland in 1872. In the first World War it became a prisoner of war camp, in the second World War it was used as a naval training base. Boasting some of the finest beaches in the area, it is now a recreation reserve for day trips or camping controlled by the Department of Conservation.

Arriving astern at Motuihe Wharf: Rangitoto and Motuihe Islands by ferry (Auckland, 2002)
The ferry was booked to wait for a while at Motuihe before returning to Auckland so I decided to just explore the beach nearby and then rejoin the same ferry, rather than spending some hours on the island before catching a later ferry. The sun was strong and all signs of the morning rain had disappeared.

Ferry waiting at Rangitoto Wharf: Rangitoto and Motuihe Islands by ferry (Auckland, 2002)
On the return journey, we stopped at Devonport Pier and I was able to admire the preserved steam tug 'William C Daldy'. There's more information on their website here.

Devonport Pier with preserved steam tug 'William C Daldy': Rangitoto and Motuihe Islands by ferry (Auckland, 2002)
As we left the pier, we passed a large catamaran ferry arriving.

Leaving Devonport Pier for Auckland, showing a catamaran ferry arriving: Rangitoto and Motuihe Islands by ferry (Auckland, 2002)
Within ten minutes, we were docking at Auckland, after a marvellous trip.
 Arriving back at Auckland's ferry terminal: Rangitoto and Motuihe Islands by ferry (Auckland, 2002)
Related posts on this website
Selecting label 'RTW1' or clicking here displays all the posts on this trip in reverse date-of-posting order.
My pictures
Rangitoto and Motuihe Islands by ferry, 2002
Evening Departures on 16th April 2020
At the time of writing, the world is suffering from the serious, new respiratory disease Covid-19 and the U.K. is currently in 'Lockdown'. Only essential travel is permitted, resulting in train passenger numbers collapsing and revised timetables.
In the post Watching The Trains Go By I outlined how you can remotely monitor train movements in real time and, using the network of cameras operated by Railcam UK, actually see live views at selected locations.
There's another site called Open Train Times which offers similar timetable and signalling diagram information (without the cameras) which I've found excellent. Whereas Railcam UK works well on a 'Smartphone' or a larger display, Open Train Times really needs a decent-sized display. In complex areas, some detail is lost using Railcam UK but the signalling diagrams in Open Train Times make fewer concessions and include 'route set' data, where available from Network Rail, and will appeal to signalling enthusiasts. Open Train Times also allows you to customise the presentation by separately toggling on and off data showing signal numbers, signal symbols and unoccupied train describer berths.
On Thursday evening 16th April 2020, I decided to use Railcam UK 'app' on my 'Smartphone' to see what long-distance expresses were running out of Euston that evening. This was the day the U.K. Government announced that the lockdown would continue for at least another three weeks and television was showing the usual fare of repeats.
At about 8.15 p.m. I made a list of the trains scheduled to leave Euston in the next hour, recording the platform, the train reporting number displayed for the departure, the final destination, the time due to arrive at that destination, a reference to my explanatory note, the ATOC code for the Train Operating Company (TOC) and, finally, the reporting number in the arrival 'berth' (usually indicating the previous journey undertaken by the unit). I didn't include the various local services and the d.c. electrics, except for one typical example of a Northampton service (2N62). I also ignored the various multiple units displaying a train reporting number starting with '5' indicating 'Empty Stock'.
| Plat |
Nbr |
Dep |
Destination |
Arr |
Note |
TOC |
In |
| 2 |
1P07 |
20:30 |
Crewe |
23:00 |
#2 |
VT |
1M15 |
| 4 |
9G45 |
20:40 |
Wolverhampton |
22.33 |
#1 |
VT |
1B57 |
| 5 |
1F28 |
21:03 |
Liverpool |
23:33 |
#3 |
VT |
1A60 |
| 11 |
2N63 |
20:45 |
Northampton |
22:05 |
#4 |
LM |
- |
| 15 |
1S25 |
21:16 |
Inverness |
|
#6 |
CS |
- |
| 14 |
1P09 |
21:10 |
Preston |
23.59 |
#5 |
VT |
1A62 |
During the evening, I'd periodically return to the Railcam UK signalling diagram screen to see how well things were going. Every so often, I'd also check the Railcam U.K. camera on the main lines at Camden to confirm there really were trains going by, but it was getting dark so the pictures weren't terribly exciting on the small screen I was using (particularly for a steam enthusiast). Then, I made some notes on each train, in the order of departure which appear below.
#1: 9G45
This Wolverhampton service by an Avanti West Coast Class 390 (with a train reporting number starting with '9') made a right-time departure with booked stops at Watford, Milton Keynes, Rugby, Coventry, Birmingham International, Birmingham New Street, Sandwell & Dudley. At Wolverhampton the empty stock would make the short journey to Oxley Sidings where Alstom, the builders of the Class 390, have a Traincare Depot'. I noted that the ATOC code for Avanti remains 'VT' because, until recently, these trains were operated by Virgin Trains. There's a Wikipedia article on the Class 390 here.
#2: 1P07
This Avanti West Coast Class 390 'Pendolino' should have left at 20:30 but was 14 minutes late departing for an unknown reason. It was booked via the Trent Valley Line calling at Tamworth, Lichfield, Stafford, Crewe, Warrington, Wigan and, finally, Preston.
#3: 1F28
Avanti West Coast Class 390 also serve Liverpool. This train was booked to stop at Watford, Milton Keynes, Nuneaton, Crewe, Runcorn and Liverpool Lime Street. Alstom also have a Traincare Depot at Edge Hill, Liverpool.
#4: 2N63
Northampton is served by a regular stopping service operated by West Midland Trains, ATOC code 'LM' (because the franchise was formerly operated by London Midland). The homely-sounding 'West Midland Trains' is, in fact, a joint venture between Abellio (part of Dutch National Railways), East Japan Railway and Mitsui Group. These services are normally routed on the Slow lines to Roade Junction as they generally stop everywhere and most of the stations only have platform access to the slow lines
#5: 1P09
This Avanti West Coast Class 390 'Pendolino' left on time and was booked via the Trent Valley Line calling at Tamworth, Lichfield, Stafford, Crewe, Warrington, Wigan and, finally, Preston.
#5: 1S25
Almost all movements at Euston are Electric Multiple Units (EMU). The notable exception is the locomotive-hauled Caledonian Sleeper, operated by Serco with traction provided by GB Railfreight (GBRf). The rolling stock for this service, a 16-coach rake, was fairly recently renewed at enormous expense and initially suffered a number of technical problems but seems to have settled down. Due to Covid-19, a temporary timetable is in use. After departure at 21:16, stops were scheduled at Watford Junction, Brinklow on the Trent Valley Line (Brinklow?), Crewe, Preston, Carlisle, Lockerbie and Edinburgh Waverley (where I assume diesel traction replaces electric). The train then continues, with intermediate stops, to Inverness arriving at 08:40 on Friday. The timetable information showed Class 92 'Voltaire' (92038) hauling the train, which is limited to 80 m.p.h.
There's a Wikipedia article on the Class 92 here. I've had an interest in the design which can develop 6,760 horse power since being involved in design work and testing on one of the safety systems some years ago. My short post Crewe International Electric Maintenance Depot has links to detail pictures of the Class 92.
Earlier in the evening, the Empty Stock for the Caledonian Sleeper had been brought from Wembley Carriage Sidings by a locomotive currently 'trapped' at the buffer stop end of platform 15, showing on the Railcam UK signallingdisplay as 0A95 (the '0' signifying Light Engine). The Caledonian Sleeper set of on its long journey and, shortly afterwards, 0A95 followed slowly up Camden bank.
I logged onto the Railcam U.K. camera on the main lines at Camden to watch '1S25' pass. There was certainly a Class 92 on the front, followed by 16-coaches in the distinctive Caledonian Sleeper livery. Then I kept watching for the light engine which eventually appeared on the camera at 21:31 travelling slowly - a diesel-electric (Class 66 perhaps) with the big 'GBRf' logo on the side. I realised that a freight train from Camden Road direction has been 'turned out' onto the down slow. Railcam UK showed that the train was 4M92, operated by Freightliner and being worked by locomotive 66555, which had left Felixstowe at 18:12 and was due to arrive at Lawley Street (Birmingham) at 00:06 on Friday. Its route was via Rugby and Nuneaton, from where it would reach Lawley Street by branching onto the former Midland Railway line to Birmingham.
I continued to use the Railcam UK signalling display to see the Freightliner train making rapid progress on the Down Slow and the light locomotive diverged onto the Down Carriage Line before 'dropping out of sight' as it continued onto uncontrolled lines in Wembley Carriage Sidings.
We may be under 'lockdown' but it's still possible to 'Watch the Trains go by!
My pictures
My pictures taken before we were in 'Lockdown' can be selected, viewed or downloaded, in various sizes, from the albums below:-
London: Euston Station.
London & Birmingham Railway (showing the line approaching Euston).
Today (Easter Monday 2020) is a public holiday in the UK but this is an Easter like no other I have lived through. Whilst some people (health workers, care workers, retail, transport and other workers in essential services) are heroically risking their lives to continue working, the remainder of the population must remain at home by law (apart from limited exercise outside or obtaining essential shopping). Even Churches and other places of Worship are locked. This is because of the virulence and lethality of the new disease Covid-19 which has disrupted the whole world, causing myriad deaths and untold misery, against which 'social distancing' is currently our defence.
I am very fortunate as I have a garden I can spend time in. The cherry blossom just now would delight any Japanese and there are signs of new life everywhere. The sun is shining today but the wind is strong, keeping the temperature at 8 degrees Celsius here, although a couple of days ago it was a balmy 16 degrees.
A few pictures below are intended to give hope for the future in these unprecedented times. There are more pictures in the album here.

Cherry Blossom, Upper Lawn (Brewood Hall Garden 2020)

Cherry Blossom, Easter 2020: Brewood Hall Garden

New Growth, Easter 2020: Brewood Hall Garden

New Growth on the Weeping Ash, Easter 2020: Brewood Hall Garden
Keep safe!
My pictures
Pictures in this post can be viewed uncropped, where necessary, by clicking on the image. Selecting from the full 2020 album below allows viewing or downloading in various resolutions:-
Brewood Hall garden 2020
This is the 15th post describing an 'Expedition Cruise' with Noble Caledonia in 2020 under the title 'Across the Tropic of Capricorn'.
Events of Friday 28th February 2020
I awoke reasonably refreshed at the Hilton Hotel in Cairns, dressed and went downstairs for buffet breakfast in the large restaurant on the ground floor which overlooked Chinaman Creek. Bright sunshine had replaced the rain I'd experienced the previous evening. Some of my fellow-passengers from 'Caledonian Sky' drifted in and one asked if I'd seen the cruise ship 'Queen Elizabeth' arrive. I had not, but I decided that a morning walk towards the Cruise Terminal was indicated. I've seen 'Queen Elizabeth' in a number of ports around the world during my travels, but I only discovered during my post-trip research that the ship's arrival that morning was the very first time such a large, 'Vista' class cruise ship had berthed in Cairns following a project to widen and deepen the shipping channel. There's an outline of the project on the Ports North website here, with a video of 'Queen Elizabeth's' arrival here.
I left the hotel, joined the Foreshore Walk and headed south towards the cruise terminal. Although the whole area has been landscaped and a modern, concrete sea wall constructed, the many abandoned wooden piles standing in the creek were enough to indicate that this had been the original commercial port.

Hilton Hotel and Foreshore Walk viewed from the modern fishing pier, Cairns.
A little further on, this was confirmed on passing a small, modern cafe named 'Wharf One'.

Chinaman Creek, Cairns, looking north towards the sea with 'Wharf One' cafe on the left and Marlin Wharf and Marina in the background.
The transit sheds for Wharf 2 and Wharf 3 have been retained but 're-purposed'. 'Shed 2' is now Hemingway's Brewery ("a waterfront gastro-brewpub that showcases local provenance in a vibrant setting" according to their website here). 'Shed 3' has become 'Cairns Cruise Liner Terminal' but as I approached, the terminal was dwarfed by the massive bulk of 'Queen Elizabeth'.

'Queen Elizabeth' docked at Cairns Cruise Liner Terminal.
The road in front of the terminal carried signs saying 'CLOSED ON SHIP DAYS' and this was enforced by rising bollards in the raised position, a heavy-duty barrier, also raised, and a lady security guard. I had to research the barrier, as I wasn't sure of the correct name for this type of product - it's a 'Hostile Vehicle Mitigation Product'! The one in my picture was supplied by Australian firm AVS-elli and their website confirmed it was a LW7 Folding Block Barrier, the heaviest in their range - in fact, their website showed a picture of the very installation at Cairns! I also noticed, with interest, the remains of an early 3 foot 6 inch gauge siding leading to the transit shed inset into the road surface not using tramway rail but conventional rail and double check rails.

Cairns Cruise Liner Terminal, showing railway siding, raised road barriers and various coaches awaiting the cruise passengers.
As I walked back north, a large, modern catamaran called 'Tropic Sunbird' operated by 'Sunlover Reef Cruises' headed into Chinaman Creek, to give the passengers a chance to see (and photograph) the cruise ship. The catamaran slowly turned through 180 degrees, then returned north at speed.

'Queen Elizabeth' viewed from Wharf One, as a 'Tropic Sunbird' inspects the cruise ship.
In the above picture, you can also see overhead conveyors and loading gantries in the background. I was intrigued but lacked time to find out more until I returned home when I found out that almost all the sugar grown in Australia comes from Queensland and that over 80% is exported. Queensland Sugar Limited (often referred to simply as 'QSL') is a not-for-profit organisation owned by the Queensland sugar industry. The conveyors I'd seen were part of Cairns Sugar Terminal which has a storage capacity of around 250,000 tonnes of raw sugar. The terminal is owned by Sugar Terminals Limited (STL) and managed by QSL under an operating agreement.
The tug 'Gulf Explorer', operated by Tim North Marine was moored at the Fishing Jetty, with the three crew relaxing on the jetty in the shade of the superstructure. I assumed she'd assisted 'Queen Elizabeth' to the berth.

Tug moored at the Fishing Jetty, Chinaman Creek, Cairns. 'Gulf Explorer', 25m long 8m beam 30 ton bollard, was built in 1972 by Carrington Slipways, Newcastle, Australia.
I'd toyed with the idea of walking to Cairns railway station but it's modern and buried under the car park of Cairns Central Shopping Centre a few blocks away so I knew I'd be disappointed. Now, if the original station on McCloud Street had survived, that would have been different.

Cairns Railway Station around 1890, from a glass negative in John Oxley Library, Queensland (Public Domain)
Queensland Rail now operates two contrasting rail services from Cairns: the 'Spirit of Queensland' diesel-electric Tilt Train makes five trips each week between Cairns and Brisbane, covering the 1,681 km distance in 24 hours whilst two services a day serve tourists on the 37 km long Kuranda Scenic Railway. There's a short history of the Kuranda line on the railway's website here.
Instead, I returned to my hotel to complete my packing and have a few minutes on the balcony of my room looking out over the city.

View from my room at the Hilton Hotel, Cairns, looking across Trinity Bay to the airport.
I was puzzled by the glazed domes on top of a modern building to my left. Only later did I find out that Cairns Zoom and Wildlife Dome is a rather odd synthesis of Zip Line experience and wildlife park perched on top of a Casino. I'm afraid I approve of neither the gambling nor the creatures in captivity (no matter how well looked after) but (alhough I haven't tried it) the zip lining sounds fun.
I was booked to leave Cairns for home on the noon flight to Melbourne. Most of the Noble Caledonia passengers were travelling later that afternoon but a few, with different flight arrangements, were leaving earlier so a transfer to the airport had been arranged for 09:45 which I joined.
To avoid the ongoing road works, the coach drove to the airport using a route partly different from that used on our arrival the previous afternoon, offering some different views of Cairns - white-painted Cairns City Library with its columned frontage followed by Cairns Aquarium. Then, a block with St. Monica's High School, the modern St. Monica's Cathedral and the Dioscese of Cairns offices. Next, we passed through an area filled with modern apartment blocks followed by Cairns Hospital.

Cairns, Australia: view from Abbott Street showing Florence Street with Cairns Aquarium on left (City to Airport)

St. Monica's High School, Cairns, Australia (City to Airport)

Dioscese of Cairns offices, Cairns, Australia (City to Airport)
There were brief "good byes" as we were dropped-off outside Departures then I had a brief struggle to get my luggage to the right check-in queue. Fortunately, it didn't take long to complete the fomalities and then, with plenty of time in hand, I made my way to the Quantas Lounge to await my flight at the end of my very brief, but interesting, visit to Cairns.
Related posts on this website
This post is in the series labelled 'Tropic of Capricorn’. The first post is here.
Clicking on the 'Next report' link will display the post describing the next events. In this way, you may read about the trip in sequence.
Next report
Alternately, clicking on the 'All my Tropic of Capricorn reports' link displays all the posts on this trip in reverse date-of-posting order.
All my Tropic of Capricorn reports
My pictures
Cairns Airport, Australia
Cairns, Queensland, Australia
Hilton Hotel, Cairns, Australia
[Link to 'Next Report' added 5-Nov-2020]
