skip to main |
skip to sidebar
This is the third of a group of posts describing an 'Expedition Cruise' with Noble Caledonia in 2020 under the title 'Across the Tropic of Capricorn'.
Events of Wednesday 12th February 2020
Overnight, the ship had sailed north-west along the coast of New Zealand’s North Island to the area called the Bay of Islands. This is described as “a drowned valley system, 16 km wide and 260 square km in area with 144 islands and numerous peninsulas and inlets”. We anchored offshore and prepared to dispatch the guests to land in the ship’s fleet of Zodiac inflatable boats. This involved a mandatory ‘Zodiac Briefing’ and explanations of the use of the second type of self-inflating lifejacket used on Zodiac transfers.
Disembarkation started at around 8.15 a.m. and it took some time to ferry all the passengers ashore because, rather than take us to the closest township at Russell, Zodiacs were making a longer, exhilarating crossing to the other side of the bay near Waitangi at a location called Ti Point. A modern pier with a floating pontoon allowed a ‘dry landing’. As each Zodiac arrived, guests were directed to one of a number of waiting coaches.

Modern pier near Kerikeri Mission House, Bay of Islands
A short drive took us to the Kerikeri Mission House. In 1819 the Church Missionary Society seeking to spread the Word chose this site by navigating up-river from the Bay of Islands to a suitable site for a wharf allowing them to import all the materials necessary to establish a permanent presence. Adjacent to the wharf they built a substantial stone building which remains open as a shop today as part of the site now in the care of Heritage New Zealand.

The Stone Store at Kerikeri Mission House, Bay of Islands
Nearby stands Kemp House of mainly wooden construction, restored, furnished to represent the period and open daily as a museum. A lady guide, dressed as a storekeeper, told us a little of the history before we explored the house. Because of the age of the building, they only allow up to five visitors on the first floor at a time, so the guide stood at the foot of the stairs with five spurtles (a Scottish stirring stick used when making porridge) which she used to keep track of visitors as she allowed them to the upper floor. The missionaries had chosen the site well: it remains a charming, quiet spot.

Kemp House, Kerikeri Mission House, Bay of Islands
Then it was ‘back on the bus’ for a drive through the undulating, fertile landscape of volcanic soil to the Waitagi Treaty Ground.
The Maori had lived in what is now New Zealand for generations before whalers, European settlers and missionaries started to arrive. Different Maori tribes competed with one another for the trading opportunities these visitors offered. In 1835 a confederation of Maori leaders had signed a Declaration of Independence. But settlers and the New Zealand Company (a similar arrangement to the better-known East India Company) were urging Britain to establish a Colony and the French were also showing interest in the lands.
In 1840, the important Treaty of Waitangi was signed between the British and the Maori giving sovereignty to the British Crown but continued ownership of land by the Maori. The Maori were given full rights and protection as British Subjects but differences in the English and Maori language versions of the Treaty led to long-term disagreements and contributed to the New Zealand Wars between 1845 and 1872. Nonetheless, the Treaty of Waitangi is regarded as the first step in the long road to the creation of modern New Zealand.
We left the coaches at a special gate for parties and an excellent lady Maori Guide led us to the traditional Maori carved meeting house called a Hotunui nearby (similar to the one I’d seen in Auckland Museum the previous day). Here, we watched a cultural performance given by a group of Maori people in traditional dress.

Maori Cultural Performance, Waitangi Treaty Ground, Bay of Islands
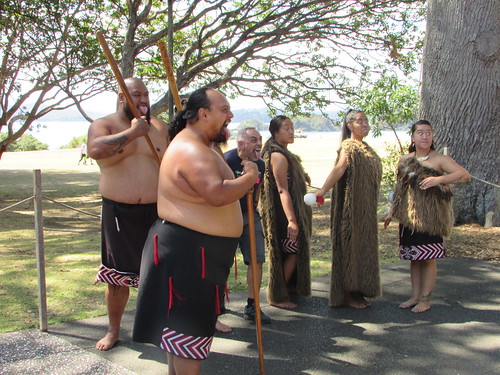
Maori Performers, Waitangi Treaty Ground, Bay of Islands
After an opportunity to be photographed with the Maori performers, our guide led us across the grassy headland to James Busby’s home overlooking the headland. This mainly wooden building is now laid out as a most interesting museum.

The view from James Busby’s House at Waitangi Treaty Ground, Bay of Islands

James Busby’s House at Waitangi Treaty Ground, Bay of Islands
Our guide then took us to a long shed near the water housing an incredible, long, traditional Maori canoe designed for over 100 rowers. Because of the length, it was constructed in three sections lashed together.

Maori canoe designed for over 100 rowers, Waitangi Treaty Ground, Bay of Islands
Finally, we walked to the main museum complex, a modern design incorporating video presentation theatre, shop, café and toilets. Slightly apart, I almost missed another modern museum building with two more galleries of historical exhibits which I only had time to ‘skim’ before the meeting time back at the bus.
We then drove back to the pier at Ti Point where we were offered a choice: back to the ship by Zodiac, lunch on board, then take the short Zodiac trip to the town of Russell or stay on the coach to Kerikeri, take the public ferry to Russell and make our own arrangements for lunch. I chose the second option along, I think, with most guests so the coach continued past a beach area where a number of sailboarders powered by parachutes were enjoying themselves and a speedboat circling the bay was hauling a 2-man parasail aloft.

Kerikeri, Bay of Islands
The rather modern-looking township of Kerikeri, confusingly, is also known as Paihia. Modern, catamaran ferries provide a regular ‘water taxi’ service to Russell.

Map displayed in James Busby's House at Waitangi Treaty Ground, showing Waitangi, Paihia (Kerikeri) and Russell.
Kerikeri has a modern, complex system of floating pontoons allowing vessels of different sizes to dock, with each pontoon linked to the upper main pier by a hinged, inclined walkway. We walked to the largest pontoon which was flanked by one large ferry, already loaded, and a smaller ferry in the course of loading. We queued to pay our seven New Zealand Dollars to a man standing on the dock equipped with a portable, computerised ticket machine. We were soon on our way, Our route passed fairly close to ‘Caledonian Sky’ at its offshore mooring, creating interest among the passengers on the ferry.

Kerikeri and its pier, Bay of Islands

The busy public ferry from Kerikeri to Russell, Bay of Islands.

'Caledonian Sky' at anchor off Russell, viewed from the public ferry.
Russell had an elaborate pier similar to Kerikeri which led to an attractive township set around pretty Kokorareka Bay. On the sunny day I arrived, with happy visitors exploring the various shops, it was hard to believe that in its early days, Russell was known as the “Hell-hole of the Pacific” in the lawless times as whalers came ashore for Rest and Recreation. The town now enjoys an altogether more refined reputation and I wandered round various streets studying the layout. A lady from Auckland I’d chatted to on the ferry had recommended the Duke of Marlborough Hotel on the Strand so I considered taking lunch there. The white-painted wooden building overlooking the water certainly looked appealing but it was rather crowded so instead, remembering a remark by our coach guide at Kerikeri, I settled for an ice-cream from a nearby shop which was excellent.

'Duke of Marlborough' Hotel on the Strand, Russell, Bay of Islands.

York Street, Russell, Bay of Islands.

Custom House from 1870, Police Station from 1900, now the policeman's home on the Strand, Russell, Bay of Islands.
I hadn’t time (or energy) to explore all Russell’s attractions but decided to visit Russell Museum which had some interesting exhibits, including an impressive one-fifth scale model of Cook’s ‘Endeavour’.
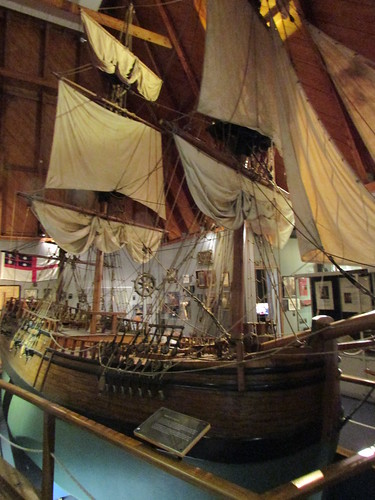
One-fifth scale model of Cook’s ‘Endeavour’, Russell Museum, Russell, Bay of Islands.
After my visit to the museum, I was starting to wilt, so I decided to return to the ship which, by this time, was operating a regular Zodiac shuttle service between a low-level pontoon at Russell pier and the ship’s rear Marina Deck.

Zodiac 5 boarding passengers to return to 'Caledonian Sky', Russell, Bay of Islands.
Once everyone was safety back on board, the ship left its anchorage and set off on the 491 nautical mile journey to Norfolk Island. In the evening, the Captain’s Welcome Cocktail Party was followed by the Captain’s Dinner in the restaurant.
Related posts on this website
This is the third post in the series labelled 'Tropic of Capricorn’. The first post is here.
Clicking on the 'Next report' link will display the post describing the next events. In this way, you may read about the trip in sequence.
Next report.
Alternately, clicking on the 'All my Tropic of Capricorn reports' link displays all the posts on this trip in reverse date-of-posting order.
All my Tropic of Capricorn reports
My pictures
This blog post was first published on the ship via a satellite link with limited capacity so picture links were added later. Pictures in this post can be viewed uncropped, where necessary, by clicking on the image. Selecting from the albums below allows viewing or downloading in various resolutions:-
Kerikeri Mission House, Bay of Islands
Waitangi Treaty Grounds, Bay of Islands
Russell, Bay of Islands
[Link to pictures added 4-Mar-2020: Minor edits, pictures embedded 23-Apr-2020]
Events of Tuesday, 11th February 2020
I slept well but not for anywhere near long enough and made my way to the ‘Aria’ restaurant of the Crowne Plaza on the lobby level, level 4. This is the level of the vehicle access on Albert Street but there is a multi-level shopping mall open to the public below. The mall has access by foot to pedestrianized Elliot Street parallel to Albert Street at the rear of the hotel, nearer Victoria Street, Auckland’s original main street. As I’ve already commented, Auckland is quite hilly.

Multi-level shopping mall beneath the Crowne Plaza, Auckland.
An excellent American-style buffet breakfast was provided and a friendly chef at the ‘Egg Station’ produced a plain omelette in seconds which I supplemented from the wide range of serve-yourself items on offer. Before 9.00 a.m. everybody on my trip seemed to be assembled in the lobby near a huge collection of our luggage which we had to identify prior to being whisked away ready for loading onto our ship.
But before the passengers reached the ship, we were having a sightseeing tour of Auckland. Outside the hotel three huge Volvo six-wheel coaches (with two passenger access doors on the left side and steering on two of the axles) were drawn up, each with a ‘Noble Caledonia’ card in the front window. I was allocated to Coach 2, which one of our guides identified by writing ‘2’ on a scrap of paper which he added to the ‘Noble Caledonia’ card. I chose to remember the simple vehicle registration number ‘TS05’ which had the advantage that I could recognize the right coach from the rear as well as the front.
We drove in a loop around the downtown area with our driver giving a commentary on the places of interest we were passing before driving past the dock area, now largely given over to container traffic, and Auckland Rose Garden.

Coach tour of Auckland, 2020 (Tropic of Capricorn).

Auckland Rose Garden, coach tour of Auckland, 2020 (Tropic of Capricorn).
Beyond the city, our route stayed near the waterfront giving us views of a series of very pretty bays. We drove through the residential suburb of Orakei, reputed to have the most expensive houses in Auckland. We stopped briefly at the Michael Joseph Savage Memorial Garden on the hill behind Bastion Point where we explored well-maintained gardens dedicated to the respected Socialist Prime Minister who died in 1940.

Michael Joseph Savage Memorial Garden, coach tour of Auckland, 2020 (Tropic of Capricorn).
Our vantage point gave us views in one direction of the city and dock area (about 5 km away)and in the other the currently-dormant volcano of Rangitoto.

View of Auckland and its docks from Michael Joseph Savage Memorial Garden, coach tour of Auckland, 2020 (Tropic of Capricorn).

View of Rangitoto from coach tour of Auckland, 2020 (Tropic of Capricorn).
Rangitoto last erupted a few hundred years ago but New Zealand’s position on the ‘Ring of Fire’ means that none of its volcanoes can really be regarded as ‘extinct’ – a truth we were reminded of just two months before writing this when there were a number of fatalities on White Island in New Zealand's Bay of Plenty area during a visit by tourists when volcanic activity re-started. Looking at the forbidding outline of Rangitoto’s caldera, I found it hard to believe that on my first trip to New Zealand in 2006 I actually walked to the summit at an elevation of 850 feet (260 metres). There's a very short report on that Round the World Trip here.
Our coach then took the road which would eventually lead us to Auckland Museum. For part of the way, in Tamaki Drive, we were alongside the Eastern Line railway, now electrified.

View from Tamaki Drive, showing Eastern Line train leaving Auckland (Auckland's Commuter Railways in 2020)
As we neared the dock area, we passed a set of sidings, now apparently little-used, and I was astonished to see a line of three derelict, rusting steam locomotives disfigured by graffiti. There were two large tender engines, probably 4-8-2s, plus an impressive Beyer Garratt.

View from Tamaki Drive, showing road bridge over Eastern Line sidings near docks with steam locomotives (Auckland's Commuter Railways in 2020)
Auckland Museum is housed in an imposing building which, unusually, also serves as the National War Memorial and there is a Cenotaph outside the columned front elevation. On a previous trip to New Zealand, I’d visited the museum and thought the unusual juxtaposition of museum and war memorial worked well.

National Memorial Musuem, Auckland 2020
This time, the Noble Caledonia group was issued with stick-on paper labels and ushered through the Grand Foyer into the Maori Court Central where the former Director of Auckland War Museum, Roy Clare, gave us a brief introduction. Although a significant gallery area was closed for redevelopment, the museum did not disappoint. The ground floor dealt with ‘Pacific People’, and included many Maori-related displays, most notably a full-size carved meeting house or Hotunui, a store house and a long boat. The first floor explored the natural history of New Zealand, with an important section on volcanoes and an interactive section called ‘Weird and Wonderful’ particularly aimed at children.
On the second floor, under the title ‘Scars on the Heart’ formed the war memorial. One long gallery lined with marble panels engraved with the names of the dead from various conflicts formed a moving memorial which was approached through a series of perhaps nine galleries each dedicated to different aspects of warfare or different conflicts. Two preserved aircraft were on display – a British ‘Spitfire’ and a Japanese ‘Zero’.

The Gallery honouring the Dead at the National Memorial Musuem, Auckland 2020
Finally, there was an apparently fairly recently-opened gallery with early photographs of Auckland. The many artefacts around the Museum were carefully chosen and sensibly interpreted and it would take the best part of a day to do it justice but our tour allowed around 90 minutes.
Then, the three coaches drove back to the city, taking the route leading to the Auckland Harbour Bridge which funnels commuters between the residential areas on the north side of Waitemata Harbour and the city. This bridge, first opened in 1959, is not as well-known as Sydney Harbour Bridge (opened 1932) but its central truss approached on either side by a series of trusses on tall piers was still a significant undertaking. Our driver explained that it originally opened with two carriageways in each direction which rapidly proved totally inadequate so, by 1969, two more lanes had been cantilevered from the original structure on each side. The contractor for this work was Japanese so Aucklanders refer to these new lanes as ‘Nippon Clip-ons’.
Our destination for lunch was ‘McHugh’s of Cheltenham’ in the desirable residential area of Cheltenham (settlers made wide re-use of English place names). Buffet lunch was enjoyed in a dining room overlooking an attractive beach. As we dined an odd-looking ship, which I could see was a car-carrier, was making its way towards Auckland creating some interest for the diners. After the meal there was some delay in rounding-up up guests who’d decided to explore the beach.

View of car carrier 'SERENITY ACE' from ‘McHugh’s of Cheltenham’, Auckland, 2020 (Tropic of Capricorn)

View of Rangitoto from Cheltenham Beach, Auckland, 2020 (Tropic of Capricorn)
We then drove a short distance to Devonport where the ferry pier has been developed as a tourist destination and we had a short stop. I watched one of the frequent, modern catamaran ferries operated by Fullers arrive at Devonport after its ten minute crossing from Auckland’s ferry terminal. In the background, ‘SERENITY ACE’ was manoeuvring astern to its berth not far from Auckland ferry terminal.

View of Auckland from Devonport Pier in 2020, with ferry arriving and car carrier docking in the background (Tropic of Capricorn).
The coach returned over Auckland Harbour Bridge using the leftmost, cantilevered lane and continued fairly slowly through the heavy late afternoon traffic until we finally turned into the cruise ship terminal next to Auckland Ferry Terminal.
We disembarked at Shed 10, a re-purposed transit shed, just a vast open space, large enough to process the thousands of passengers carried on large cruise ships. The original building framework appeared to be largely of wood but it had been re-clad using modern materials. I was in the last of our three coaches to arrive and I joined a slow-moving queue of our ship’s guests being processed first by the ships doctor, checking our Health Declarations and checking the temperature of some passengers and then passing through the New Zealand Immigration formalities before proceeding to the ship’s gangway.
At Reception on Deck 3 in exchange for our passport we received the keycard to our pre-selected cabin and a credit-card sized identity card which would be scanned each time we left the ship and returned thereafter. We were then directed to the Caledonian Lounge where welcome drinks and snacks were offered. After a while, people started to disperse to their cabins and I readily did the same, pretty exhausted after the long flights, not enough sleep the previous night and a fairly tiring, though enjoyable, day.
My cabin, 257 named ‘Drum Castle’, was on the Castle Deck, deck 2. The ship had been re-fitted since my last trip when I was on deck 3 so I wasn’t quite sure what to expect but I was delighted with what I found. The cabin was spacious and well-equipped, described by the operator as a ‘standard suite’ which seemed an accurate description. Deck 2 cabins had portholes, rather than windows but with three portholes in my cabin I was perfectly happy. The bed was set up as a wide double, which suited me, but the bed frame and mattress could be re-configured as twin beds. The majority of the walls and ceiling were panelled in a rather dark imitation wood grain with a gloss surface which wouldn’t have been my personal choice but was fine. There was plenty of storage space, a writing desk, a smaller desk with a large mirror for make-up and two armchairs facing a large flat-screen wall mounted television offering various on-ship and satellite channels.


Views of my cabin on 'Caledonian Sky' (Tropic of Capricorn)
We were not finished - there was then a mandatory safely briefing in the lounge, followed by a simulated emergency where all guests moved to the muster stations, lifejackets were donned and crew conducted groups, single-file, to the appropriate lifeboat station. My cabin was allocated to lifeboat 1 (there are four).
As it was a glorious evening, we were recommended to watch the ship’s departure from one of the outside decks. In addition to vessel ‘SERENITY ACE’, sister car carrier ‘COURAGEOUS ACE’ was also docked. At the next wharf, container ship ‘SOFRANA TOURVILLE’ (length 143m, beam 23m, 12,502 deadweight tons built by Dae Sun Shipbuilding in South Korea in 2009) currently works regularly between New Zealand ports and Brisbane, Australia. General cargo ship 'RUBY ENTERPRISE' (length 177m, beam 29m, 33,415 deadweight tons built 2016) was moored nearby.

Auckland Port viewed from 'Caledonian Sky', L: 'Sofrana Tourville', R: 'Ruby Enterprise' (Tropic of Capricorn)
'KOTA LIHAT' (266m long, 32m beam, 51,822 deadweight tons, built in China by Dalian Shipbuilding in 2013) was being attended by three on the massive container cranes on Fergusson Wharf.

Leaving Auckland on 'Caledonian Sky' showing Fergusson Wharf and container ship 'KOTA LIHAT' (Tropic of Capricorn)
Looking to port, there were views of Devonport Pier which we'd visited just a few hours earlier.

View of Devonport Pier from 'Caledonian Sky' (Tropic of Capricorn)
The last activity of the day was dinner, taken either at the inside restaurant or on-deck in the Lido area. Then, at last, I was able to retire to the very comfortable bed.
Related posts on this website
This is the second post in the series labelled 'Tropic of Capricorn’. The first post is here.
Clicking on the 'Next report' link will display the post describing the next events. In this way, you may read about the trip in sequence.
Next report
Alternately, clicking on the 'All my Tropic of Capricorn reports' link (where shown) displays all the posts on this trip in reverse date-of-posting order.
All my Tropic of Capricorn reports
My pictures
This blog post was first published on the ship via a satellite link with limited capacity so picture links were added later. Pictures in this post can be viewed uncropped, where necessary, by clicking on the image. Selecting from the albums below allows viewing or downloading in various resolutions:-
This blog post was first published on the ship via a satellite link with limited capacity so picture links were added later.
Albums from 2020:-
Auckland, 2020
Auckland's Commuter Railways in 2020
National Memorial Musuem, Auckland 2020
Crowne Plaza, Auckland
'Caledonian Sky' in 2020
Leaving Auckland on 'Caledonian Sky'
Earlier albums for comparision:-
Auckland, New Zealand, 2007
National Museum and War Memorial, Auckland, 2007
[Links to pictures added 4-Mar-2020: Minor edits, pictures embedded 01-May-2020]
This is the first of a group of posts describing an 'Expedition Cruise' with Noble Caledonia in 2020 under the title 'Across the Tropic of Capricorn'. The ship 'Caledonian Sky' embarked her passengers in Auckland, New Zealand on Tuesday, 11th February 2020 so the first logistical problem was to travel to Auckland.
Events of 8th, 9th, 10th February 2020
Although travel from Heathrow with an overnight in Singapore was offered by Noble Caledonia, I decided to make my own arrangements through my agents Wexas, so I ended up leaving Birmingham Airport at 20:50 on Saturday 8th February 2020 from my local airport at Birmingham, UK, on Emirates flight EK038 to Dubai, operated by a huge Airbus A380. I was able to take a 'screenshot' to show my aircraft on the ground, viewed from the camera mounted on top of the aircrat tail.

Live view of my aircraft at Birmingham as on TV screen on 8-Feb-2020 in connection with 'Tropic of Capricorn' trip.
This flight was due in Dubai at 07:50 (local time) on Sunday and, after a transit stop of two and a quarter hours, I was then booked on Emirates EK448 to Auckland, due in Auckland at 11:05 (local time) on Monday. This is a long journey by any standards and, flying eastwards, I 'lost' eleven hours, which I would recover during my journey home. To call it a journey of endurance is rather ungracious compared with the exploits of the original explorers by sea like Cook, who suffered months of hardship to reach what is now New Zealand. But it is nonetheless rather taxing for people of my age so Business Class with Emirates is about the best way of lessening the 'ordeal'.
I was very well looked after by the airline and arrived in sunny Auckland full of optimism for the ocean trip ahead. An Emirates car took me to the Crowne Plaza hotel in Albert Street, right in downtown, where I was to join-up with travellers who had travelled from London with a stopover in Singapore.

Office block and Crowne Plaza Hotel, Albert Street, Auckland (Tropic of Capricorn).
Although I was quite tired from the flights, with a few hours to spare before the Welcome Dinner in the evening, I decided to take a walk in the city.
My first visit to Auckland was during my 'Round the World 1' trip at the end of 2001 - I was in Auckland for the New Year. There's a very brief post for that trip here. Visit 2 was only a quick trip into the city by 'bus whilst changing 'planes on 'Round the World 2' (I arrived from Hawaii and then took a domestic flight to Christchurch, on New Zealand's South Island). I visited Auckland again in February 2007 as part of 'Round the World 4' (Auckland is discussed in the post here) with pictures here.
So, I was interested to see what changes the city had experienced since my last visit. I made my way to the ferry terminal where significant development was taking place and some of the ferries had been relocated during this work.

New construction work near the Ferry Building, Auckland, 2020 (Tropic of Capricorn).
A cruise ship terminal, apparently a rebuilt former transit shed at a now-unused wharf in the commercial docks was still called 'Shed 10'.

'Pacific Princess' moored alongside Cruise Ship Terminal 'Shed 10', Auckland, 2020 (Tropic of Capricorn).
The commercial traffic previously handled at this wharf is now dealt with at the berths to the east and at Fergusson Wharf which is equipped with huge container cranes. The ferry routes are always an attraction but, with limited time, I decided not to make a trip by ferry but to see what changes had occurred at the city's suburban station, Britomart.
The original Railway station closed many years ago and a new tunnelled line was built to a terminus for commuter trains in the heart of the city on Queen Street called Britomart. The commuter railway system is now electrified and the City Rail Link project (project web site is working on a tunnelled link to improve connectivity, currently causing chaos at street level with the associated construction work closing many streets.

Queen Street, Auckland in 2020 (Tropic of Capricorn).
Regular readers may not be surprised to read that I decided that a short journey from Britomart to the next but one station of Newmarket and back was essential. Because of what was described as 'a signal issue' the service was rather dislocated with trains to the south having to reverse at Newmarket, causing the passengers some confusion.
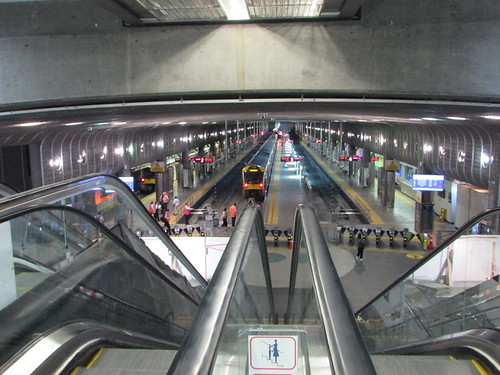
Britomart Station. Note the line of automatic ticket gates (Auckland's Commuter Railways in 2020).
After an interesting trip, I walked back to my hotel (uphill as I was moving away from the waterfront), arriving thoroughly shattered and, at last, able to shower after my marathon trip from England.
Related posts on this website
Clicking on the 'Next report' link (where shown) will display the post describing the next events. In this way, you may read about the trip in sequence.
Next report
Alternately, clicking on the 'All my Tropic of Capricorn reports' link displays all the posts on this trip in reverse date-of-posting order.
All my Tropic of Capricorn reports
My pictures
This blog post was first published on the ship via a satellite link with limited capacity so picture links were added later.
Albums from 2020:-
Auckland, 2020
Auckland's Commuter Railways in 2020
Crowne Plaza, Auckland
Earlier albums for comparision:-
Auckland, New Zealand, 2007
Auckland's Commuter Railways, 2007
[Links to pictures added 2-Mar-2020: Minor edits, pictures embedded 03-May-2020]
Until 2018, Yangon Central Station in Myanmar had been controlled by an elderly Westinghouse 'Style L' miniature lever frame. Back in 2014, through the kind offices of my friend Doctor Hla Tun, I visited the installation and that visit is described here.
In 2014, ambitious plans were emerging for the modernisation of the main line from Yangon to Mandalay and the important Circle Line around Yangon in a major scheme with the Japanese Government through the Japan International Cooperation Agency.
During my visit to Myanmar in October 2017, signs of the modernisation work were apparent. Some point installations had been equipped with new Kyosan a.c. electric point machines but the earlier colour light signals and
the Westinghouse miniature lever frame remained in use. Examples of the work in progress are shown in the pictures below.

Reinstated surface after installing new cables and signal post on platform 9 at Yangon (Yangon - Mahlwagon c/w)

New track circuit installation at Yangon Central Station (Yangon - Mahlwagon c/w)

New Kyosan point machine at Yangon. Note elevated mounting (Mahlwagon - Yangon Central Station c/w)

New Location Case Y10C (Yangon Central Station Movements 1-Oct-2017)

New Kyosan a.c. point machine at Yangon. Note cable termination box right foreground, still wrapped in green plastic (Yangon Central Station Movements 1-Oct-2017)
In May 2018, following a visit to Bago by car, I returned by train to Yangon. Near my destination, I could see the progress of the modernisation work. More point installations had been equipped with Kyosan a.c. electric point machines and the new signal posts had been fitted with colour light signal heads, although not yet brought into use, as shown in the pictures below.

Bago - Yangon by train 9th May 2018: Approaching Yangon Central on Down Main showing L: Replacement signal P7, not yet commissioned (3-aspect colour light with 'box' of 3x3 lights above), R: Existing signal P7 (Siemens).

Bago - Yangon by train 9th May 2018: Approaching Yangon Central on Down Main showing Down Local signals L: R141/R139, R: Replacement R141/R139 colour light with both theatre-type and 'box' of 3x3 lights above, subsidiary aspect below, not yet commissioned.

Bago - Yangon by train 9th May 2018: Approaching Yangon Central on Down Main showing L: Existing signal R140, R: Replacement signal R140 not yet commissioned (colour light with 'box' of 3x3 lights above)
Since all the new signal posts seemed to be near the old signals and carried the same numbers, it appeared that most of the modernisation work involved a renewal of equipment, rather than a fundamental re-think.
Before my next trip to Myanmar in May 2019, I had learnt that the replacement signalling equipment at Yangon Central Station had been commissioned, controlled from a new 'Operation Control Center' (yes, 'American' spelling) in another part of the station buildings. Doctor Hla Tun arranged an official visit on the day I arrived in Yangon, Sunday 5th May 2019. We first met the Yangon Station Master in his offices on platform 1, then one of his staff conducted us to the road approach side of the station buildings and an existing entrance to offices on the upper floors. The white-painted stucco of the post-war station building had become rather stained as is common in the humid climate but the walls in the immediate area of the Operation Control Center entrance had been nicely repainted.

The entrance to the Operation Control Center in Yangon (Myanma Railways 2019)
We climbed the steep stairs to the first floor and it was clear that part of the area had been recently partitioned off to form the Operation Control Center. Access was through double-doors with glazed panels and a security lock. Immediately inside the doors there was a deep step up onto computer sub-flooring. The Operation Control Center was windowless, artificially-lit and air-conditioned. In one corner, three men were working at a group of desks.
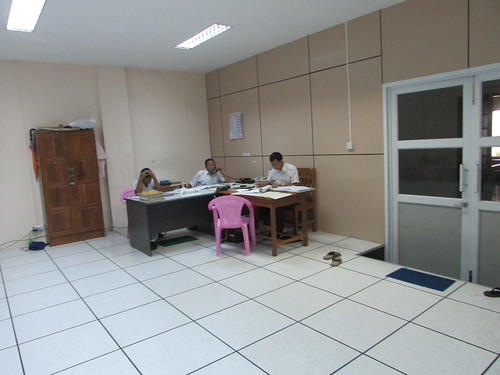
Operation Control Center, Yangon: Administrative section. Double access doors on right. Note deep step up to computer flooring (Myanma Railways 2019)
The actual control was being carried out in an adjacent corner of the room by two men seated at a row of desks with two computer monitors, each provided with a computer 'mouse', together with numerous telephones and two V.H.F. radio-telephones.

Yangon Operation Control Center (Myanma Railways 2019)
The signalman actually controlling trains that day on the the large computer monitor remembered my visit to the 'old' installation in 2014. A second signalman, with a smaller 'mimic' monitor, managed the frequent radio traffic. Studying the large colour computer monitor confirmed that the whole of Yangon Central Station had been transferred to the new control system, retaining the original signal numbers (prefixed 'R', presumably from a time when Yangon was known as 'Rangoon'. However, to the east, the vital junctions at Pazundaung, formerly a separate scheme provided by Siemens, were now controlled from Yangon with signals retaining their original numbers (prefixed 'P').

Operation Control Center, Yangon: Main signalling display at 09:53 (Myanma Railways 2019)
Yangon is a busy station and the position had changed after 8 minutes when I took the picture below.

Computer Monitor Display at 10:01, Operation Control Center, Yangon (Myanma Railways 2019)
Click for larger view.
Studying the above picture 'Computer Monitor Display at 10:01' allows a fair understanding of the design:-
Tracks: Tracks are represented on the screen by a thick line: white if the track is unoccupied, red if a train is present, yellow if a route has been set. Perpendicular lines indicate the ends of the track circuit and the track circuit number appears in the form 'R[number]T' (Yangon area), 'P[number]T' (Pazundaung area) or 'A[number]T' (Automatic area), plus some 'funnies' like 'ART', 'RT', suffix 'AT' (for approach track) and 'R65T' divided into two sections. In many cases, the same references as the earlier Westinghouse system are retained.
Points(turnouts): The current position of points is indicated by a continuous thick track line. A break in the track line shows the route is not set. A set of three inclined thin lines indicates the 'NORMAL' position and the adjacent reference in the form '108' is the reference number. For crossover points, a suffix letter 'A' or 'B' identifies the two ends. The same references as the earlier system are retained.
Running (main) Signals: Graphical symbols represent different signal types, including 2-aspect, 3-aspect and searchlight (R65,R66,R73,R74 shown as 1-aspect) running signals. Where a subsidiary aspect is provided, this is represented by adding to the symbol an empty 'right-angled triangle with one curved side'. When the subsidiary is 'off', a diagonal line is added to the symbol. If the signal leads to more than one route, a route indicator is normally provided, represented by adding a separate square to the symbol. The running signal number appears in the form 'R[number]' (Yangon area), 'P[number]' (Pazundaung area) or 'A[number]' (Automatic area). The same references as the earlier system are retained.
Ground (shunting) Signals: Represented by a 'right-angled triangle with one curved side' symbol, with an additional horizontal line which is replaced by a diagonal line when the signal is 'off'. The ground signal number appears in the form 'R[number]' (Yangon area). The same references as the earlier system are retained.
Limit of Shunt: This symbol, representing a physical Limit of Shunt board, is a square enclosing a disc and appears, unnumbered and inactive, on the Up Main and Up Local, in the rear of signals P3 and P5. Because of the long-distance trains starting and finishing at Yangon, a station pilot locomotive is kept quite busy transferring coaching stock between the carriage sidings and various platforms. I presume this type of shunting movement, authorised by a subsidiary signal, must not continue beyond the Limit of Shunt board.
'NX' pushbuttons: In traditional, mechanical lever frames, each lever is generally associated with a single set of points or a single signal. Earlier power frames retained this approach, but later approaches adopted 'route-setting' where a simple action by the signalman automatically set the whole route from one signal to the next (if safe to do so) before clearing the signal. One method introduced by Westinghouse was 'One Control Switch' (OCS) where each signal was associated with a panel of turn switches, with one switch for each route beyond the signal (there's a very brief description of 'OCS' in the section 'Sandbach' of the post here). An alternative development, called 'NX' ('eNtrance-eXit') placed push buttons or turn switches on a track diagram of the controlled area. To set a route from one signal to the next, the signalman simply activated the switch at the first signal (the entrance) and a similar switch at the desired next signal (the exit). Because of the operational simplicity, 'NX' became widespread. The picture below shows the arrangement of a typical conventional 'NX' panel at Insein signal cabin.

Insein Signal Cabin showing 'NX' control Panel
In modern systems controlled from computer monitors, there's no physical control panel required. The track layout, with 'virtual switches', is digitally generated on the monitor screen, as shown in the picture 'Computer Monitor Display at 10:01' above. The 'virtual switches' are the white circles with an alphanumeric reference centred on the thick lines representing tracks. I assume the desired button is operated by 'point and click' with the computer 'mouse'. Normally, a button would serve as the exit button for the route in the rear and the entrance button for the route in advance but there are a few routes without an obvious entrance button so I'm not certain.
Crank Handles, Yangon: Top left of the monitor are three crank handle releases. During failures or maintenance motor points can be operated locally by inserting a large special key, called a 'Crank Handle' and 'cranking' the mechanism by hand. The key is normally released electrically from the supervising signalling control when required and, until the key is returned, the signalling control will be unable to set routes remotely. At a station like Yangon, it's possible to divide the system into 'East' and 'West', so that releasing a crank handle for one end of the station does not prevent normal route setting from continuing at the other end. Under normal operation, the crank handle 'IN' virtual indication is displayed. When remote release of the key is authorised, the virtual indication crank handle 'PERMIT' is displayed. Once the key is removed crank handle 'OUT' is shown until the crank handle has been replaced. I'm afraid I didn't discover the scope of the 'Yangon Maintenance' crank handle.
Crank Handles, Pazundaung: Top right of the monitor are two more crank handle releases. I presume the 'Pazundaung' release allows points in the area to be locally operated by cranking but I'm not sure about the 'Pazundaung Maintenance' release. Since the screen display still shows a signal box symbol at Pazundaung (a rectangle enclosing a line representing a traditional lever frame with a 'dot' representing the signalman), it's possible there's some form of local control panel at Pazundaung for use under abnormal conditions.
KYI APPROACH ACK: Bottom left of the monitor is a 'virtual switch and lamp' which also generates an audible alarm when a train approaches on the Automatic Section from Khyee Myin Daing direction under Track Circuit Block rules.
KCR & KM APPROACH ACK: Bottom right of the monitor are two 'virtual switch and lamp' activated when a train approaches on the Automatic Section from Mahlwagon direction under Track Circuit Block rules on either the Circle Line or the Main Line from Mandalay.
Communication area: Across the bottom of the screen are reserved areas for messages issued by the system, plus a group of 'soft keys'.
Interpreting the 'Computer Monitor Display' picture above
From left to right and top to bottom:-
1. A westbound train from platform 6 West is occupying track circuit R1T, placing automatic signal A1 at 'danger'.
2. Track circuit R23T (platform 1) is occupied by a train.
3. Track circuit R24T (platform 2) is occupied by a train.
4. Track circuit R40T (track 9) is occupied by a train.
5. Track circuit R42T (track 10) is occupied by a train.
6. Track circuit R54T (track 8) is occupied by a train but adjacent track circuits R60T and R61T are indicating 'route set', suggesting a shunting move in progress.
7. Points 95A, 95B and 96 are shown 'REVERSE' in yellow, suggesting that they've been 'called' to that position.
8. Track circuit R68T2 (down local) is occupied by a train.
9. Track circuit P2AT (down goods Pazundaung) is occupied by a train.
We watched movements for a while as I took more pictures showing the whole computer monitor or an area of the screen. Some of the pictures aren't very good I'm afraid but you can find them here. I was only able to look at the new equipment room through the glazed panel of the door to the room so I couldn't learn much.

New Signalling Equipment Room at Yangon's Railway Operation Control Center (MyanmaRailways 2019)
At the invitation of the Station Master's staff, the Doctor and I had a closer look at some of the 'outside equipment' (signals, point machines, location equipment cabinets) to complete our fascinating visit.

New outside signalling equipment, Yangon Central Station (Myanma Railways 2019)

3-aspect colour light R87 with subsidiary aspect R103 at Yangon Central Station (MyanmaRailways 2019)

Two Kyosan a.c. electric point machines type NS-CM at Yangon Central Station, with a third machine and position light shunting signal in background (MyanmaRailways 2019)

Location Case Y12C at Yangon Central Station, described as a 'Signalling Box' and made by Daido Signal Co, Ltd. Appears to mount the Track Feeds and Track Relays for local track circuits (MyanmaRailways 2019)
Related posts on this website
Final day in Yangon and the Circle Line (visit in 2017)
Bago - Yangon by train (trip in 2018)
Return to Burma
Myanma Railways (Index)
My pictures
Myanma Railways 2019
The Circle Line (Yangon - Mahlwagon c/w in 2017)
The Circle Line (Mahlwagon - Yangon Central Station c/w in 2017)
Bago to Yangon by Train (trip in 2018)

